How to Set Up Make Integration in Bearconnect: Build Visual Lead Workflows Across Any App Without Code
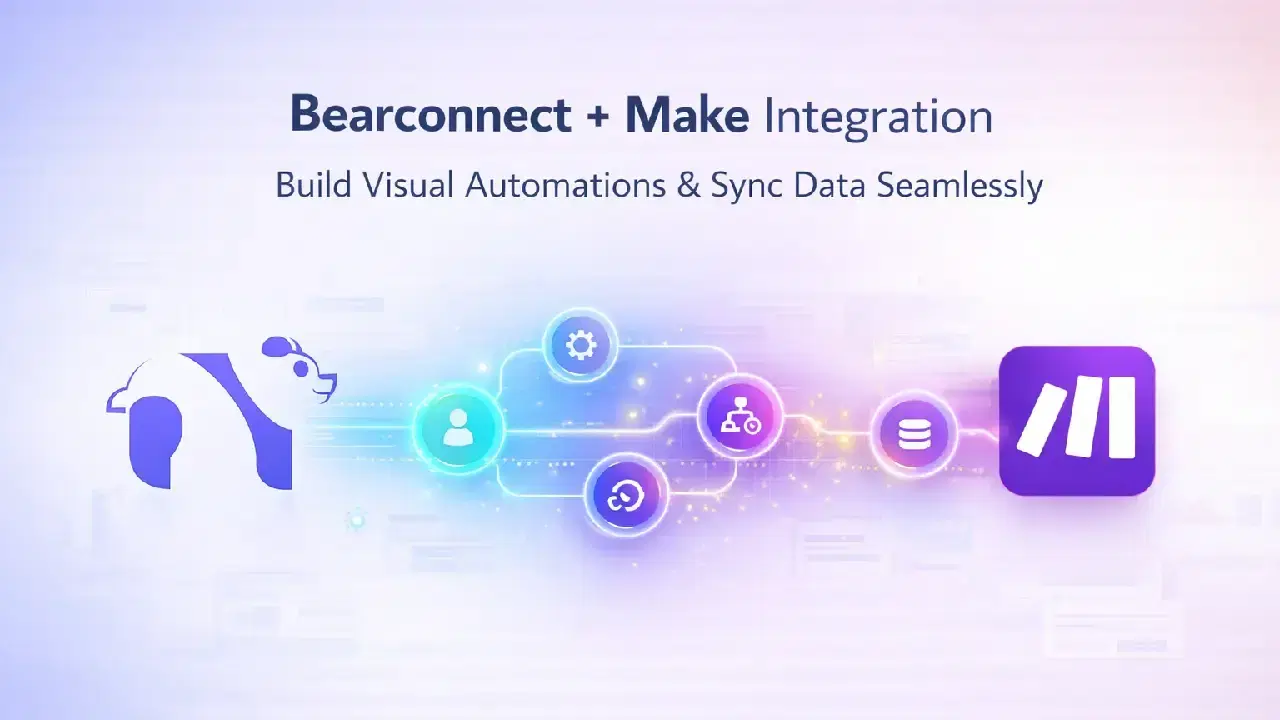
Connect Bearconnect to Make (formerly Integromat) using a Custom Webhook URL, map it to your outreach campaign.
Every lead event will trigger a visual Make scenario that routes data across any app you use, whether that is a CRM, Slack, Google Sheets, or an enrichment tool like Clearbit.
TL;DR
- Connect Make to Bearconnect in minutes using a Custom Webhook URL from a Make scenario
- Every event (connection sent, connection accepted, message sent, message replied) triggers your Make scenario automatically
- Make's Router module lets you split lead flows based on campaign name, job title, company, or event type
- You can build multi-step workflows: enrich leads, route to CRMs, notify Slack, and update Google Sheets in one scenario
- Make is the right choice when you need more control than Zapier offers, without writing any code
Why Make Is the Right Choice for Advanced LinkedIn Automation
Make gives you more control over your LinkedIn lead workflows than any basic integration tool.
If you have outgrown simple one-step automations and need conditional routing, data enrichment, or multi-path logic, Make is built for exactly that.
When you connect Bearconnect to Make:
- LinkedIn lead events trigger your Make scenarios in real time
- You decide what happens to each lead based on their job title, company, campaign, or event type
- You can chain multiple actions: enrich, route, notify, and log in a single visual workflow
- No code required at any step
This is not just a data sync. It is a programmable lead routing engine built on top of your LinkedIn outreach.
Make vs Zapier: Which Should You Use with Bearconnect?
Use Make when you need multi-step logic, conditional routing, or data transformation.
Use Zapier for simpler single-action workflows.
Here is a quick comparison to help you decide:
| Feature | Make | Zapier |
|---|---|---|
| Visual workflow builder | Yes, drag-and-drop canvas | No, linear step list |
| Router and filters | Built-in Router module | Requires paid Filter step |
| Multi-step scenarios | Unlimited modules in one scenario | Limited on free plan |
| Data transformation | Built-in functions like ifempty() |
Formatter by Zapier (paid) |
| Best for | Complex, conditional lead routing | Simple single-action automations |
If you are already running multiple campaigns for different clients and need each campaign to behave differently, Make is the better fit.
What You Need Before Starting
You need three things ready before you begin the setup.
- An active Bearconnect account with a subscription
- A Make account (Free or paid plan both work)
- A Make scenario created with a Custom Webhook module as the first trigger
The free Make plan is enough to get started. You can build and test your full workflow before deciding whether to upgrade.
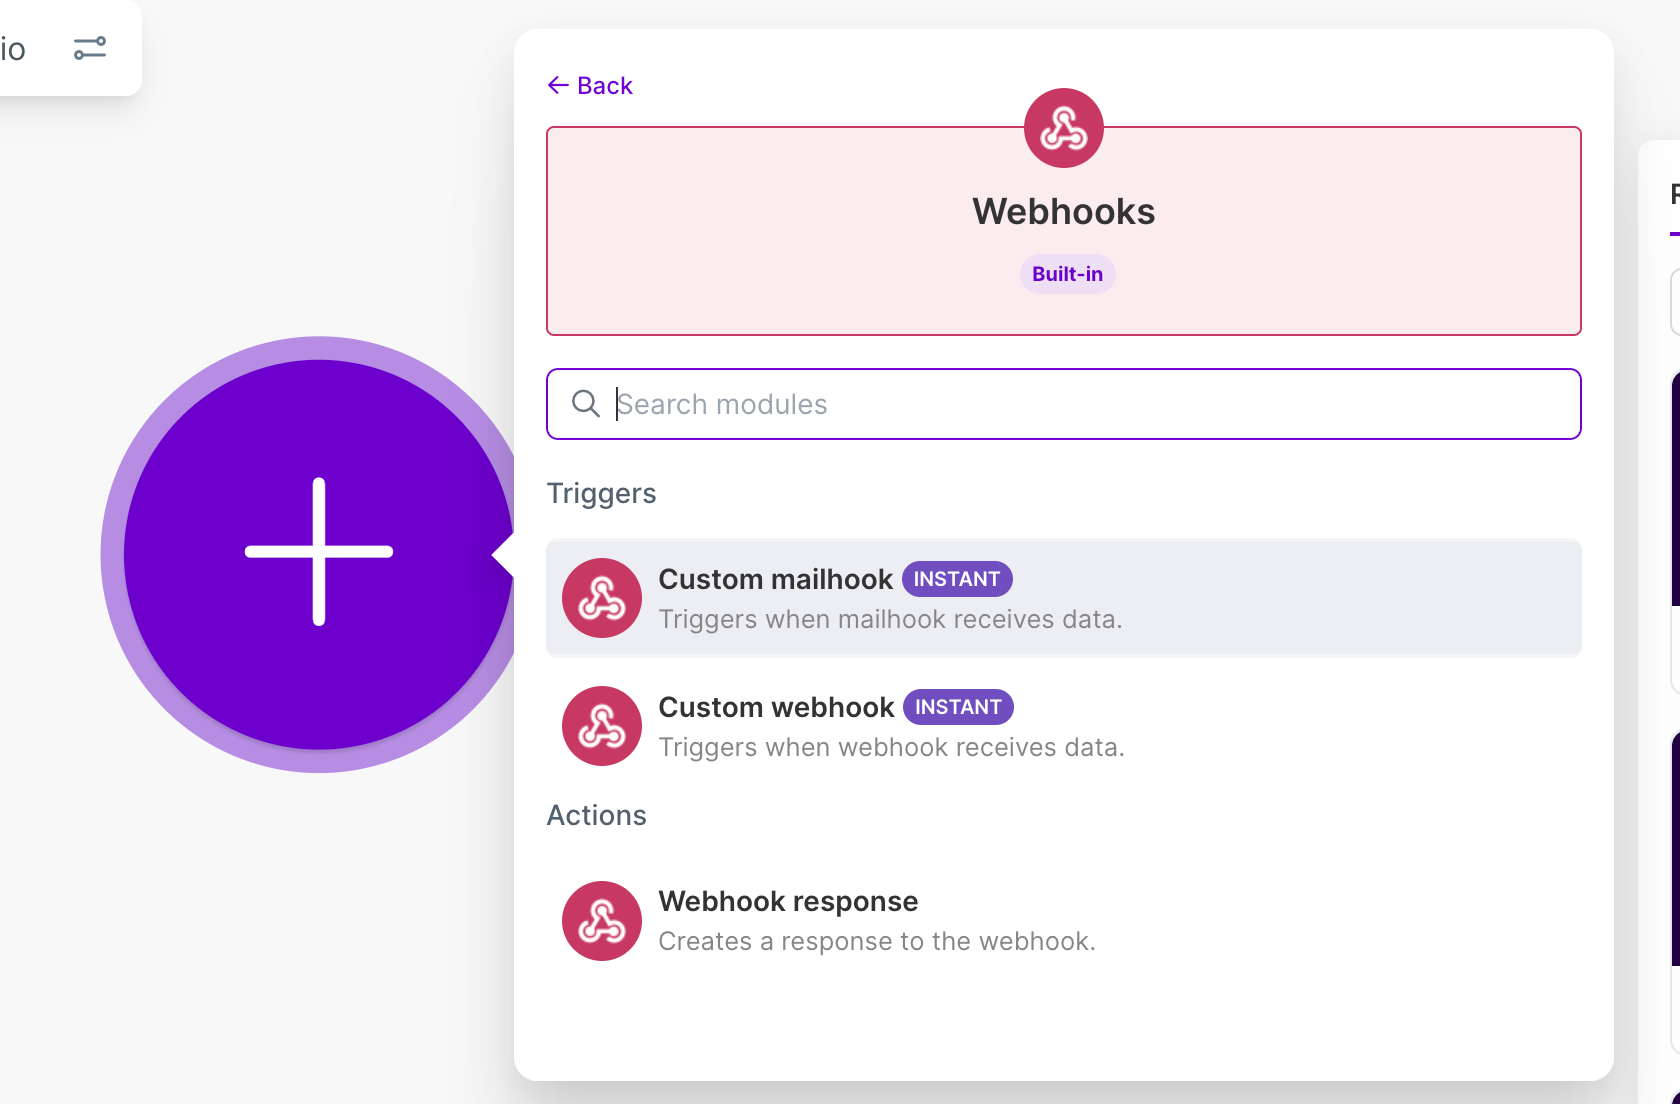
Step 1: Create Your Make Custom Webhook
Your Custom Webhook URL is what connects Make to Bearconnect. Creating it takes under 3 minutes.
Here is how to get it:
- Log in to your Make account at make.com
- Click Create a new scenario
- Click the + button to add the first module
- Search for Webhooks and select the Webhooks app
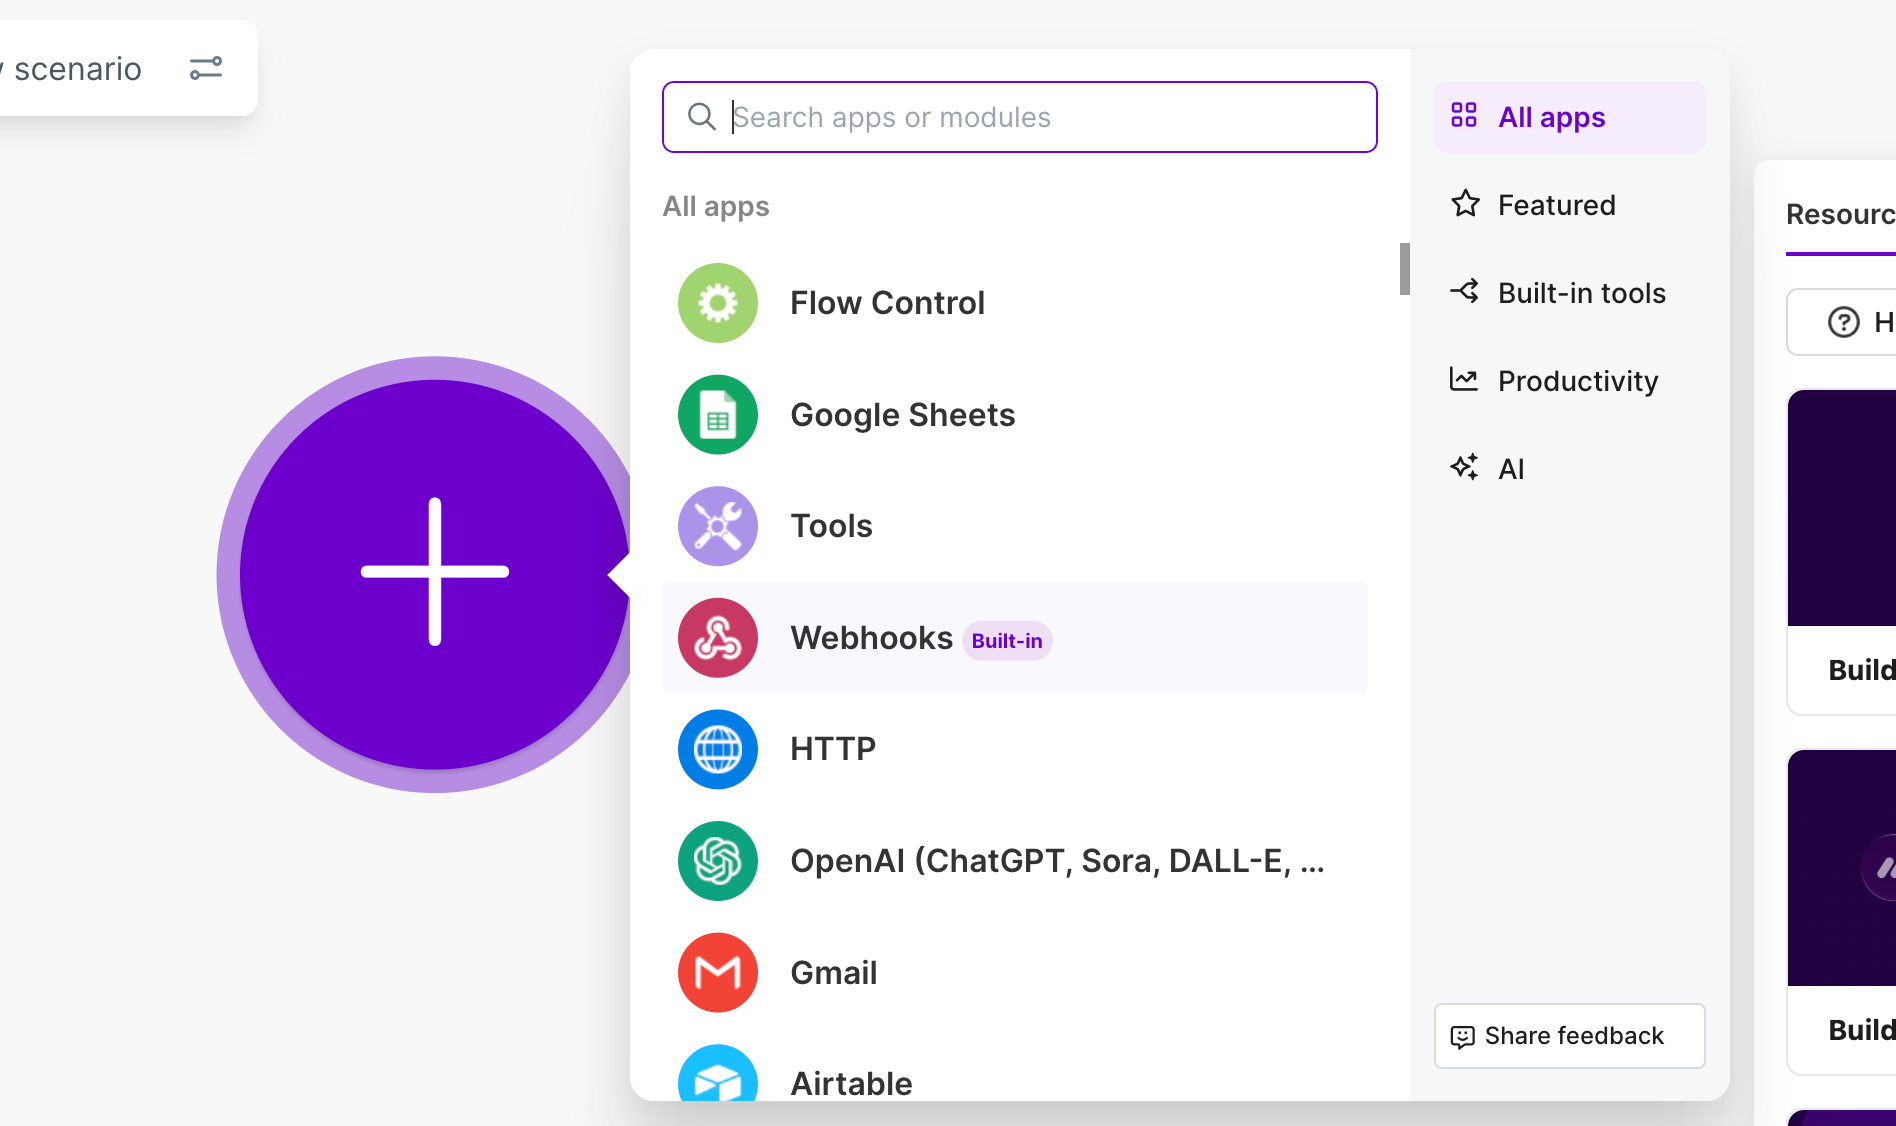
- Choose Custom webhook as the trigger type
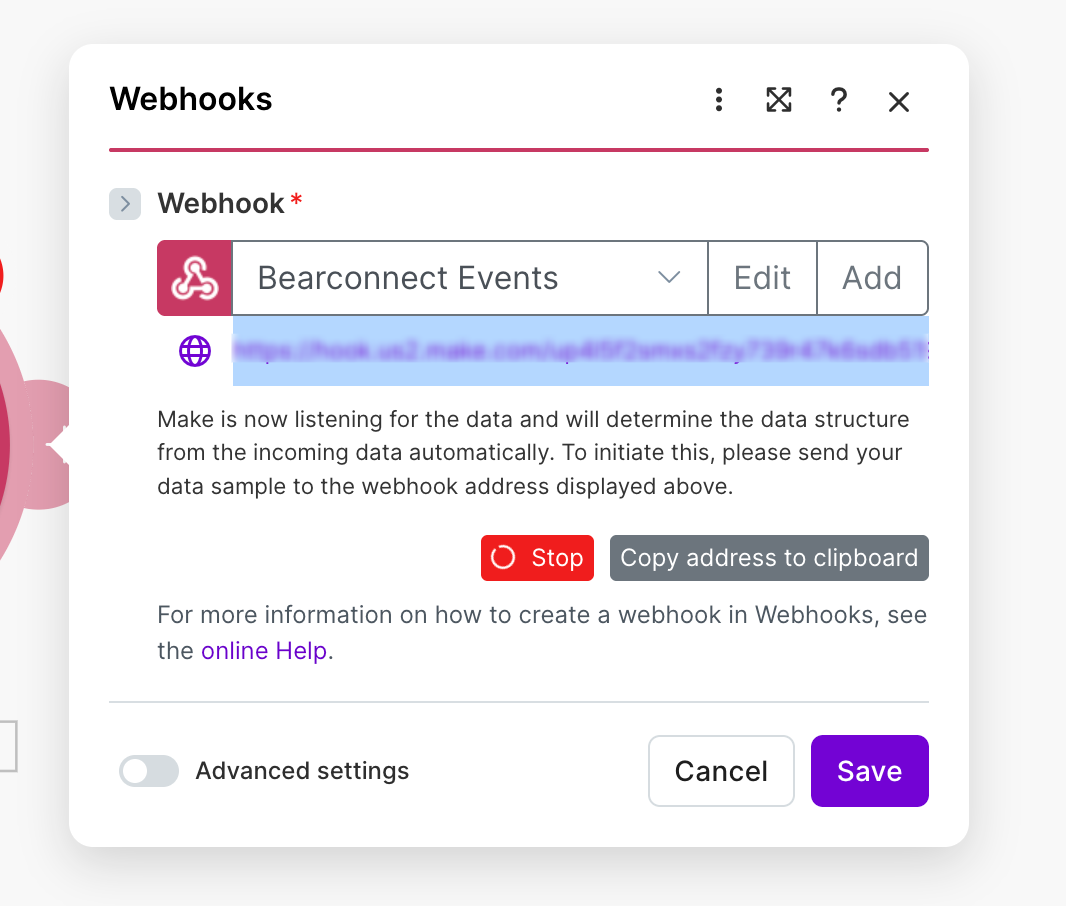
- Click Add to create a new webhook and give it a name, for example "Bearconnect Events"
- Click Save
- Make displays a URL in this format:
https://hook.{region}.make.com/...
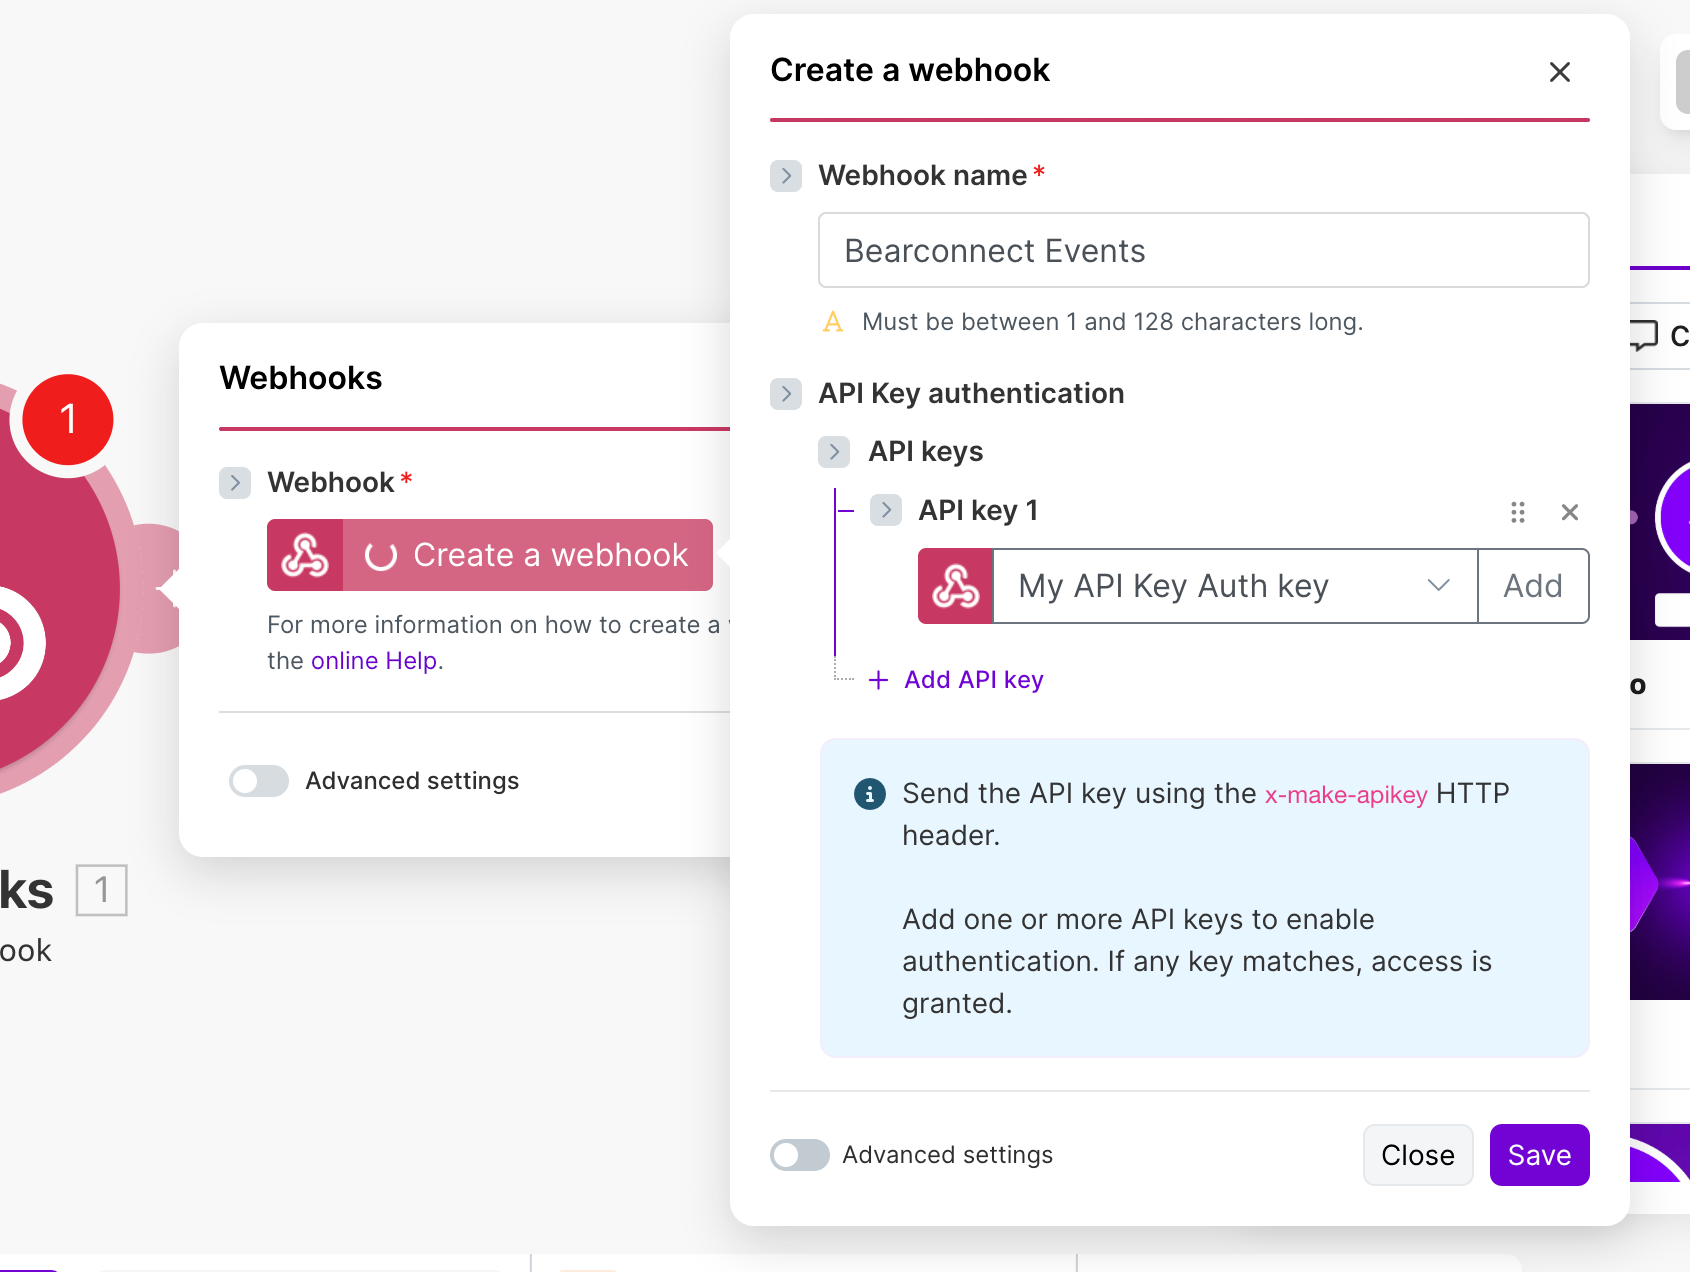
- Copy this URL
Critical: Toggle the scenario ON using the switch at the bottom of the scenario editor before you do anything else. If the scenario is inactive, Make returns a 400 error and Bearconnect will not be able to deliver any events.
Important: The webhook URL must start withhttps://hook.and be on amake.comdomain. Bearconnect does not accept URLs that do not match this pattern.
Step 2: Connect Make in Bearconnect
Connecting Make to Bearconnect takes less than 2 minutes once you have your webhook URL.
Follow these steps:
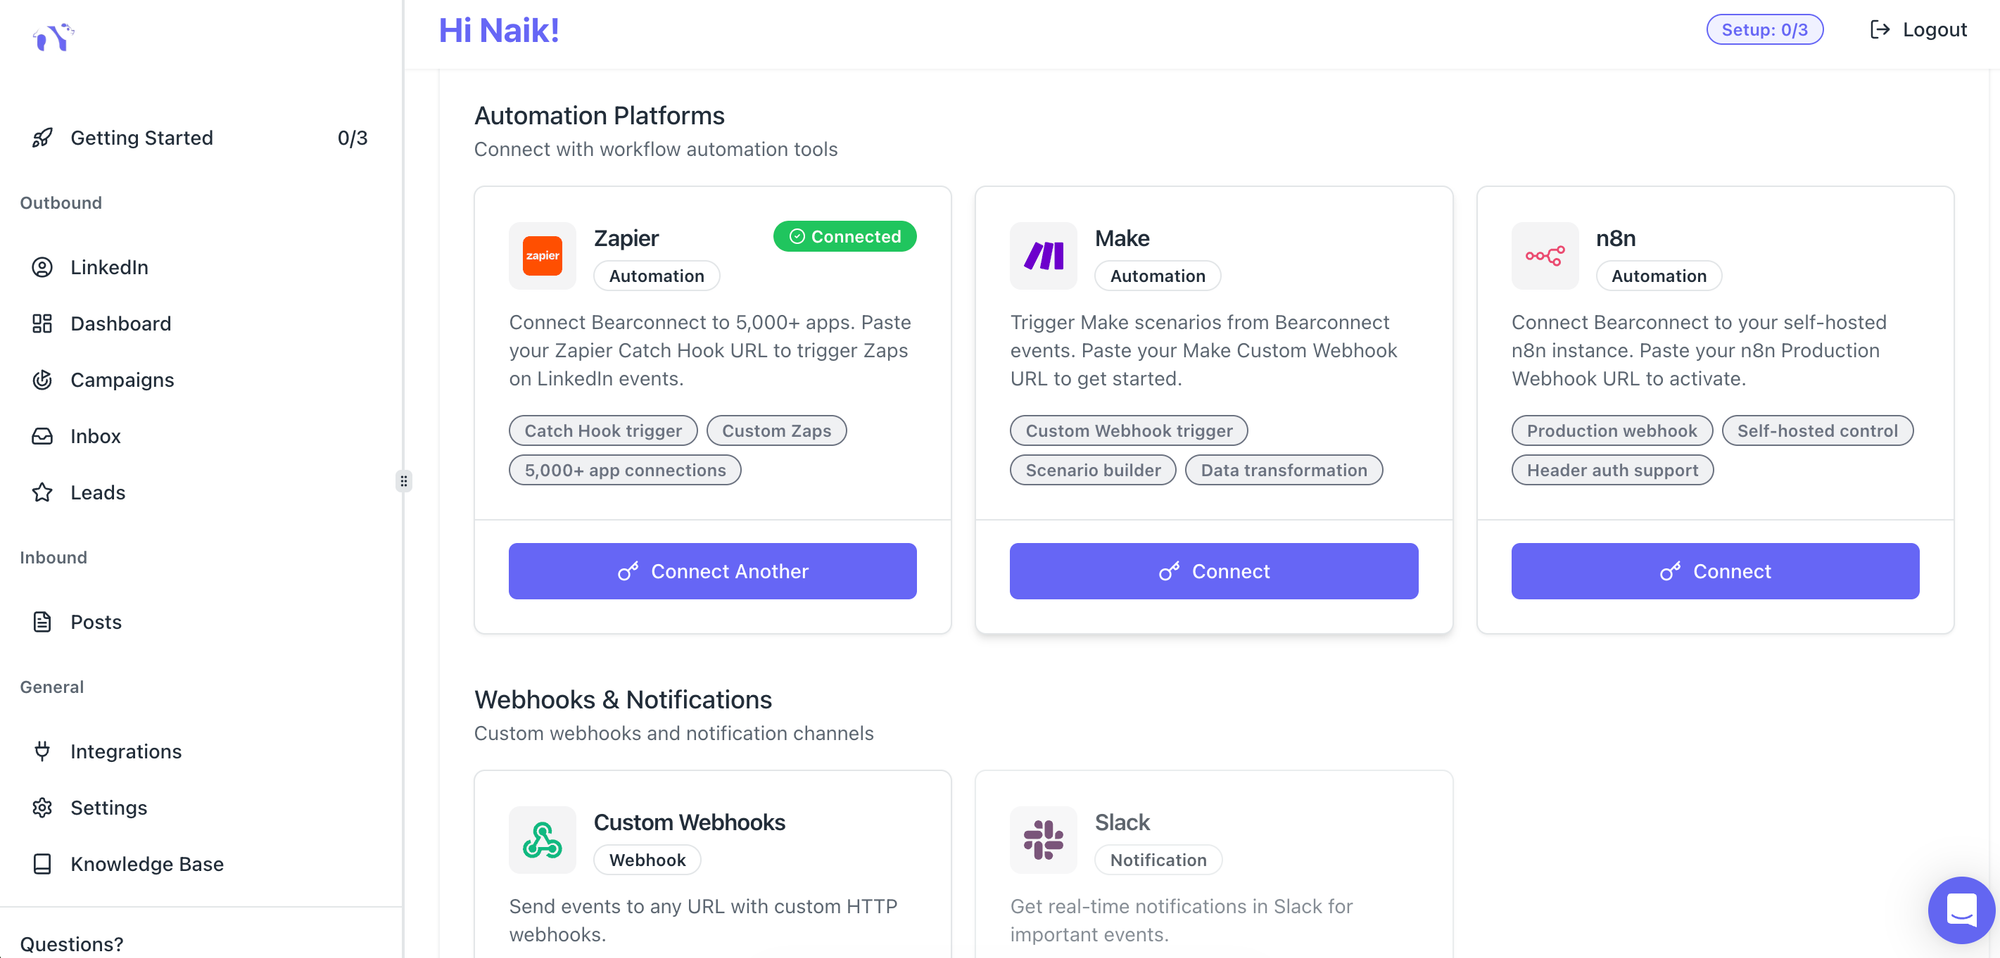
- Open your Bearconnect dashboard
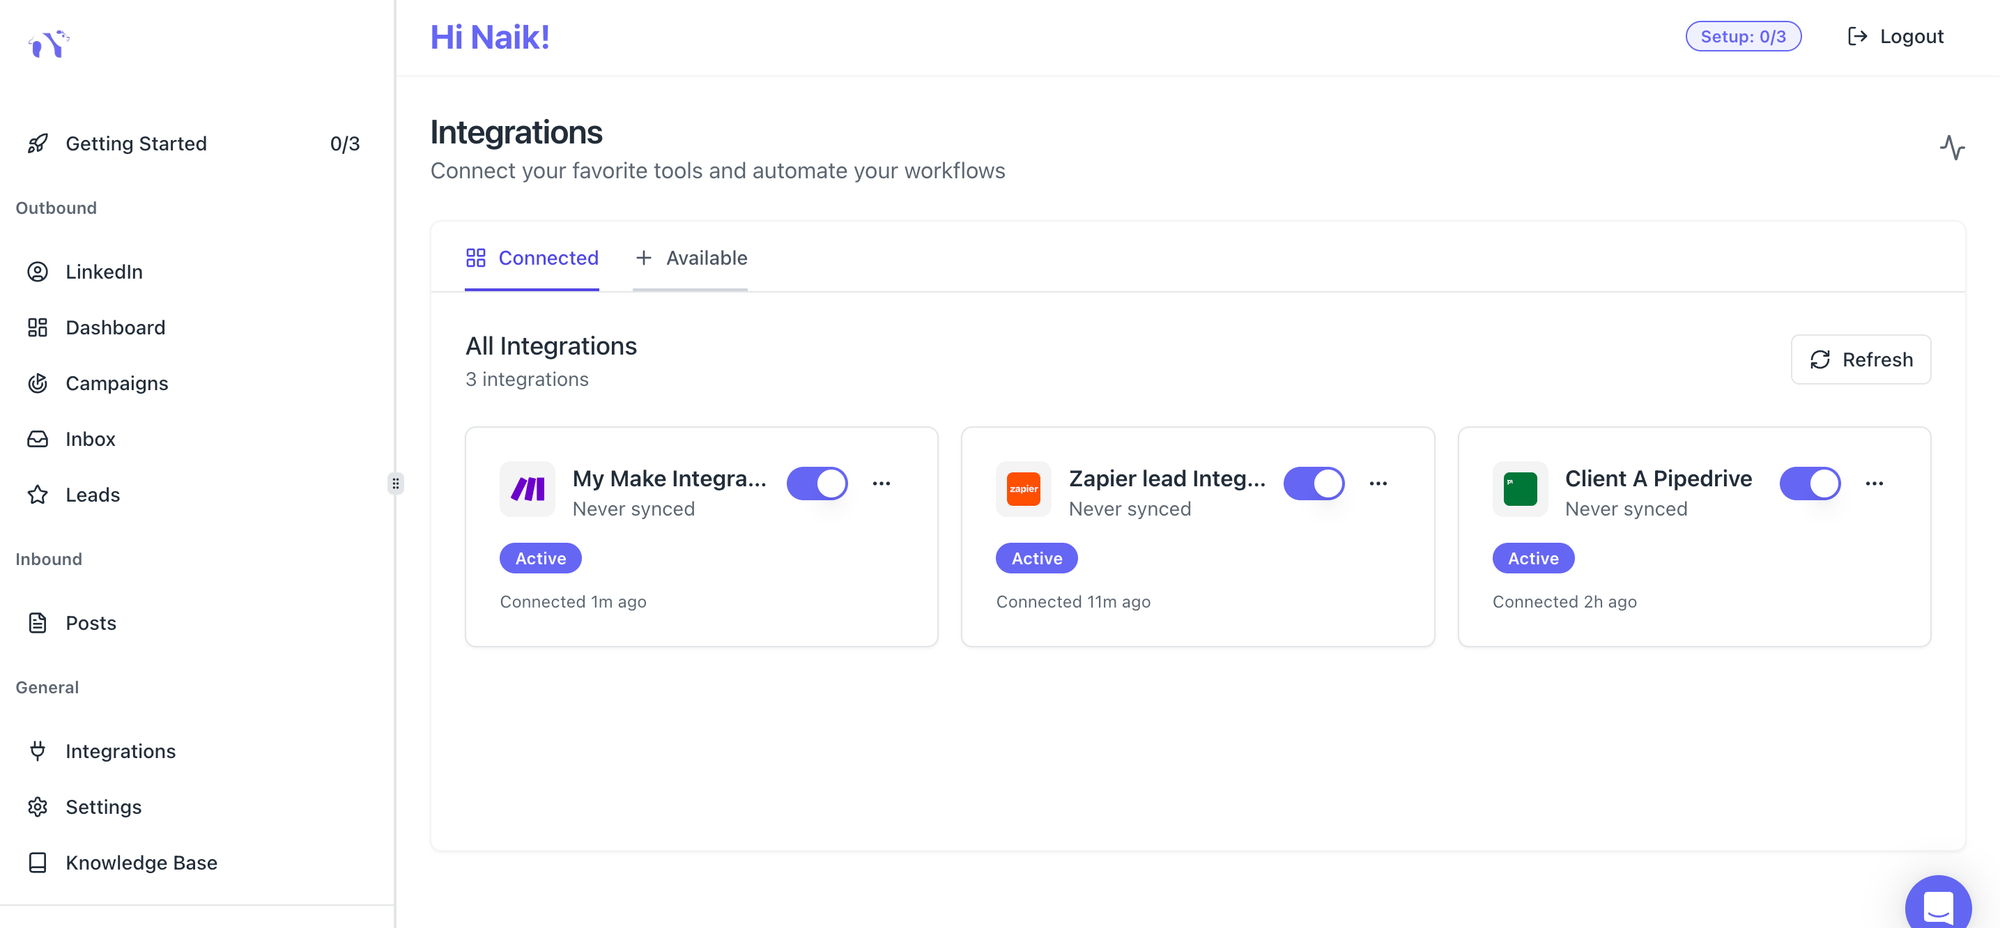
- Click Integrations in the left sidebar
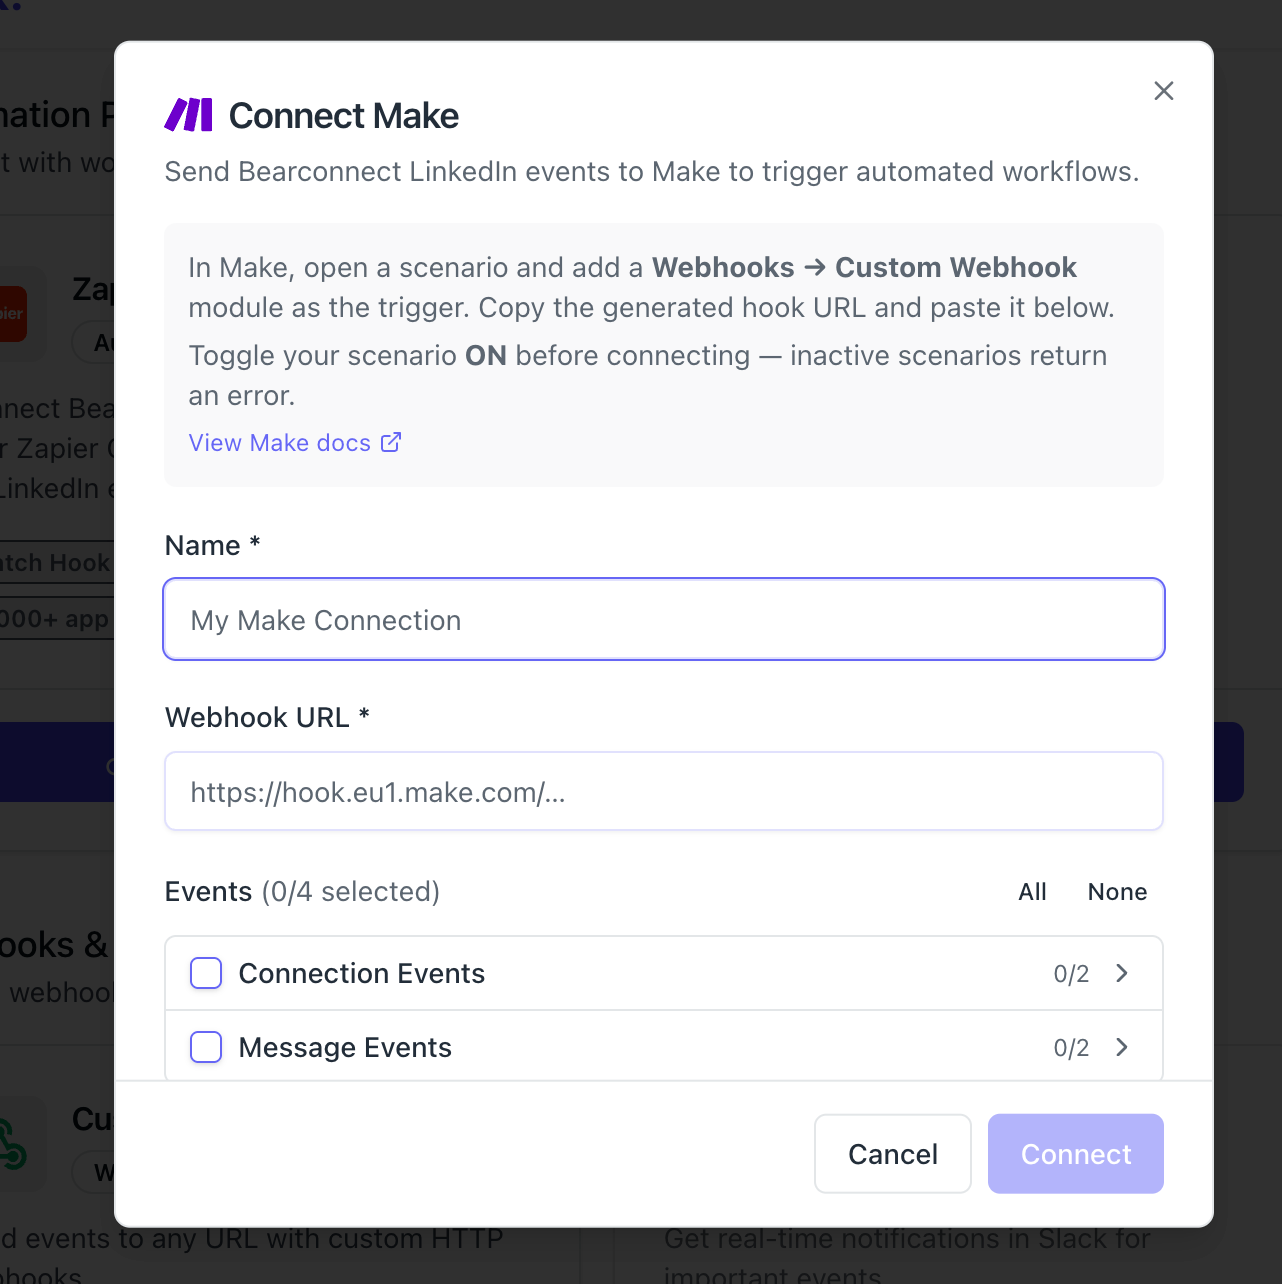
- Find Make in the Available Integrations section
- Click Connect
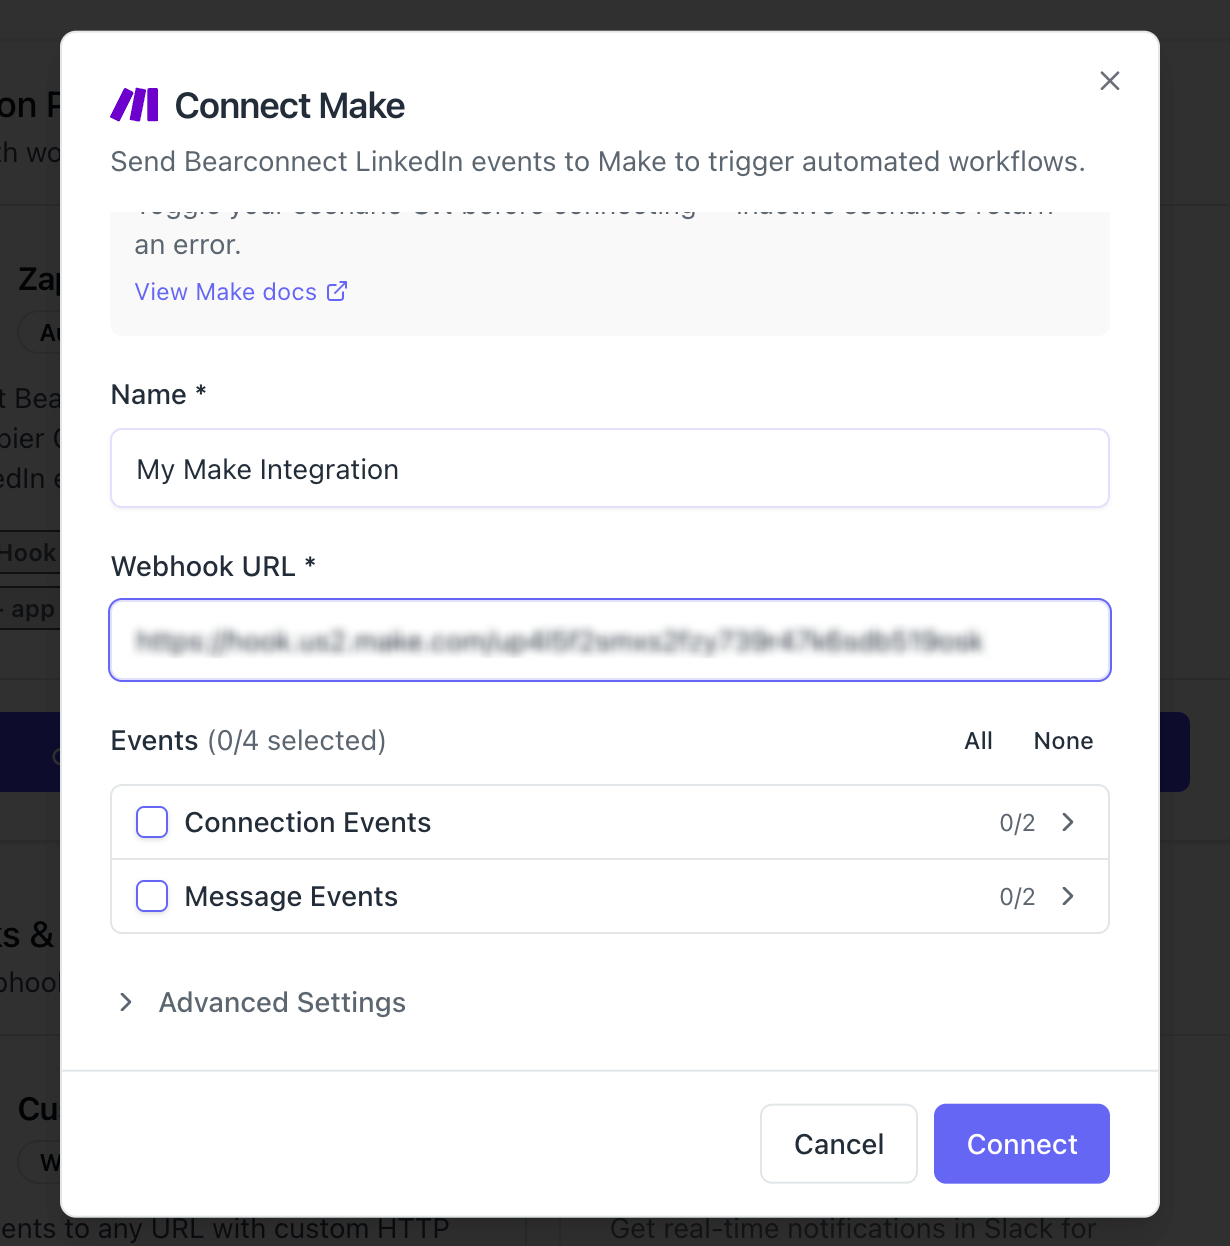
Fill in the required fields:
| Field | What to Enter |
|---|---|
| Name | A label for this connection, e.g. "Make - Lead Routing" or "Make - Client A Pipeline" |
| Custom Webhook URL | The URL you copied from Make |
- Choose which events this integration is allowed to handle:
Connection Events:
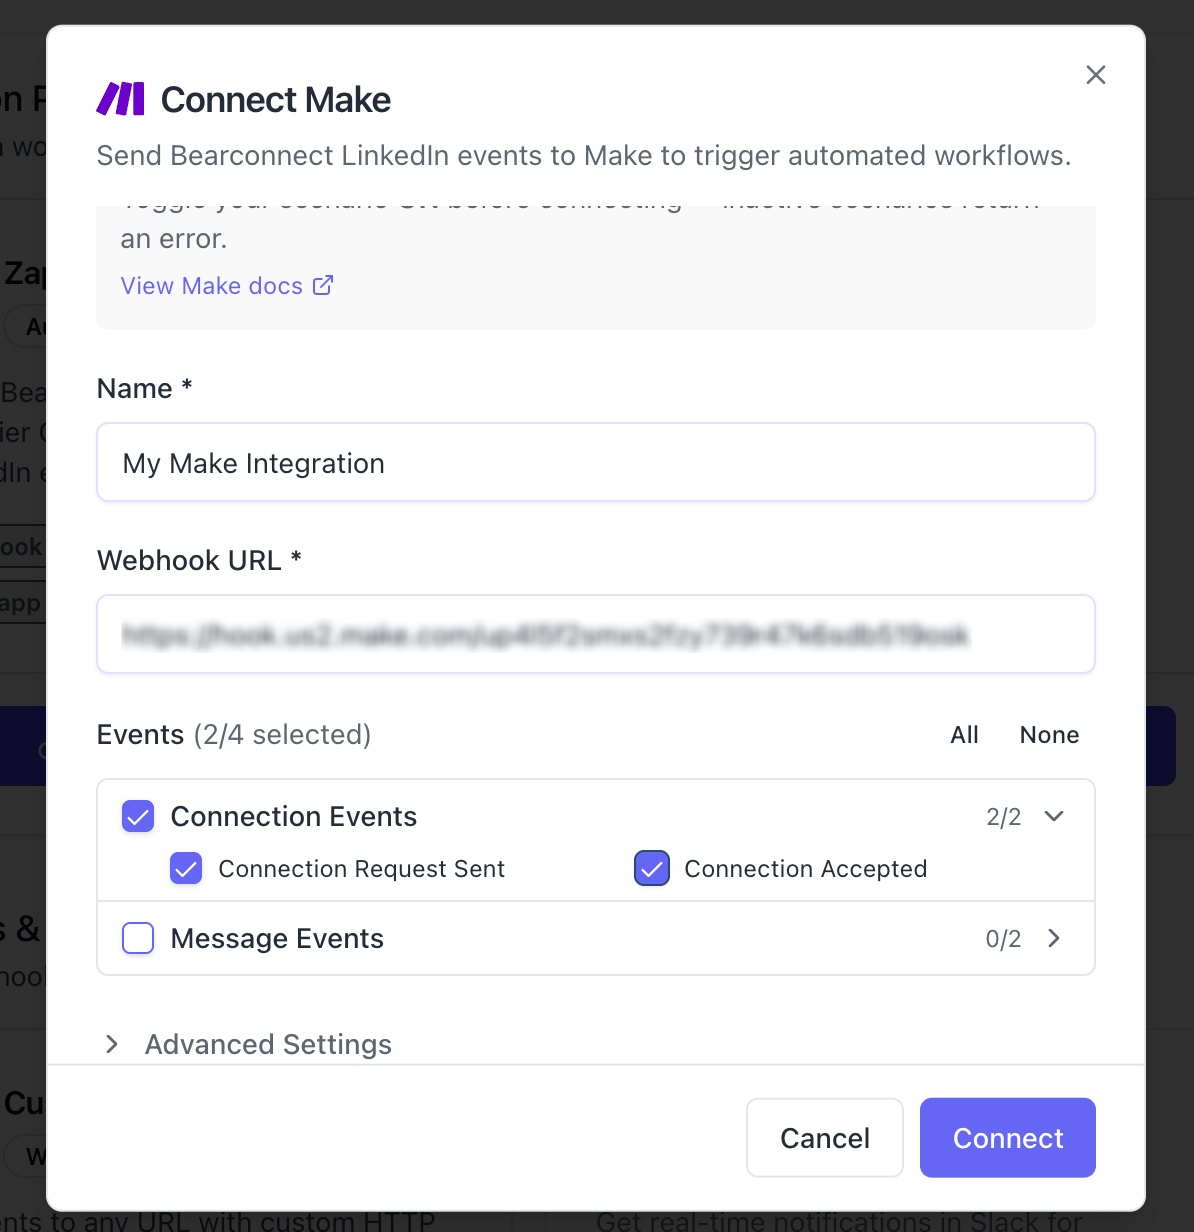
- Connection Request Sent
- Connection Accepted
Message Events:
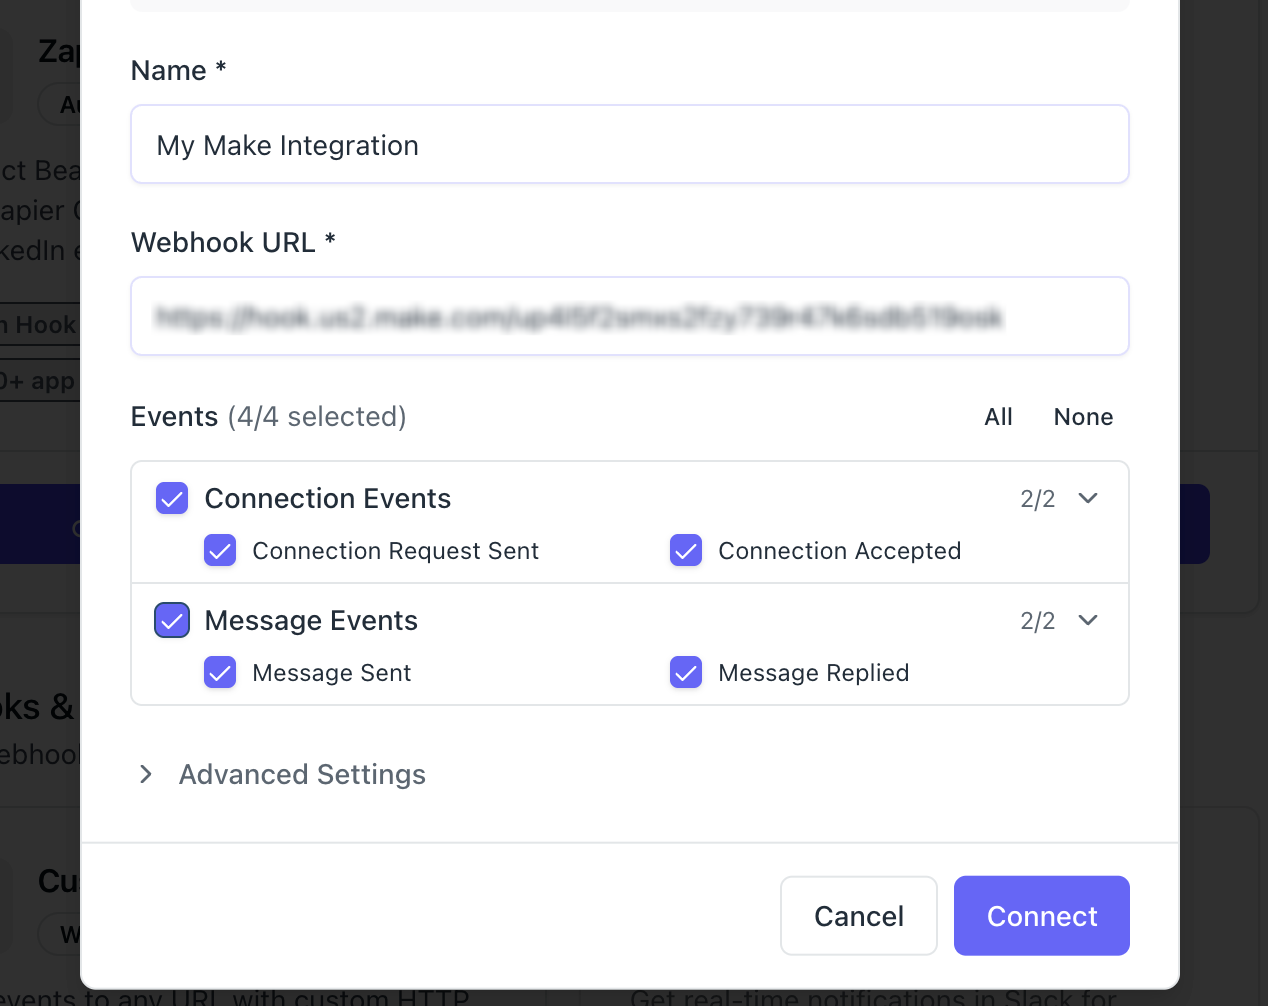
- Message Sent
- Message Replied
- Click Connect
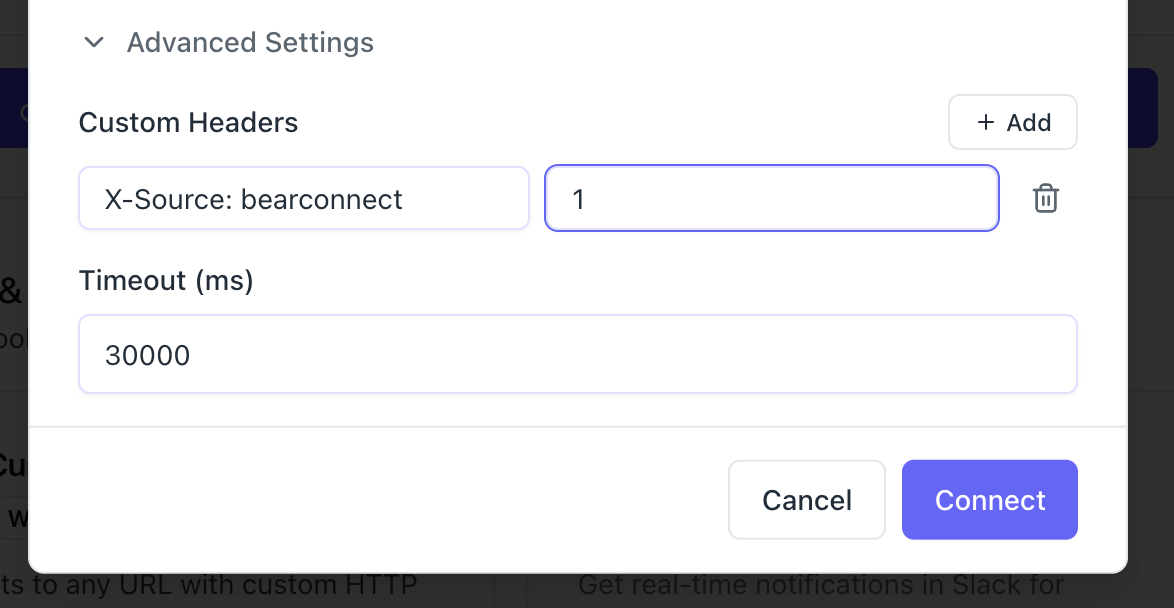
Optional: Advanced Settings
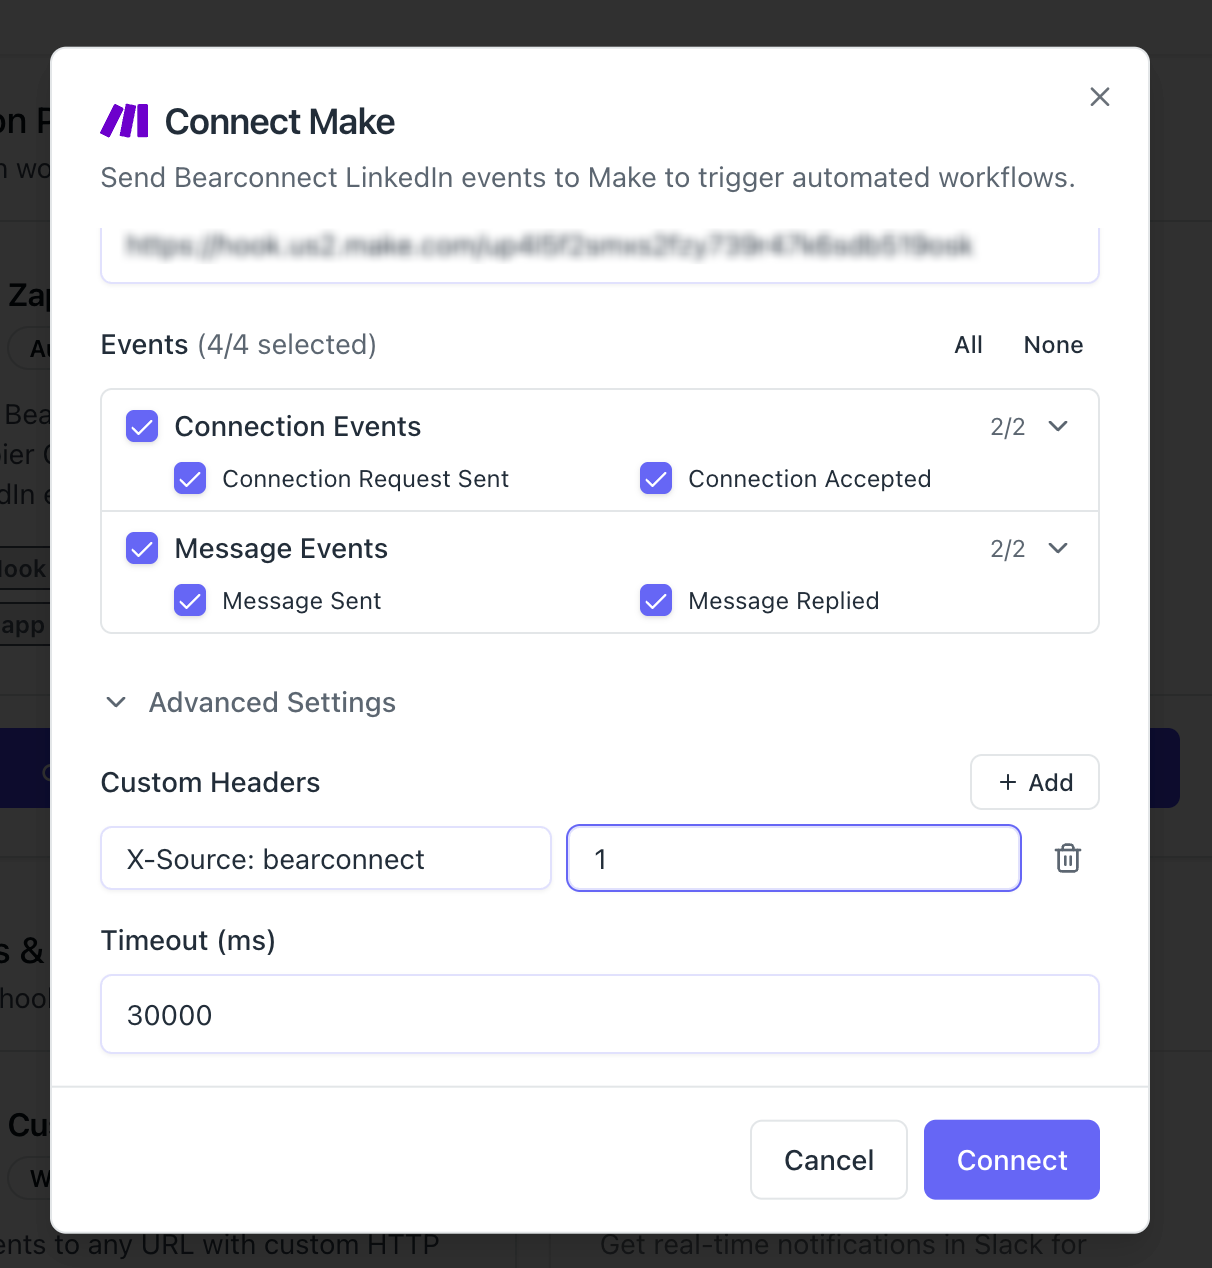
Click Advanced Settings before connecting if you need:
- Custom Headers: Add headers like
X-Source: bearconnectfor tracking or authentication
Timeout: Default is 30 seconds. Increase up to 60 seconds if you experience timeout errors with complex scenarios
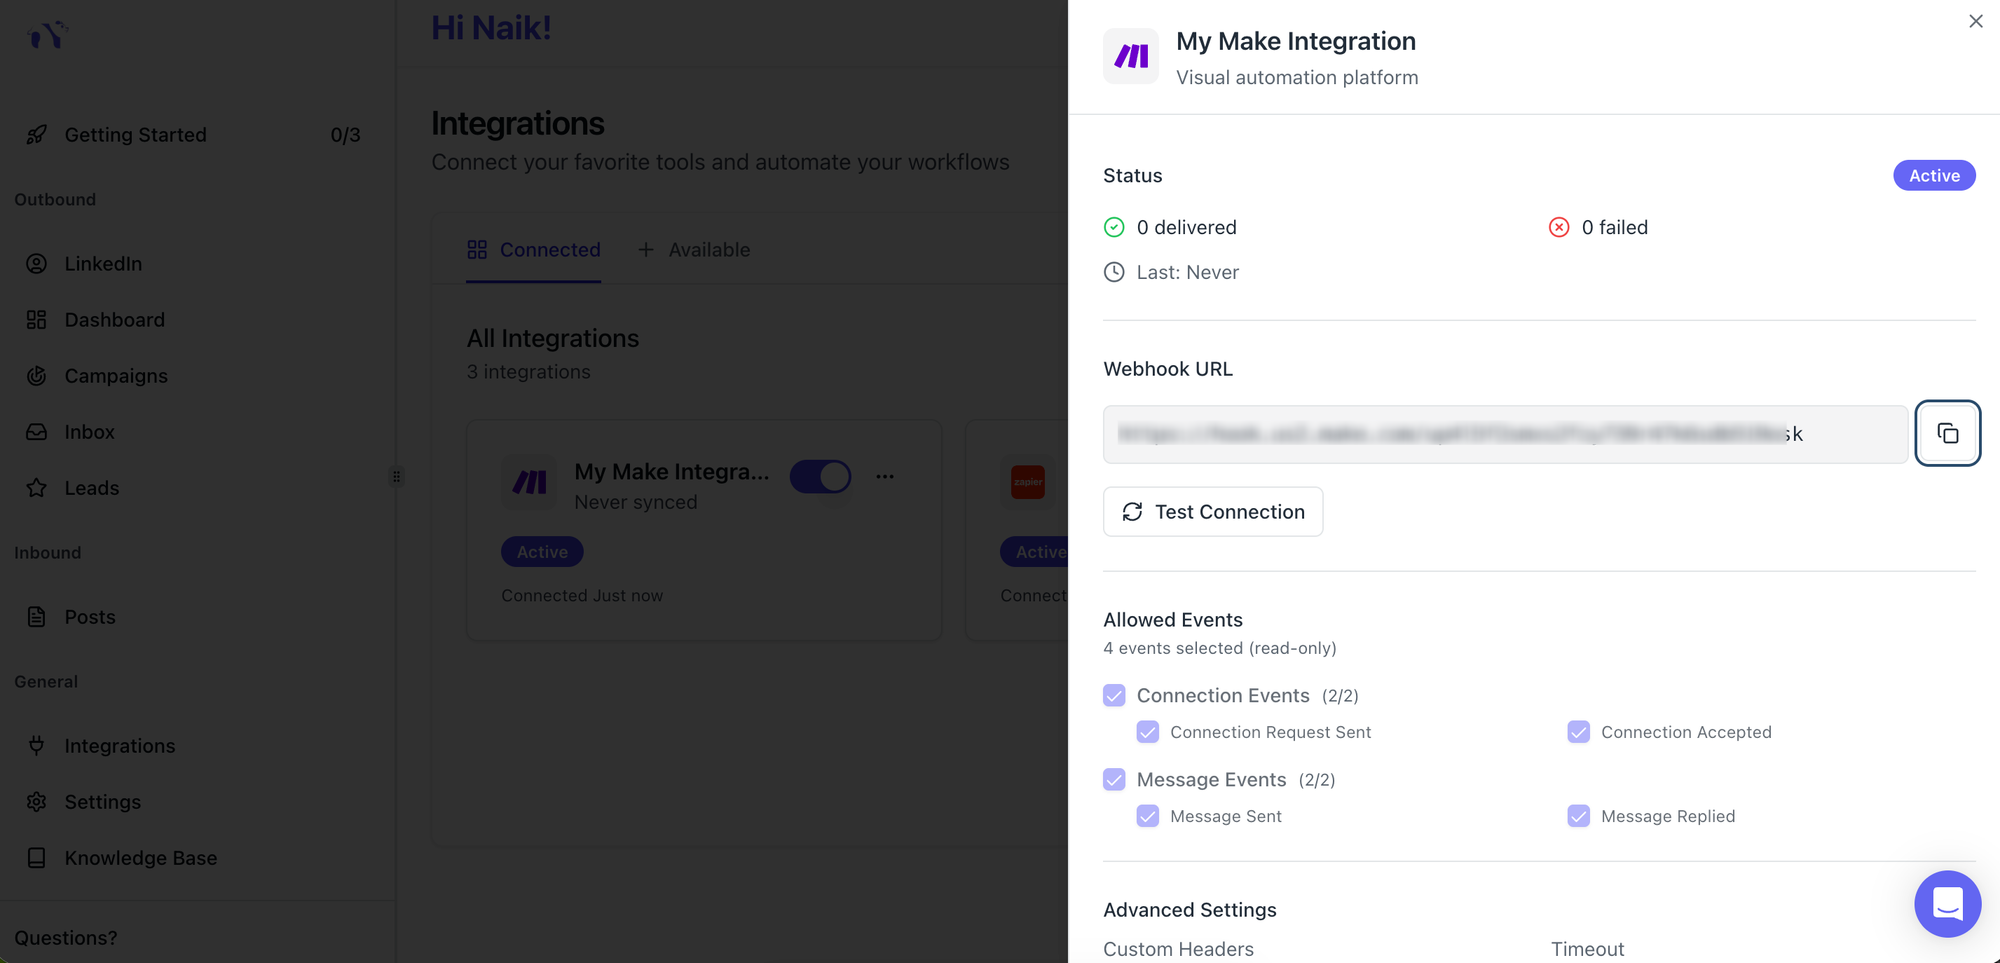
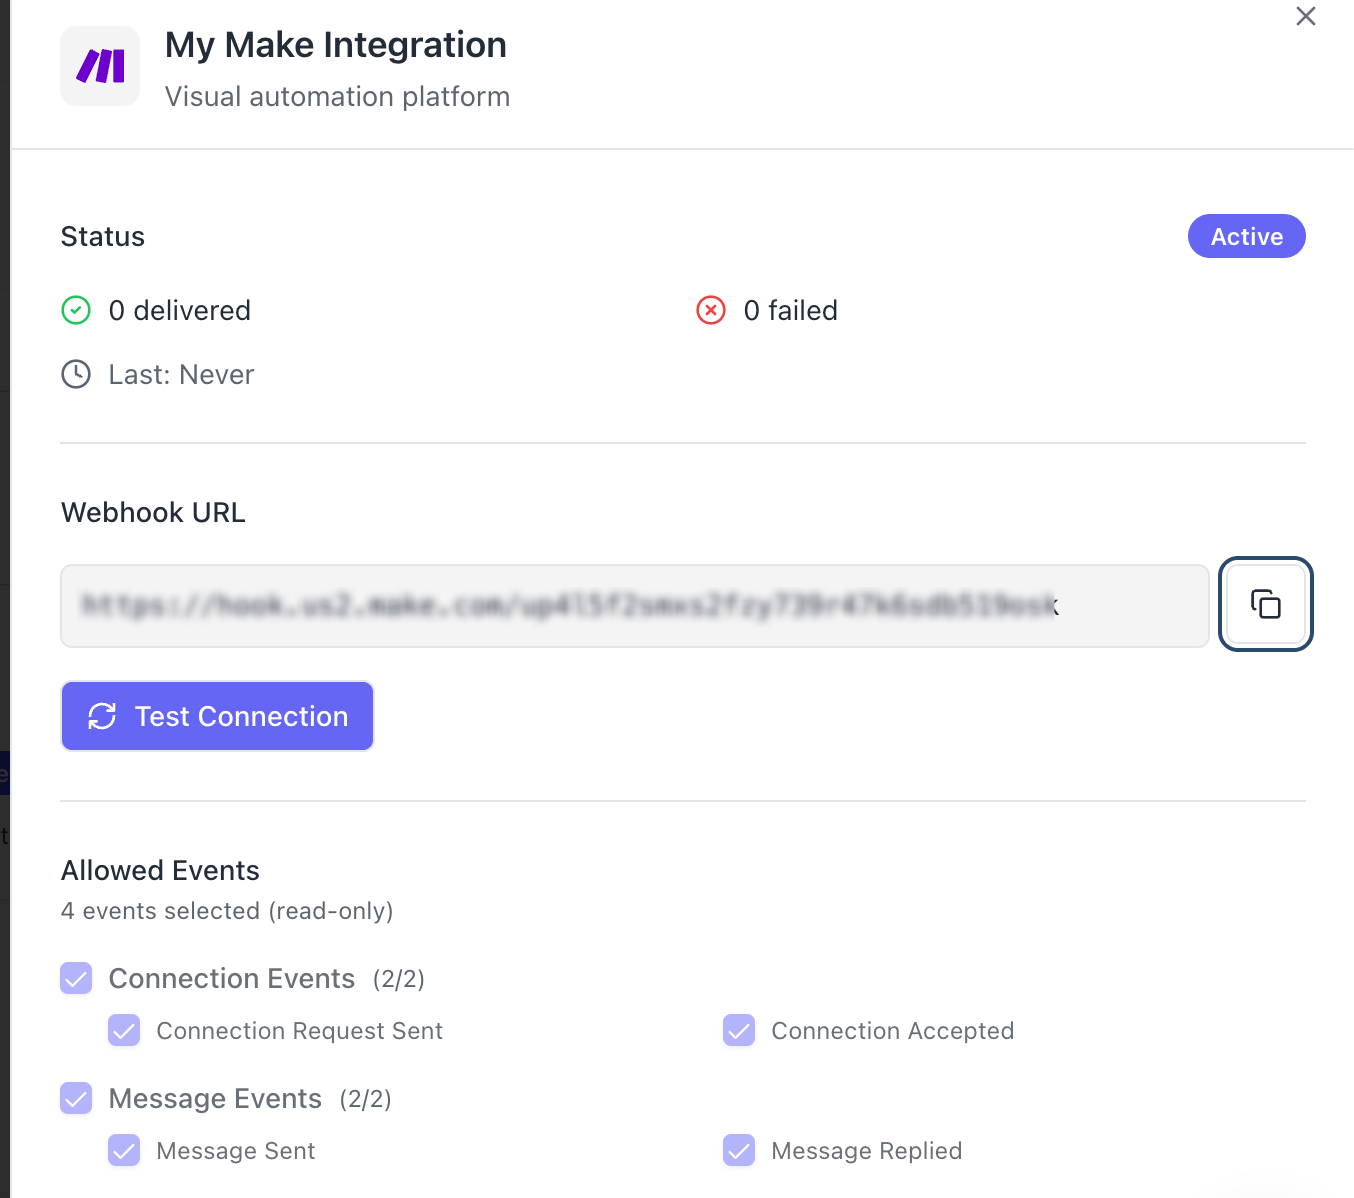
What You See After Connecting
Your Make integration tracks every delivery from the moment it goes live.
Click on your Make integration in the Connected Integrations section to see:
- Status: Active or Error
- Delivered: Total successful payloads sent to Make
- Failed: Total failed deliveries
- Last Delivery: Timestamp of the most recent event sent
- Webhook URL: Your configured Make URL (copyable)
- Allowed Events: Read-only list of which events this integration handles
If there is a delivery error, the error message appears in red directly in the panel.
Step 3: Test the Connection and Detect Your Data in Make
Testing from Bearconnect first is the correct sequence.
This step is critical for Make to recognize your data structure.
- Go to Integrations in the left sidebar
- Click on your Make integration
- Click Test Connection
- You will see "Test successful" with an HTTP 200 status code if everything is working
Now go back to Make:
- Open your scenario
- Click on the Custom Webhook module
- You will see "Successfully determined" with the detected data structure
From this point, every field Bearconnect sends is available in the mapping panel of every module you add after the webhook trigger.
Pro Tip: If you skip the test step, Make will not know the data structure. Your scenario will run, but the mapping panel in subsequent modules will be empty. Always test from Bearconnect before building out your scenario modules.
Step 4: Map Make to Your Outreach Campaign
The integration only fires for campaigns you explicitly connect it to. This gives you precise control.
Here is how to map it:
- Open any campaign from your dashboard
- Go to the Integrations tab
- Click Connect Integration
- Select your Make integration from the dropdown
- Choose which events to enable for this specific campaign
- Click Connect
Managing the Campaign Mapping
Once mapped, you get three controls on the campaign's Integrations tab:
- Toggle switch: Pause or resume event forwarding without deleting the mapping
- Settings icon: Edit which events are active for this campaign
- Trash icon: Remove this campaign mapping without deleting the Make integration itself
You can map the same Make integration to multiple campaigns simultaneously. Each campaign can have its own set of enabled events.
What Data Bearconnect Sends to Make
Every LinkedIn event sends a complete JSON payload with lead, campaign, and LinkedIn account details.
Here are the key fields available in your Make mapping panel:
| Make Field Path | Example Value | What It Is |
|---|---|---|
| event | connection_request_accepted | The event type that triggered the scenario |
| timestamp | 2026-02-13T10:30:00Z | When the event occurred |
| data.lead.firstName | Jane | Lead's first name |
| data.lead.lastName | Smith | Lead's last name |
| data.lead.email | jane@example.com | Lead's email address |
| data.lead.position | VP of Sales | Lead's job title |
| data.lead.companyName | Acme Corp | Lead's company |
| data.lead.profileUrl | linkedin.com/in/janesmith | Lead's LinkedIn URL |
| data.lead.location | San Francisco, CA | Lead's location |
| data.lead.stage | connected | Bearconnect lead stage |
| data.campaign.name | Q1 Outreach | Campaign that triggered the event |
| data.linkedInAccount.name | Sales Team Account | LinkedIn account used for outreach |
Handling Nullable Fields
Only data.lead.id and data.lead.firstName are always present. All other fields may be null depending on the lead's LinkedIn profile visibility.
Pro Tip: Use Make's built-in ifempty() function to handle missing fields.Example: {{ifempty(1.data.lead.email; "no-email@placeholder.com")}}. This prevents your scenario from failing when a field is absent.
How to Use Make's Router and Filters for Advanced Lead Routing
Make's Router module is what separates it from simpler tools like Zapier. It lets you send the same lead down completely different paths based on conditions.
Router Use Case: Route by Event Type
- Path A: Filter where
eventequalsconnection_request_accepted, then route to a CRM module to create a contact - Path B: Filter where
eventequalsmessage_replied, then route to a Slack module to alert your sales team
Router Use Case: Route by Job Title
- Path A: Filter where
data.lead.positioncontains "VP", "Director", or "C-level", then route to your CRM with a "High Priority" tag - Path B: All other leads go to a Google Sheet for batch review
Router Use Case: Route by Campaign Name
- Path A: Filter where
data.campaign.nameequals "Enterprise Outreach", route to Salesforce - Path B: Filter where
data.campaign.nameequals "SMB Outreach", route to Pipedrive
This kind of conditional logic would require multiple separate Zaps in Zapier. In Make, you build it all in one visual scenario.
5 Real Automation Workflows You Can Build
These are practical, ready-to-build Make scenarios that agencies use with Bearconnect today.
Workflow 1: Visual Lead Qualification Pipeline
Best for: Automatically separating enterprise leads from general leads.
- Trigger: Custom Webhook
- Router: Split by
data.lead.position(check for VP, Director, C-level) - Path A: CRM module with "High Priority" tag, then Slack notification
- Path B: Google Sheets row creation for batch review
- Enable: Connection Accepted event
Workflow 2: Enrich Leads Before Adding to CRM
Best for: Getting full contact data before creating a CRM record.
- Trigger: Custom Webhook
- Module: Clearbit or Apollo enrichment using
data.lead.email - Module: HubSpot or Pipedrive - Create Contact with both Bearconnect and enriched data
- Enable: Connection Accepted event
Workflow 3: Slack Alert When a Lead Replies
Best for: Instant team notification on warm leads.
- Trigger: Custom Webhook
- Filter: Only continue if
eventequalsmessage_replied - Module: Slack - Post message "Jane Smith from Acme Corp replied to your Q1 Outreach campaign"
- Enable: Message Replied event
Workflow 4: Multi-Step Connection to Reply Tracking
Best for: Building a complete interaction history in one scenario.
- Trigger: Custom Webhook
- Router: Split by event type
- Path A (Connection Accepted): Add row to Google Sheet
- Path B (Message Replied): Update existing Google Sheet row, send Slack notification
- Enable: All four events
Workflow 5: Update CRM Deal Stage on Reply
Best for: Keeping your pipeline stage current without manual updates.
- Trigger: Custom Webhook
- Filter: Only continue if
eventequalsmessage_replied - Module: Search for existing contact by
data.lead.email - Module: Update deal stage to "Replied" in HubSpot or Pipedrive
- Enable: Message Replied event
How to Manually Export a Lead to Make
You can push any individual lead into your Make scenario directly from the Leads page.
Steps:
- Go to the Leads page in Bearconnect
- Click the three-dot menu on the lead row
- Click Export
- Select your Make integration
- Click Export
The lead data is sent immediately as a JSON payload to your Make webhook, triggering the scenario instantly.
The event field in this payload is set to lead_added_to_campaign.Troubleshooting Common Issues
Most Make integration problems come from one of four root causes.
1. Make Scenario Is Inactive (400 Error)
- This is the most common issue. Make rejects all incoming requests when the scenario is not running.
- Fix: Open your scenario in Make and toggle it ON using the switch at the bottom of the scenario editor.
2. Make Webhook Expired (410 Error)
Make webhook URLs expire after 5 days of inactivity. This means if no events are delivered within 5 days, the URL becomes invalid.
Fix:
- Open your scenario in Make
- Click the Custom Webhook module
- Re-enable the webhook or create a new one
- If the URL changed, update it in the Bearconnect integration settings
3. Data Not Appearing in Make Modules
You can see delivery counts increasing in Bearconnect but Make is not showing data in your modules.
Fix:
- Click Test Connection in Bearconnect to send a fresh sample payload
- In Make, open the Custom Webhook module and confirm it shows "Successfully determined"
- Check the scenario execution history in Make (click the clock icon) for any errors
4. Rate Limiting
Make allows 300 requests per 10 seconds per scenario. High-volume campaigns can hit this limit.
Fix:
- Create multiple scenarios with different webhook URLs and split events across them
- Only enable the specific events you need on each campaign mapping to reduce total event volume
Frequently Asked Questions
Q1: Do I need a paid Make account to use this integration?
No. A free Make account works for building and running scenarios with Bearconnect. You only need a paid plan when you need higher operation limits, more scenarios, or advanced modules. The Bearconnect side of the integration works the same regardless of your Make plan.
Q2: Can I connect multiple Make scenarios to one Bearconnect campaign?
You can create multiple Make integrations in Bearconnect, each with a different webhook URL. However, each campaign mapping connects to one integration at a time. To send the same campaign events to multiple scenarios, create separate Bearconnect integrations pointing to different Make webhook URLs.
Q3: What is the difference between Make and Zapier when used with Bearconnect?
Both use webhooks and receive identical JSON payloads from Bearconnect. Make gives you a visual canvas, a Router module for conditional branching, and more flexible data transformation. Zapier is simpler and better for single-step workflows. If you need to route leads differently based on campaign or job title, Make is the better choice.
Q4: Why is the mapping panel empty in my Make modules after connecting?
Make needs to receive at least one payload before it can detect the data structure. Go to the Bearconnect Integrations page, click on your Make integration, and click Test Connection. After that, go back to Make and the mapping panel in your modules will show all available fields.
Q5: What happens to my Make scenario if I delete the integration in Bearconnect?
Deleting the integration in Bearconnect stops all event forwarding and removes all campaign mappings. Your Make scenario itself remains untouched. All previously processed data in Make and any downstream apps (CRM, Sheets, Slack) is not deleted.
Start Building Your LinkedIn Lead Automation Stack Today
If you are running LinkedIn outreach and your leads are still sitting in disconnected tools, you are losing pipeline momentum every day.
Connect Make to Bearconnect, set up your first scenario, and every LinkedIn interaction starts flowing through exactly the workflow you design.
New to Bearconnect? Start your 7-day free trial and connect Make in under 10 minutes.
Already a Bearconnect user? Head to Integrations in your dashboard and connect Make right now.
Explore More Bearconnect Integrations
Make is one of several integration options available in Bearconnect.
Here is the full list of available and upcoming guides to help you build your complete LinkedIn automation stack.
CRM Integrations
- HubSpot Integration - Sync LinkedIn leads into HubSpot, log activities, and automate contact management.
- Pipedrive Integration - Auto-sync LinkedIn leads to Pipedrive and create deals the moment leads reply.
Automation and Webhook Integrations
- Zapier Integration - Send LinkedIn lead events to thousands of apps using Zapier triggers and actions.
- Custom Webhook Integration - Send Bearconnect LinkedIn events to any external system in real time.
- n8n Integration - Set up self-hosted automation workflows connecting Bearconnect with your internal systems. (Guide coming soon)
Browse all integrations: Bearconnect Integrations Overview
Related Reading
Ready to Transform Your LinkedIn Strategy?
Join thousands of professionals already using Bearconnect to automate their outreach and grow their network.
7-day free trial • Cancel anytime
Related Articles
How to Set Up n8n Integration in Bearconnect: Build Self-Hosted LinkedIn Lead Workflows Without Code
Connect Bearconnect with n8n to automate LinkedIn lead workflows using flexible, self-hosted automation. Sync data across your CRM and tools, build custom workflows, and gain full control over your automation setup.
How to Set Up Zapier Integration in Bearconnect: Auto-Send Leads to Your CRM, Slack, or Google Sheets
Connect Bearconnect with Zapier to automatically send LinkedIn leads to your CRM, Slack, or Google Sheets. This step-by-step guide helps you streamline workflows, reduce manual work, and capture leads in real time.

How to Set Up Pipedrive Integration in Bearconnect: Auto-Sync Leads and Create Deals When They Reply
Connect Pipedrive with Bearconnect to automatically sync LinkedIn leads and create deals when prospects reply. This step-by-step guide shows how to automate your outreach workflow, eliminate manual tracking, and close deals faster using CRM integration.