How to set up HubSpot Integration in Bearconnect : Sync LinkedIn Leads Automatically in Minutes
Connect Bearconnect to HubSpot in 10 minutes by creating a Legacy App in HubSpot, configuring required API scopes, copying your access token
And pasting it into Bearconnect's integration panel to automatically sync LinkedIn activities to your CRM.
TL;DR
- Create a Legacy App in HubSpot with specific API permissions
- Copy your HubSpot access token (starts with pat-)
- Connect in Bearconnect under Integrations
- Choose between campaign-level auto-sync or manual lead exports
- Setup takes 10 minutes for first-time users
Why Bearconnect's HubSpot Integration Changes Your Workflow
Manual data entry kills productivity.
- Sales teams waste 5-10 hours weekly copying LinkedIn activities into their CRM.
- Connection requests, message replies, and lead details get lost in the shuffle.
- Bearconnect's HubSpot integration eliminates this bottleneck. Your LinkedIn outreach syncs automatically to HubSpot in real time.
What the HubSpot Integration Actually Does
Core Capabilities
1. Automatic activity logging
Every LinkedIn action syncs to HubSpot. Connection requests sent, messages delivered, and replies received all appear in your contact timeline.
2. Lead creation and updates
New LinkedIn leads become HubSpot contacts automatically. Existing contacts update with fresh LinkedIn data.
3. Deal tracking
Create or update deals based on LinkedIn engagement. When a prospect replies, trigger deal stage changes in HubSpot.
4. Custom property creation
Bearconnect creates custom HubSpot properties for LinkedIn-specific data like profile URLs, headlines, and engagement metrics.
Learn more about how to generate quality LinkedIn leads that sync seamlessly to your CRM.
Prerequisites Before You Start
You need three things:
1. Active Bearconnect subscription
Any paid plan works. The integration is available to all users.
2. HubSpot account
Works with Free, Starter, Professional, or Enterprise tiers. No Sales Navigator required.
3. HubSpot admin permissions
You need Admin or Super Admin access to create Legacy Apps in HubSpot.
Don't have admin access? Contact your HubSpot account owner.
How HubSpot Integration works in Bearconnect
What the HubSpot Integration Does
Bearconnect now connects directly to your HubSpot CRM.
Core capabilities:
- Export campaign activities to HubSpot automatically
- Sync leads as HubSpot contacts
- Log LinkedIn activities (connection requests, messages, replies)
- Create and update deals based on LinkedIn engagement
Learn more about how to generate quality LinkedIn leads that you can sync to your CRM.
How to Set Up HubSpot Integration
What you need before starting:
- Active Bearconnect subscription
- HubSpot account (Free, Starter, Professional, or Enterprise)
- Admin or Super Admin permissions in HubSpot
Step 1: Create a Legacy App in HubSpot
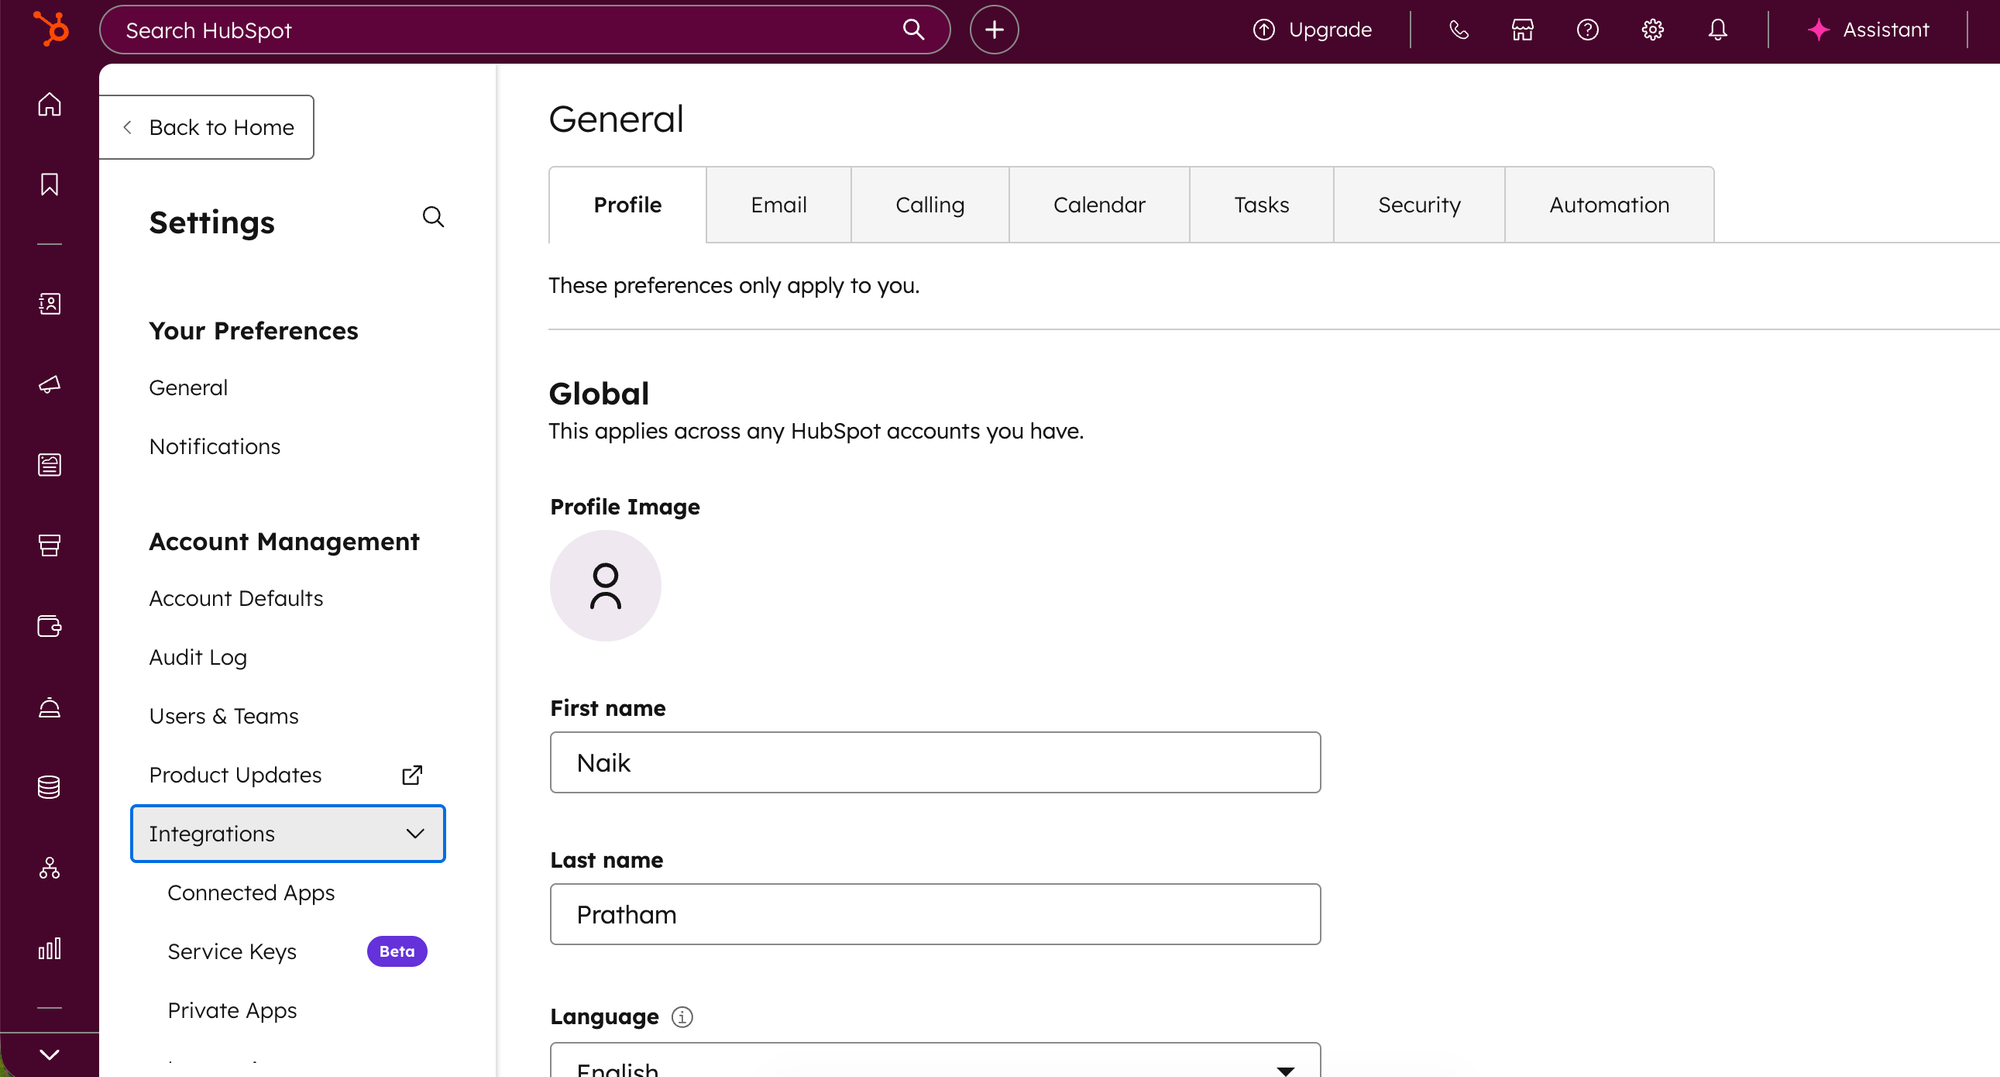
- Log into your HubSpot account
- Go to Settings in the top navigation
- Click Integrations, then Legacy apps
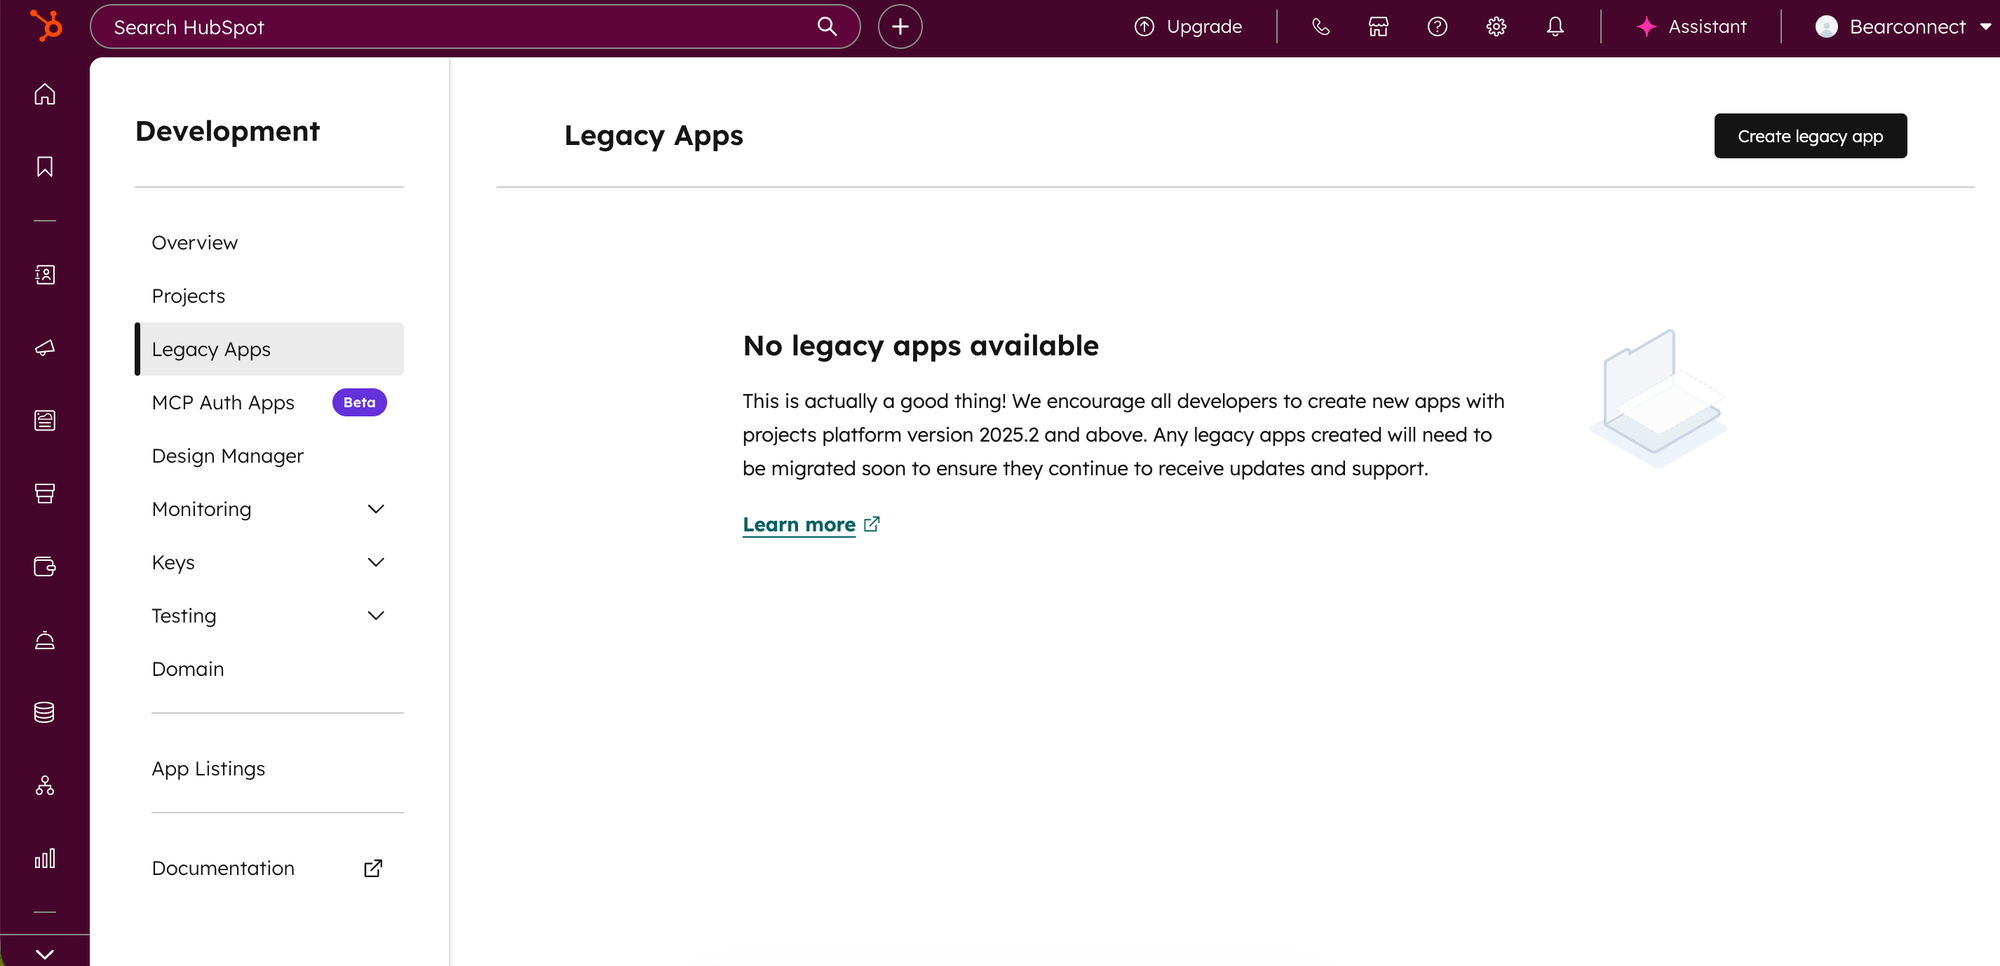
- Click Create legacy app and select Private
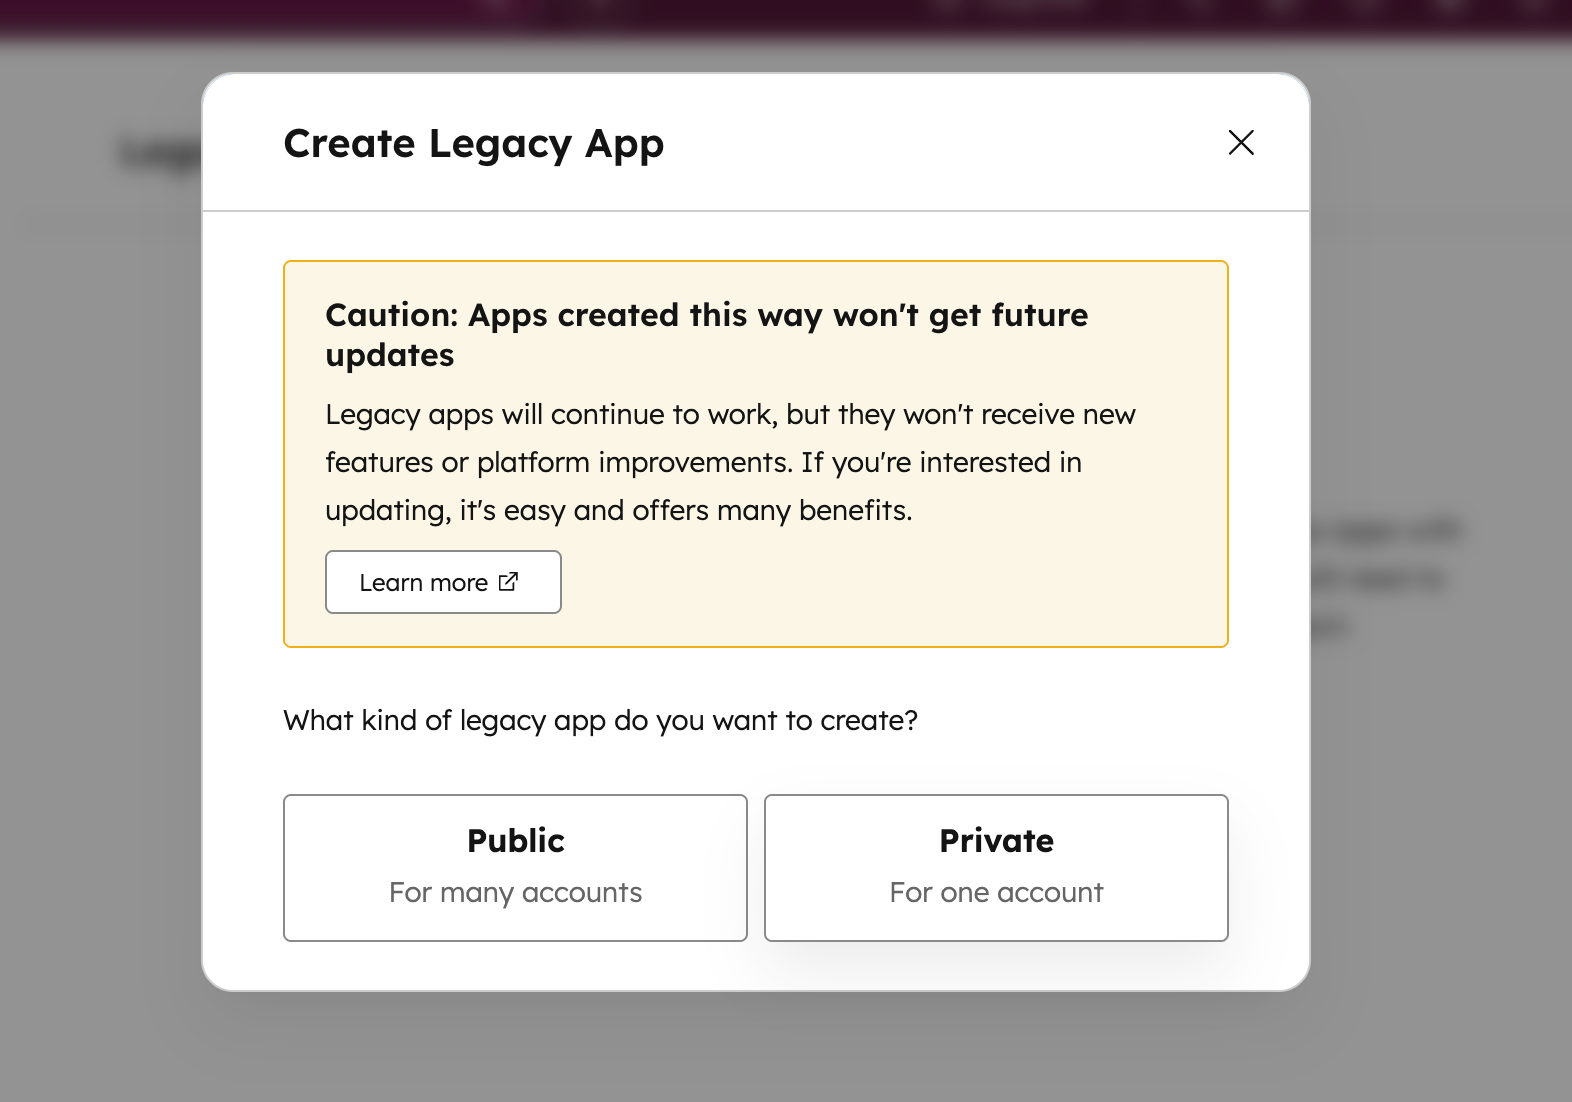
- Name it something memorable (like "Bearconnect Integration")
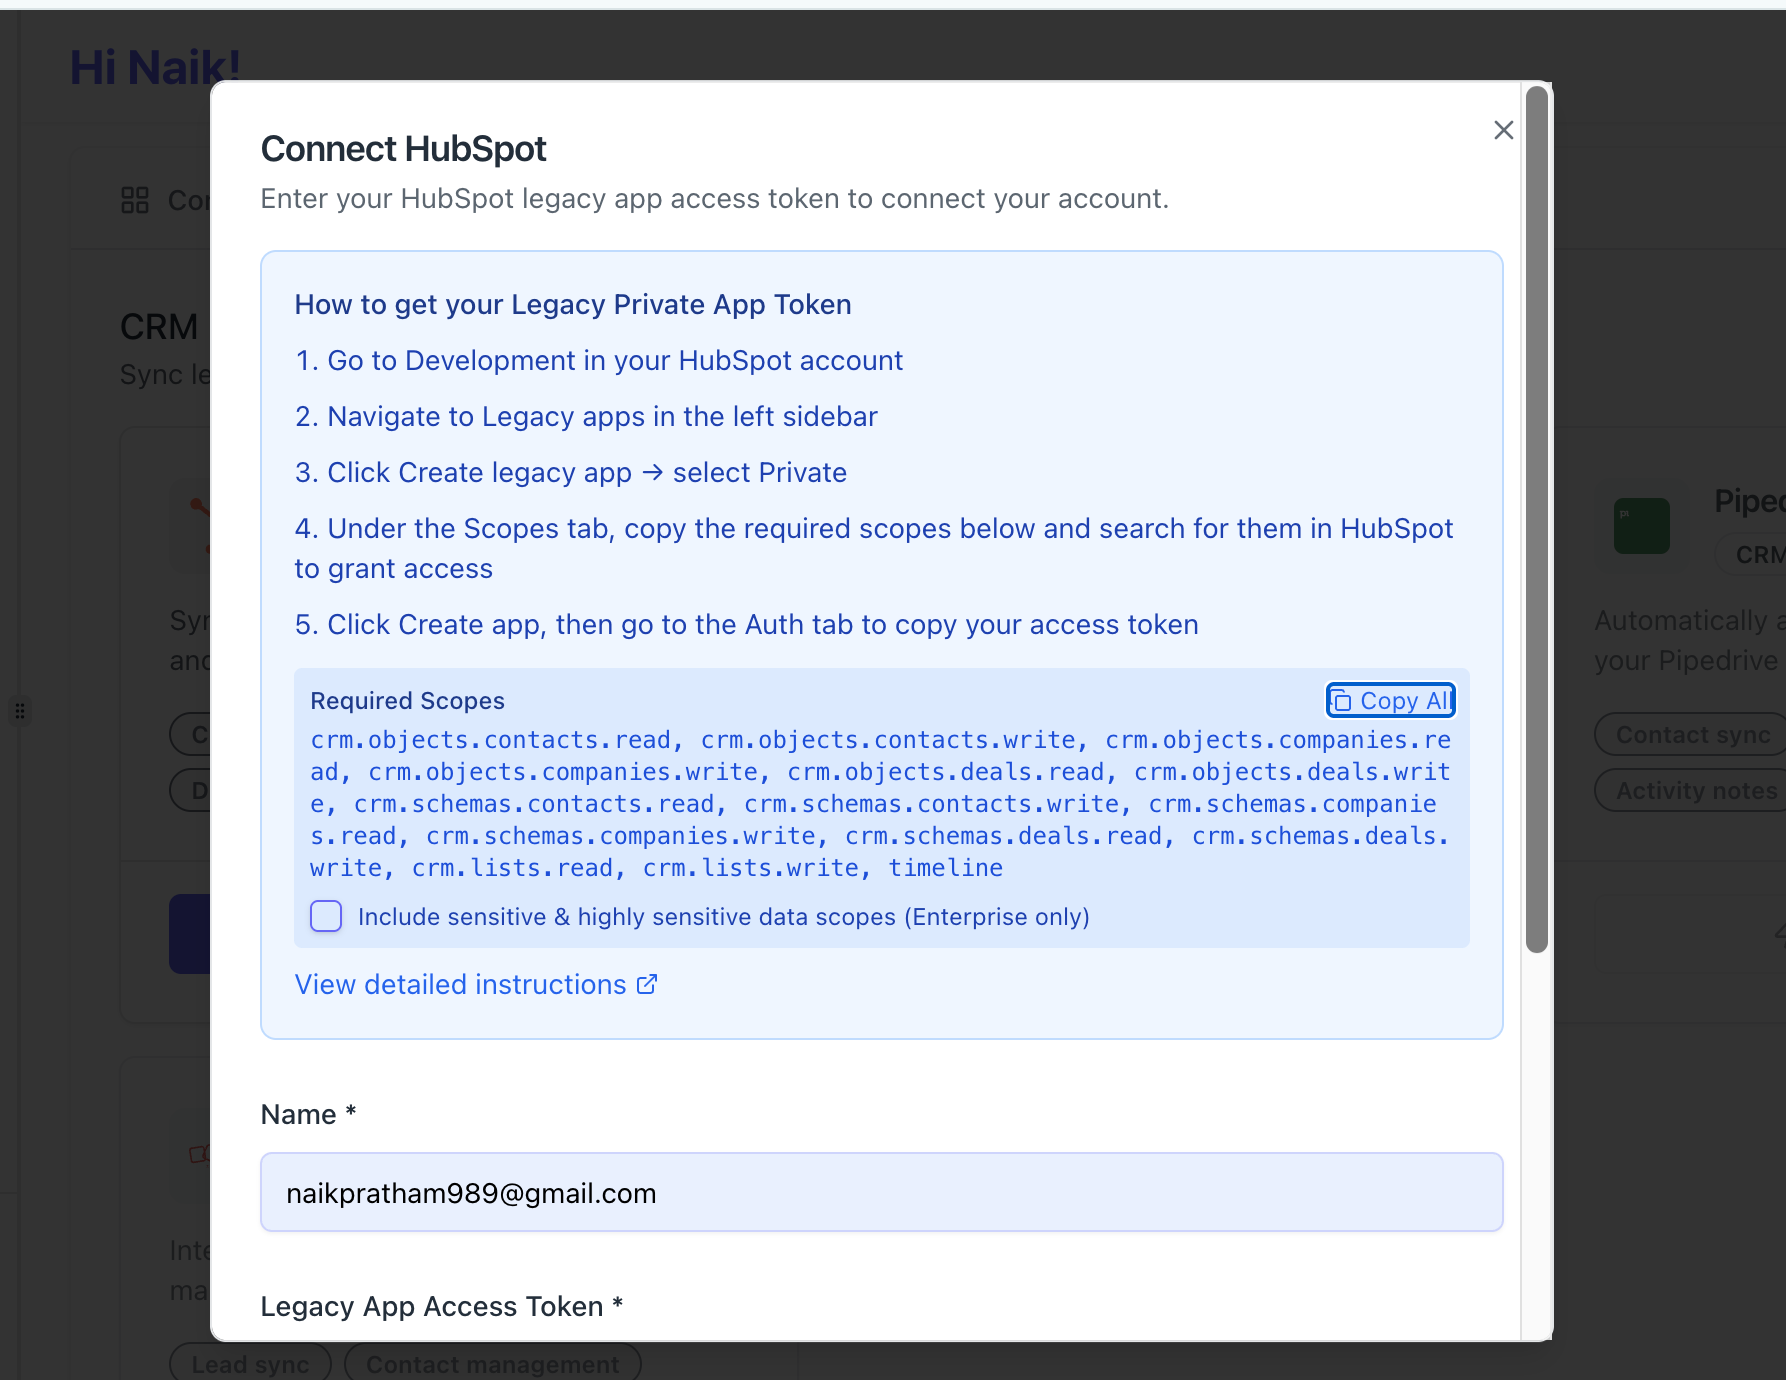
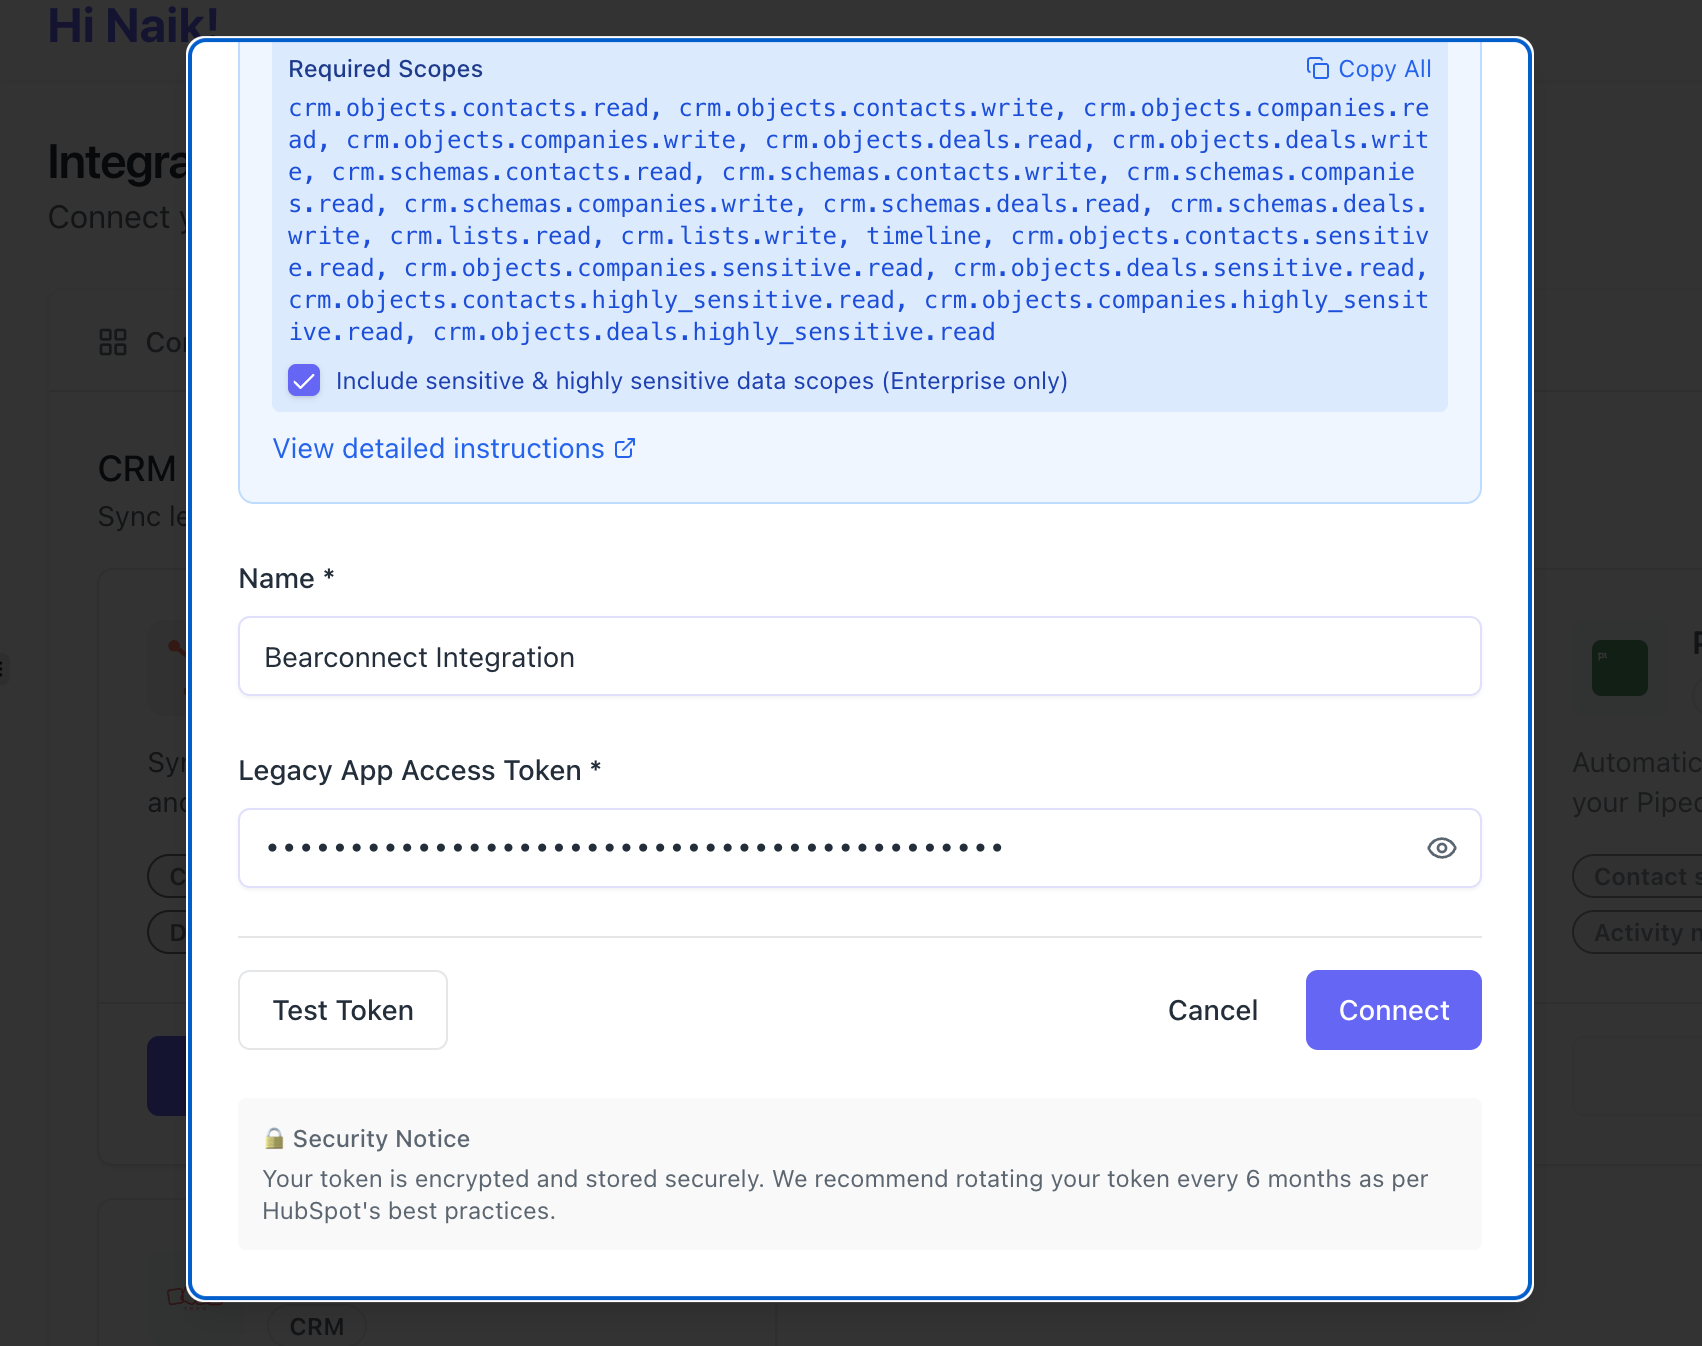
Step 2: Configure Required Permissions
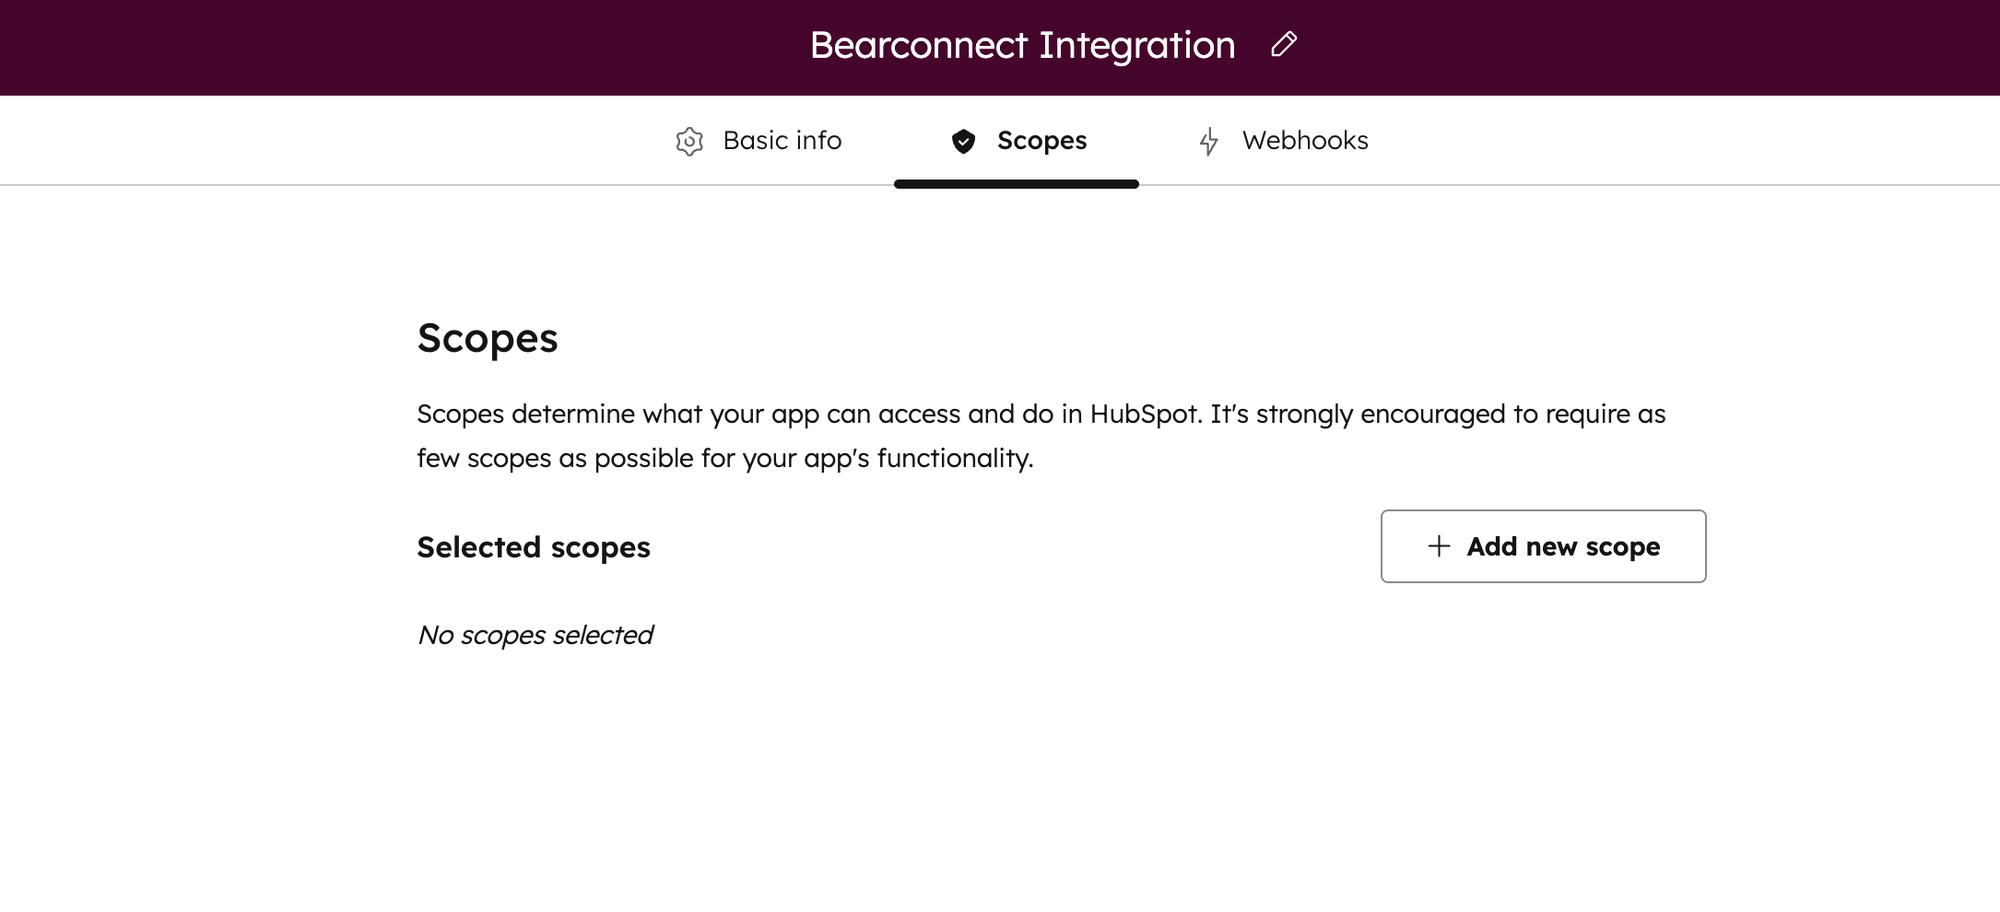
Your HubSpot app needs specific scopes to work with Bearconnect. Copy these required scopes from the Bearconnect connection form using the "Copy All" button:
- crm.objects.contacts.read/write
- crm.objects.companies.read/write
- crm.objects.deals.read/write
- crm.schemas.contacts.read/write
- crm.lists.read/write
- timeline

Pro Tip: HubSpot Enterprise users can enable sensitive data scopes for access to protected contact fields, but most users don't need this.
Step 3: Copy Your Access Token
- Click Create app in HubSpot
- Go to the Auth tab
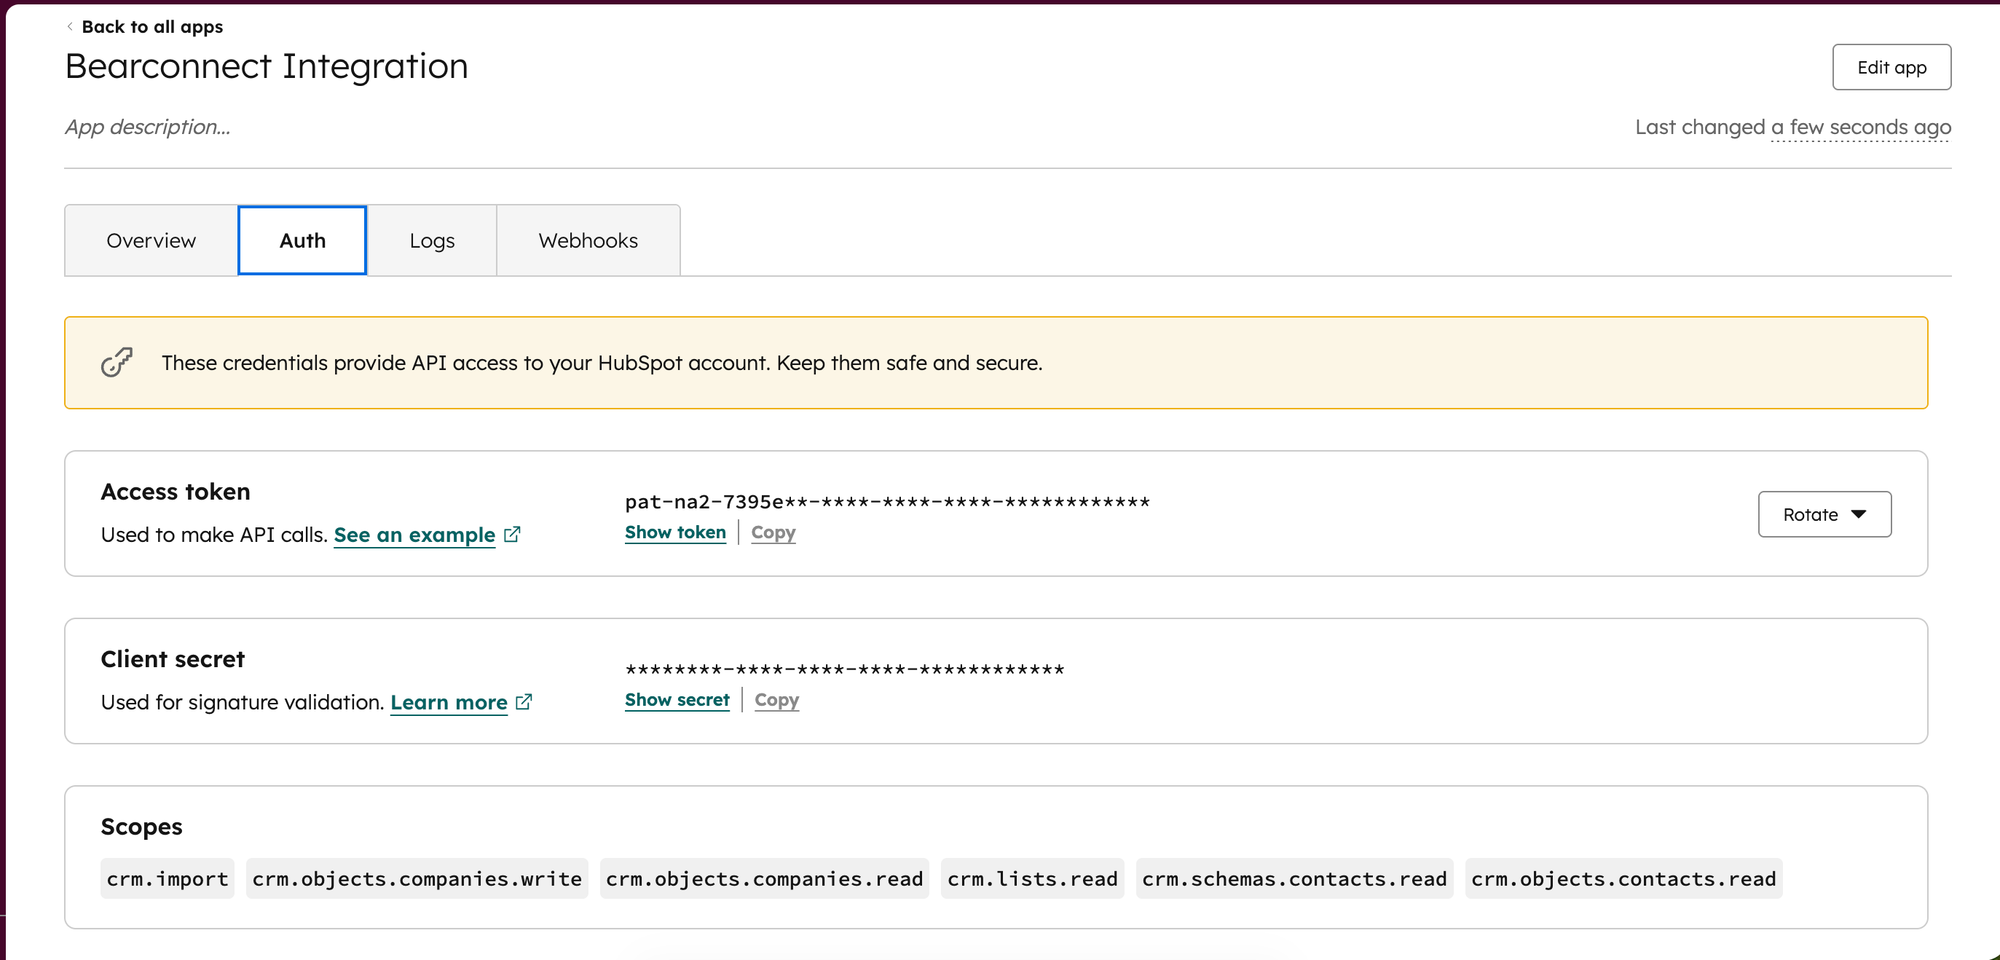
- Copy the Access Token (starts with pat-)
- Keep this secure
Step 4: Connect in Bearconnect
- Go to Integrations in your Bearconnect dashboard sidebar
- Find HubSpot in available Integrations
- Click Connect
- Paste your token and name the integration
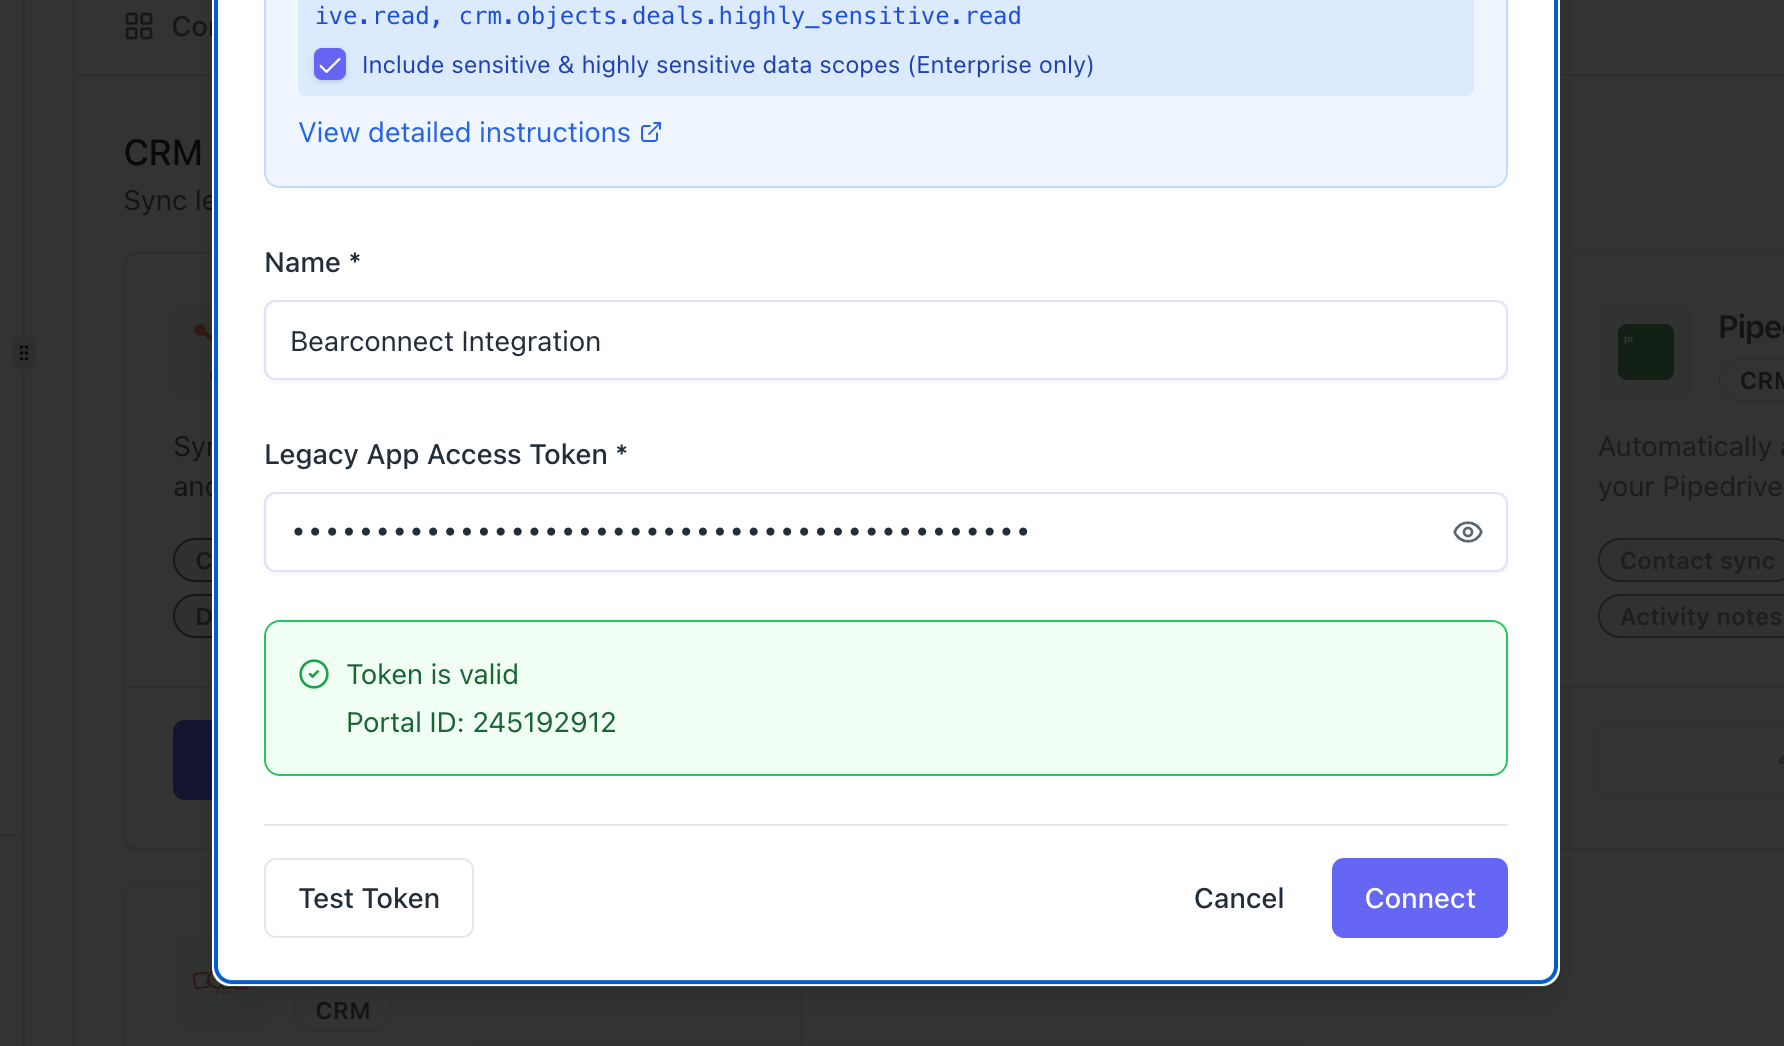
- Click Test Token to verify (optional but recommended)
- Click Connect
What Happens After Connecting

Bearconnect automatically creates custom properties in your HubSpot account for tracking LinkedIn activity. Your integration appears in Connected Integrations with full status visibility.
Two ways to use the integration:
Option 1: Connect to a Campaign
- Open any campaign in Bearconnect
- Go to the Integrations tab
- Click Connect Integration
- Select your HubSpot integration
- Choose which events to track:
- Connection Request Sent
- Connection Accepted
- Message Sent
- Message Replied
Option 2: Manually Export Leads
- Go to your Leads page
- Click the three-dot menu on any lead
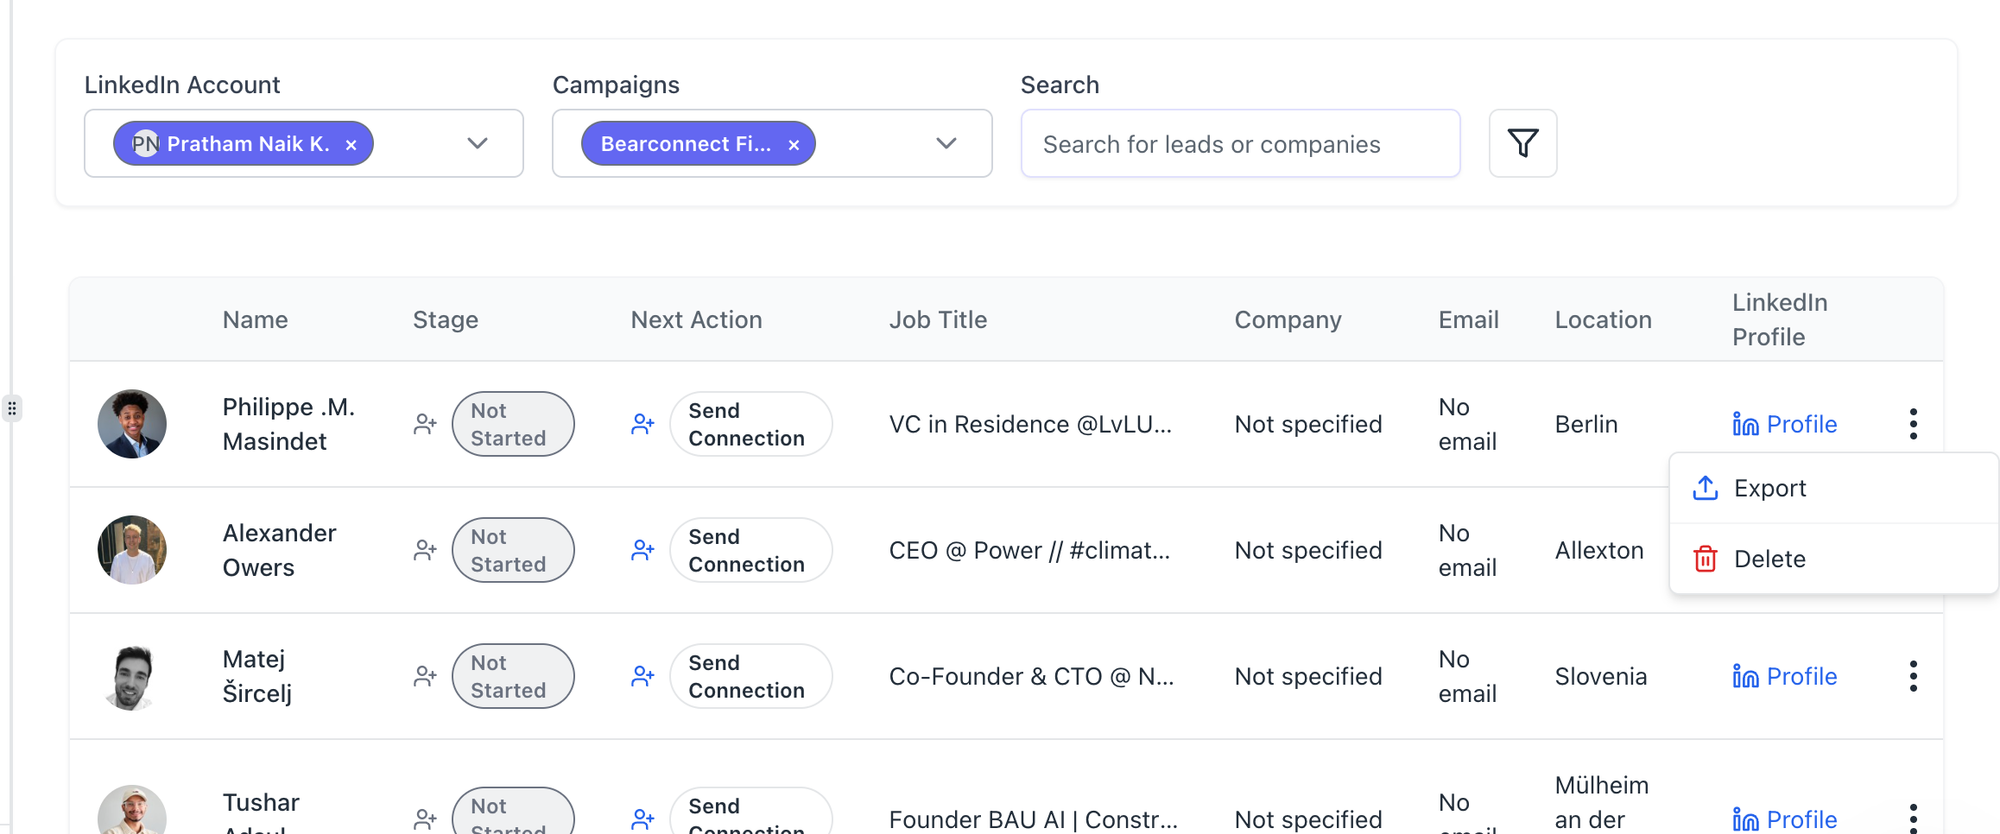
- Click Export and select HubSpot
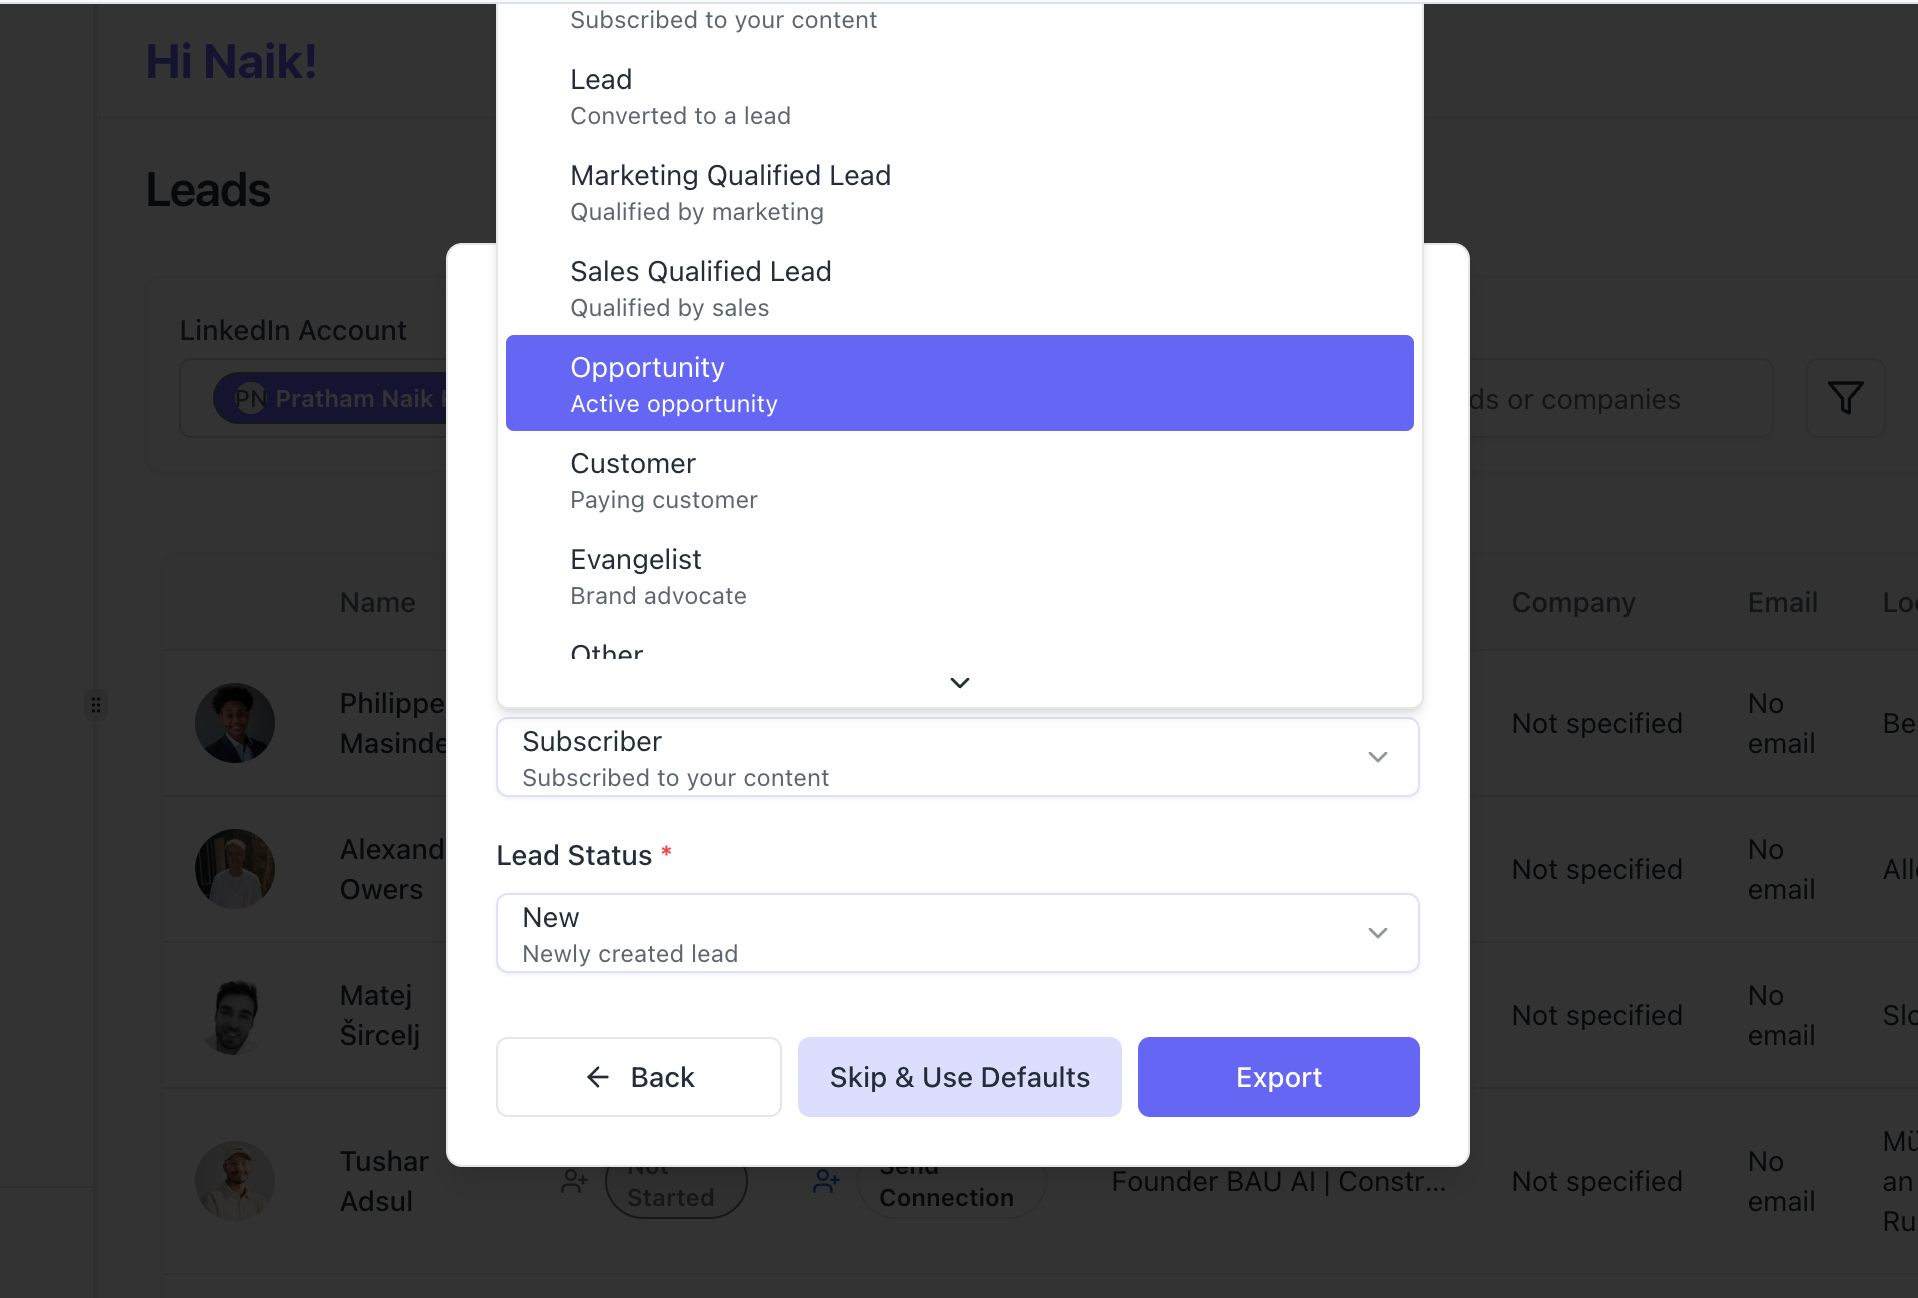
- Map fields (Lifecycle Stage and Lead Status)

- Click Export
Pro Tip: Your field mapping preferences save automatically. The next export will pre-fill your previous selections.
HubSpot Integration Settings You Should Know
Access settings by clicking your connected HubSpot integration, then Settings.
Key settings:
- Automatic Sync: Turn on for real-time forwarding
- Sync Mode: Choose Real-time, Batch (15 min), or Manual Only
- Sync Direction: Outbound Only, Inbound Only, or Bidirectional
The settings page shows contacts synced, sync errors, last sync time, and a Test Connection button.
Token Security and Rotation
HubSpot recommends rotating tokens every 180 days for security. Bearconnect tracks your token age and shows a warning banner when rotation is due.
To rotate your token:
- Go to HubSpot Development and Legacy apps
- Open your private app and go to Auth
- Click Rotate token
- Copy the new token immediately
- Update it in Bearconnect
Important: The old token stops working the moment you rotate. Update Bearconnect promptly to avoid sync interruptions.
HubSpot Integration Settings Explained
Access settings by clicking your connected HubSpot integration, then Settings.
Key Configuration Options
Automatic Sync (On/Off)
When enabled, events forward to HubSpot automatically as they occur. Turn off for manual control.
Sync Mode (3 options)
- Real-time: Events send immediately (recommended for active campaigns)
- Batch (15 min): Groups events into 15-minute intervals (reduces API calls)
- Manual Only: No automatic syncing (you trigger syncs manually)
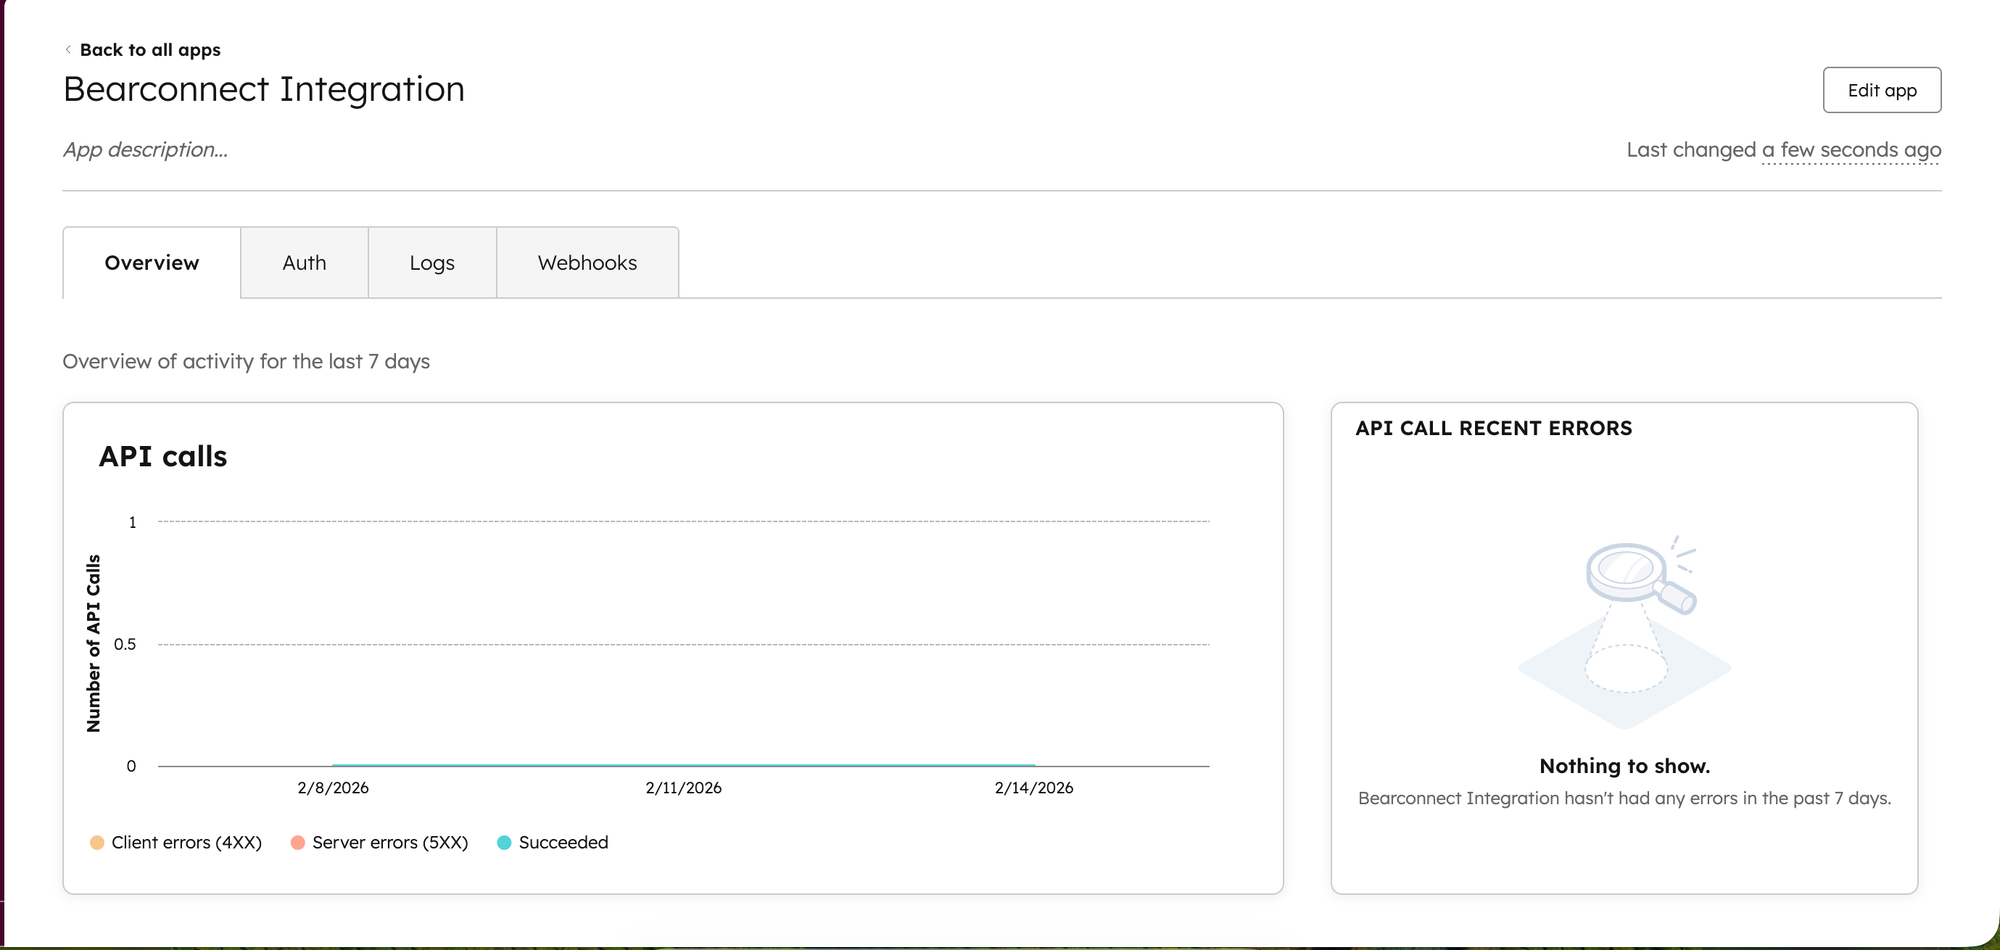
Monitoring Your Integration Health
The settings page shows real-time stats:
- Contacts Synced: Total successful syncs
- Sync Errors: Number of failed attempts
- Last Sync: Timestamp of most recent sync
- Test Connection button: Verify integration is working
Check these metrics weekly to catch issues early.
What Data Syncs to HubSpot
When you sync a lead, this information transfers to HubSpot:
| Bearconnect Field | HubSpot Field |
|---|---|
| First Name | First Name |
| Last Name | Last Name |
| Phone | Phone |
| Company Name | Company |
| Position/Job Title | Job Title |
| LinkedIn Profile URL | LinkedIn URL (custom property) |
| Profile Headline | Profile Headline (custom property) |
| Location | City/Address |
| Lifecycle Stage | Lifecycle Stage |
| Lead Status | Lead Status |
If the contact already exists in HubSpot (matched by email or LinkedIn URL), Bearconnect updates the existing record instead of creating a duplicate.
This keeps your CRM clean and prevents data conflicts.
Troubleshooting Common HubSpot Integration Issues
1. "Connection test failed"
Your token expired or was rotated.
Go to HubSpot Development, check your Legacy app Auth tab, and copy the current token. Update it in Bearconnect.
2. "Events not appearing in HubSpot"
Check four things:
- Integration status shows Active (not Error or Disconnected)
- Campaign mapping toggle is turned on
- Relevant event types are enabled in the mapping
- Automatic Sync is turned on in Settings
If using Batch sync mode, events may take up to 15 minutes to appear.
3. "Sync error" in integration status
Click the integration to see error details.
Common causes:
- HubSpot API rate limits (resolves automatically after a few minutes)
- Missing required properties (reconnect the integration)
- Insufficient permissions (verify all required scopes are enabled)
4. "Lead export shows skipped"
This means the lead already exists in HubSpot with the same or newer data.
Not an error. Bearconnect prevents duplicate records automatically.
Pro Tips for Maximum Integration Value
Tip 1: Map high-priority campaigns first
Start with your most active campaign. Validate data flow before expanding to all campaigns.
Tip 2: Use lifecycle stages strategically
Map different campaigns to different lifecycle stages. Track progression from Subscriber to Customer.
Tip 3: Monitor sync errors weekly
Check your integration status every Monday. Fix issues before they impact your pipeline.
Tip 4: Create HubSpot workflows triggered by LinkedIn events
Use Bearconnect's custom properties to trigger automated HubSpot workflows when prospects engage.
Tip 5: Combine with Bearconnect's unified inbox
Manage LinkedIn conversations and HubSpot activities from one dashboard. Learn about the unified inbox feature.
FAQs
Q: Can I connect multiple HubSpot accounts to Bearconnect?
Yes. You can create multiple HubSpot integrations and map different campaigns to different HubSpot accounts, perfect for agencies managing multiple clients.
Q: Do I need LinkedIn Sales Navigator to use this integration?
No. Bearconnect's HubSpot integration works independently of Sales Navigator and functions with all HubSpot tiers (Free, Starter, Professional, Enterprise).
Q: How long does the integration setup take?
Approximately 10 minutes for first-time setup. Subsequent integrations take 5 minutes once you understand the process.
Q: What happens to my HubSpot data if I disconnect the integration?
Previously synced contacts remain in HubSpot unchanged. Custom properties created by Bearconnect also remain. You can reconnect anytime without data loss.
Q: Can I sync historical LinkedIn activities to HubSpot?
No. The integration syncs new activities going forward from the moment you connect. Historical data before integration setup does not sync automatically.
Get Started with HubSpot Integration Today
The integration takes 10 minutes to set up and saves hours weekly.
Ready to connect your LinkedIn outreach to HubSpot? Log into your Bearconnect dashboard and start the setup process.
Need help? Our support team responds within 24 hours at support@bearconnect.io.
New to LinkedIn automation? Start with the basics before setting up integrations.
Ready to Transform Your LinkedIn Strategy?
Join thousands of professionals already using Bearconnect to automate their outreach and grow their network.
7-day free trial • Cancel anytime
Related Articles
How to Set Up n8n Integration in Bearconnect: Build Self-Hosted LinkedIn Lead Workflows Without Code
Connect Bearconnect with n8n to automate LinkedIn lead workflows using flexible, self-hosted automation. Sync data across your CRM and tools, build custom workflows, and gain full control over your automation setup.
How to Set Up Make Integration in Bearconnect: Build Visual Lead Workflows Across Any App Without Code
Connect Bearconnect with Make to build visual LinkedIn lead workflows across your CRM, Slack, and other tools without code. Automate lead capture, streamline processes, and sync data seamlessly in real time.
How to Set Up Zapier Integration in Bearconnect: Auto-Send Leads to Your CRM, Slack, or Google Sheets
Connect Bearconnect with Zapier to automatically send LinkedIn leads to your CRM, Slack, or Google Sheets. This step-by-step guide helps you streamline workflows, reduce manual work, and capture leads in real time.