How to Use Workspaces in Bearconnect: Complete Setup Guide
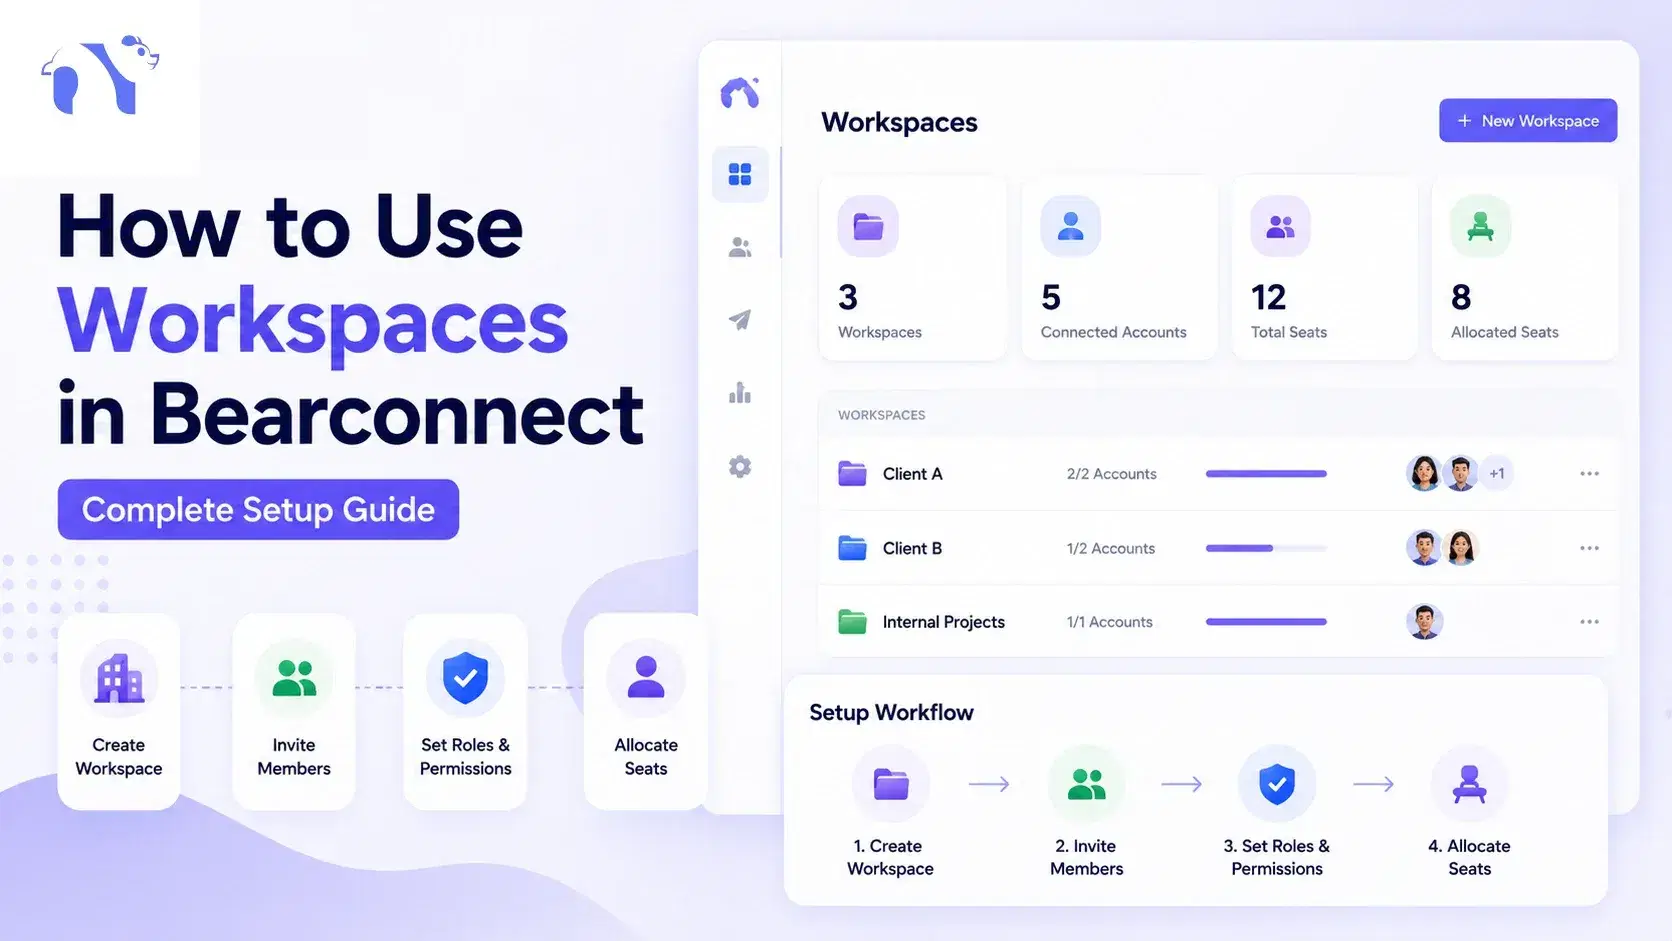
To use workspaces in Bearconnect, sign up or log in, then go to Settings > Workspaces.
TL;DR: Workspace Setup in 4 Steps
- Create → Settings > Workspaces > + New Workspace = a fresh environment with its own campaigns and inbox
- Allocate → three dots > Edit > allocate seats = the workspace can now hold a LinkedIn account
- Connect → LinkedIn > Add Account inside that workspace = outreach runs in isolation
- Invite → Settings > Members > invite by email with a role = no password sharing, ever
- Switch → workspace picker in the top bar = jump between clients in one click
One rule worth memorising now: a workspace with zero seats allocated cannot connect a LinkedIn account, even when free seats sit elsewhere on your account.
What is a Workspace in Bearconnect?
A workspace is a separate environment inside your Bearconnect account that holds its own LinkedIn account, campaigns, leads and inbox. Nothing crosses between workspaces unless you allow it.
The organization and workspace relationship, explained simply
Your organization is the house. Each workspace is a room in that house.
- The organization sits at the top and owns billing, seats and global settings
- Each workspace holds the actual outreach work
- Rooms do not share furniture, so client data stops mixing
What lives inside a single workspace
Everything campaign related lives inside the workspace, not at the account level.
- Connected LinkedIn accounts, one per allocated seat
- Campaigns and their sequences
- Lead lists and lead stages
- The unified inbox for that account
- Posts and post analytics
- Members who have access to that specific workspace
→ Client A in workspace one + Client B in workspace two = zero chance of replying to the wrong prospect as the wrong brand.
Workspace vs Organization vs Seat vs Member: What is the Difference?
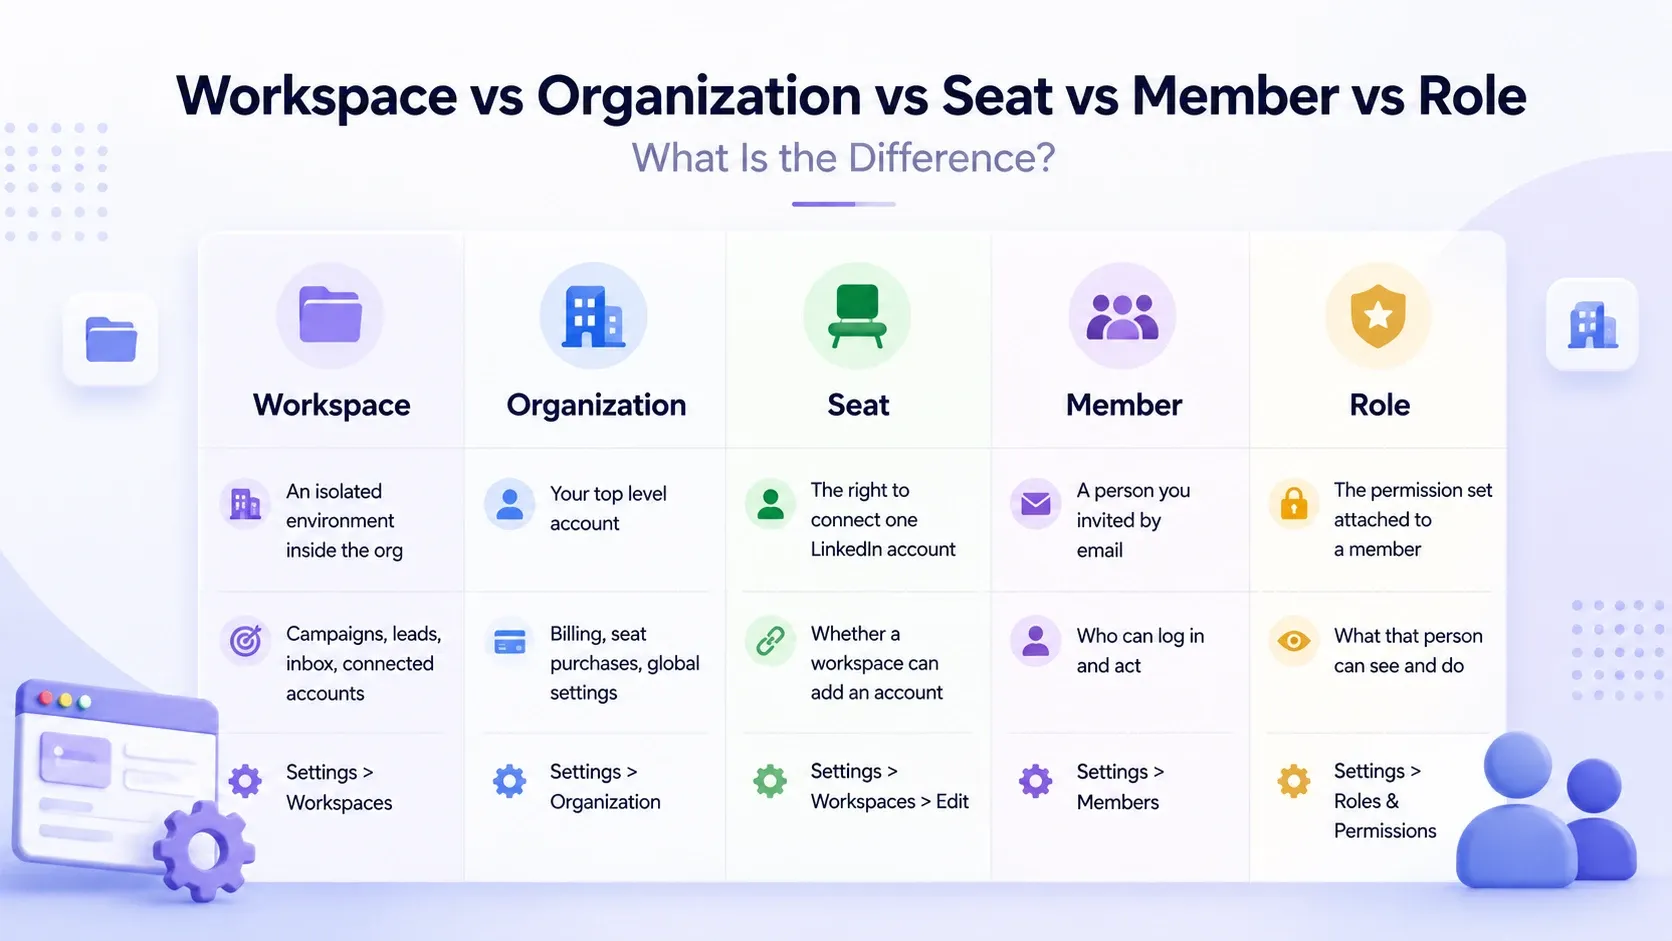
Most setup confusion comes from mixing up these four words, so here is the plain version. Read this table once and every step later makes sense.
| Concept | What it is | What it controls | Where you manage it |
|---|---|---|---|
| Organization | Your top level account | Billing, seat purchases, global settings | Settings > Organization |
| Workspace | An isolated environment inside the org | Campaigns, leads, inbox, connected accounts | Settings > Workspaces |
| Seat | The right to connect one LinkedIn account | Whether a workspace can add an account | Settings > Workspaces > Edit |
| Member | A person you invited by email | Who can log in and act | Settings > Members |
| Role | The permission set attached to a member | What that person can see and do | Settings > Roles & Permissions |
Seats track accounts. Members track people. Those two are not the same thing, and mixing them up is the single most common setup error I see.
Why Did We Introduce the New Workspace Feature in v2?
We introduced workspaces because V1 assumed one person running one set of campaigns, and almost nobody works that way. Agencies, sales teams and founders with a VA all outgrew a single flat dashboard.
What v1 users struggled with before workspaces
- One shared login, handed around over chat
- Every client campaign in one list, sorted by naming conventions
- One inbox holding threads from four different brands
- No way to show a client their results without a screen share
- No way to limit what a junior team member could touch
A real pattern from support conversations: an agency running four clients from one profile spends the first twenty minutes of every Monday working out which thread belongs to whom.
That twenty minutes is gone in v2. The inbox arrives already split.
What Are the Benefits of Workspaces in LinkedIn Automation?
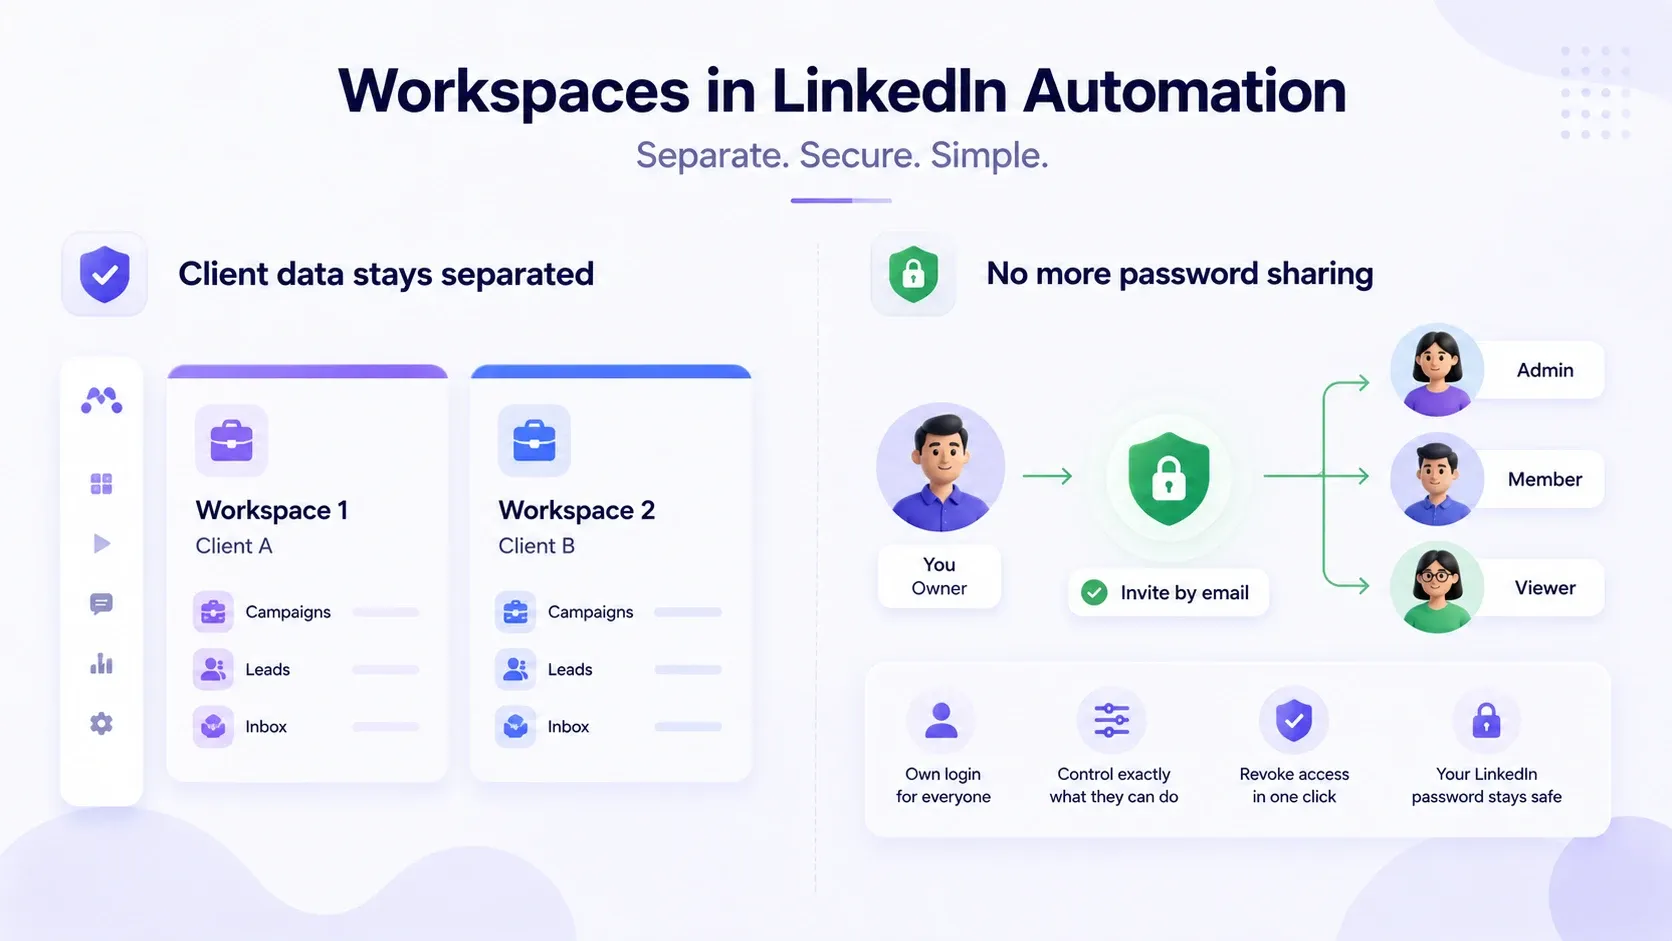
The benefits of workspaces in LinkedIn automation come down to four things: separation, secure access, clean reporting and fast switching. Each one removes a manual workaround you were probably doing by hand.
Client data stays separated
Each workspace keeps its own campaigns, leads and inbox, so client data never overlaps.
- No prefixing campaign names with client initials
- No filtering the inbox before you can reply
- No accidental cross client messaging
No more password sharing with your team or VA
You invite people by email instead of sending credentials.
- The VA gets their own login
- You choose exactly what they can touch
- You revoke access in one click when a contract ends
Your LinkedIn password never leaves your hands
Clean client reporting without screen shares
A read only role lets a client watch their own results without touching anything.
- Invite the client as a Viewer inside their workspace
- They see campaigns, leads and reports for that workspace only
- They cannot edit, delete or reach billing
For agencies, this quietly replaces the weekly reporting call with a login.
Faster account switching without logging out
The top bar picker moves you between workspaces in one click, with no logging out and back in.
→ 5 clients + 1 login = 5 clean environments and one browser tab.
Do You Actually Need Multiple Workspaces?
No, not everyone does, and I would rather you skip the setup than build structure you will never use. Run this checklist.
Create extra workspaces if you tick any of these:
- You run outreach for two or more clients or brands
- You have a VA, contractor or teammate who needs access
- You want a client to see results without editing them
- You run different LinkedIn accounts for different products or regions
- Your reps should not see each other's pipelines
When one default workspace is enough
One workspace is enough when one person runs one LinkedIn account.
- Solo founder, one profile, one offer
- Freelancer with no team and no client logins
- Anyone still testing outreach before scaling
Stay in the default workspace and ignore the rest of the settings screen. That is a legitimate answer.
Step by Step Guide to Access a Workspace in Bearconnect
Here is the exact click path, and the whole thing takes about five minutes. I ran it end to end on a fresh account before writing this section.
Step 1: Open Settings and find the Workspaces tab
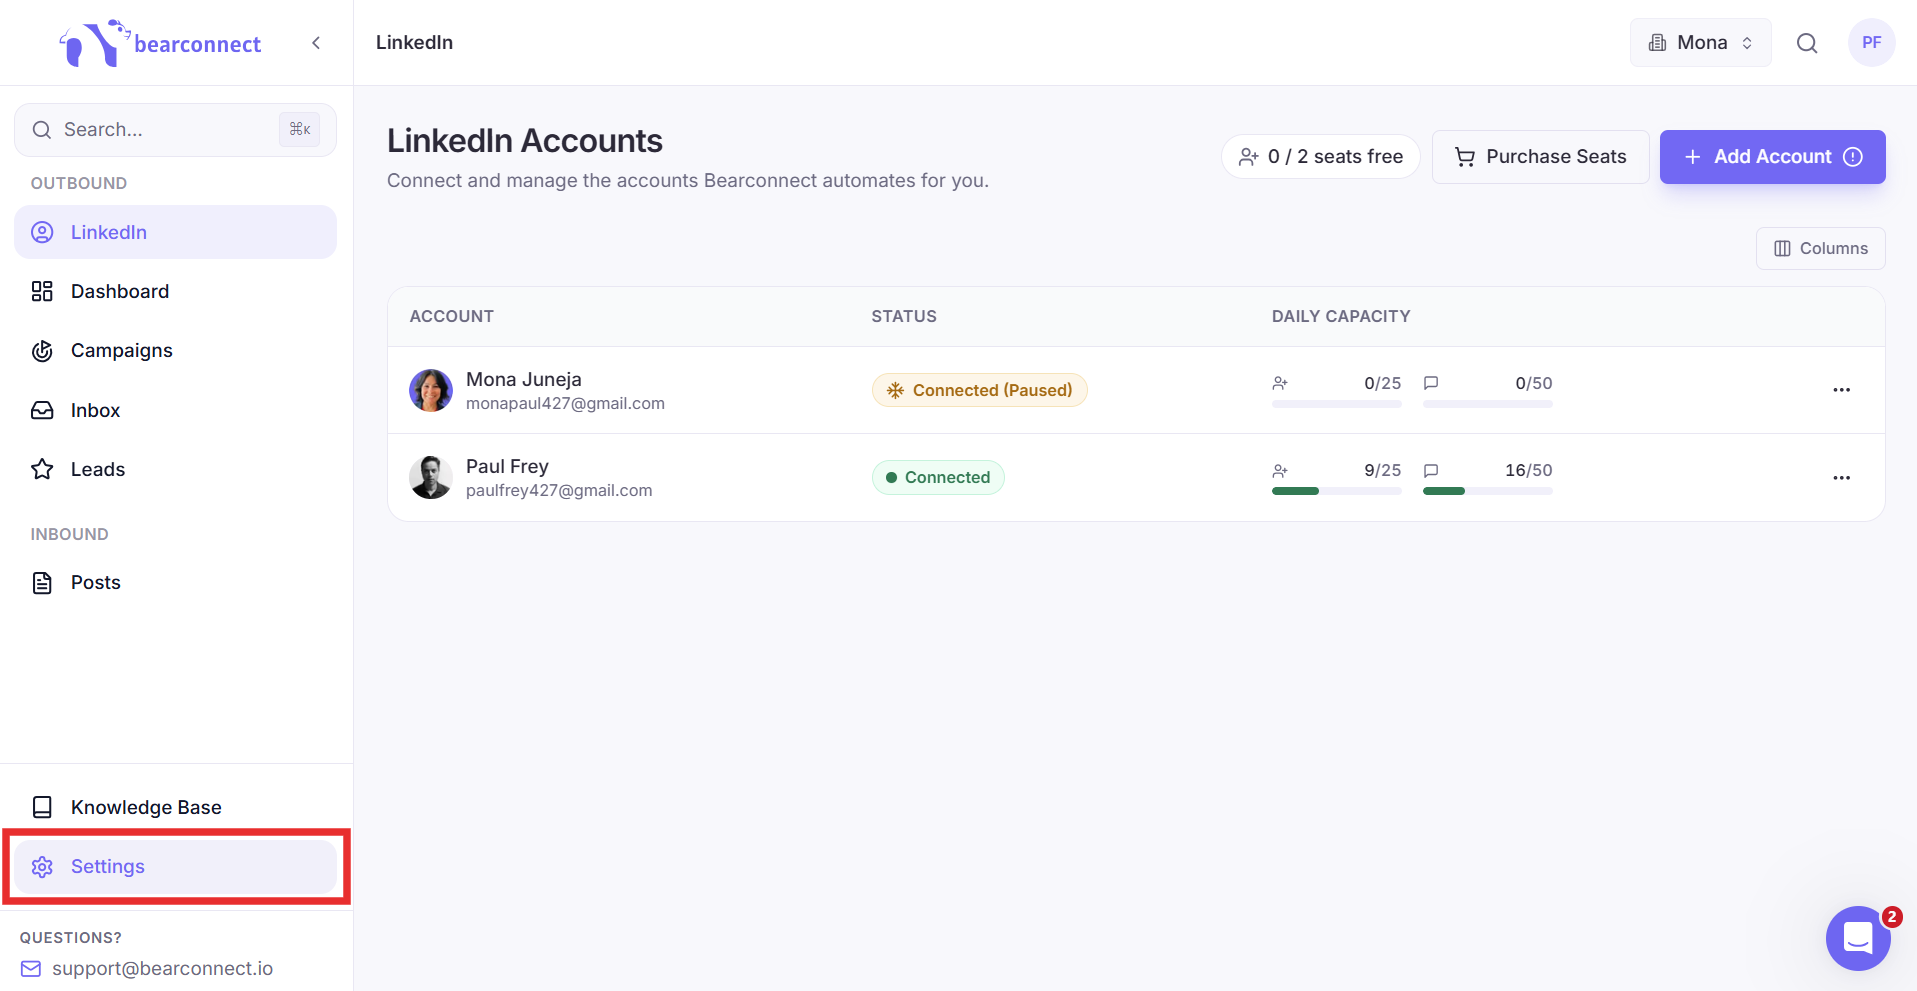
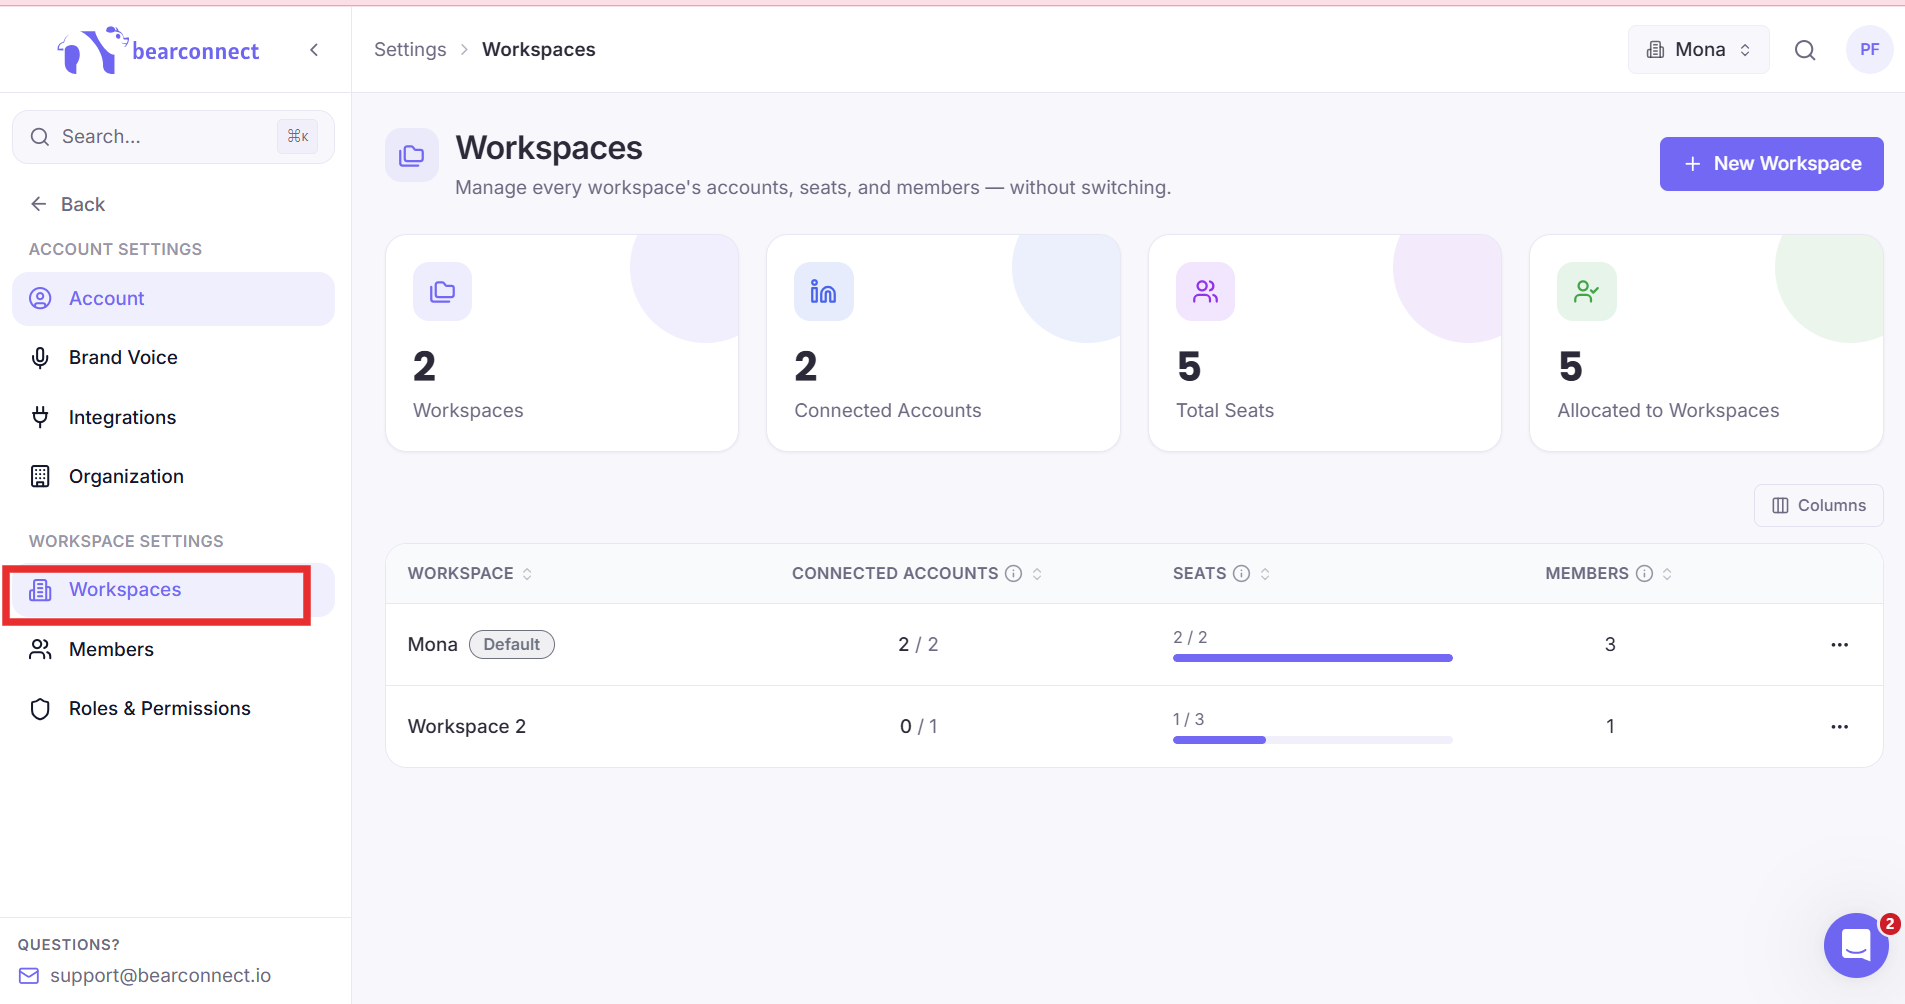
Everything workspace related lives under Settings, in the Workspace Settings group.
- Sign up or log in to Bearconnect
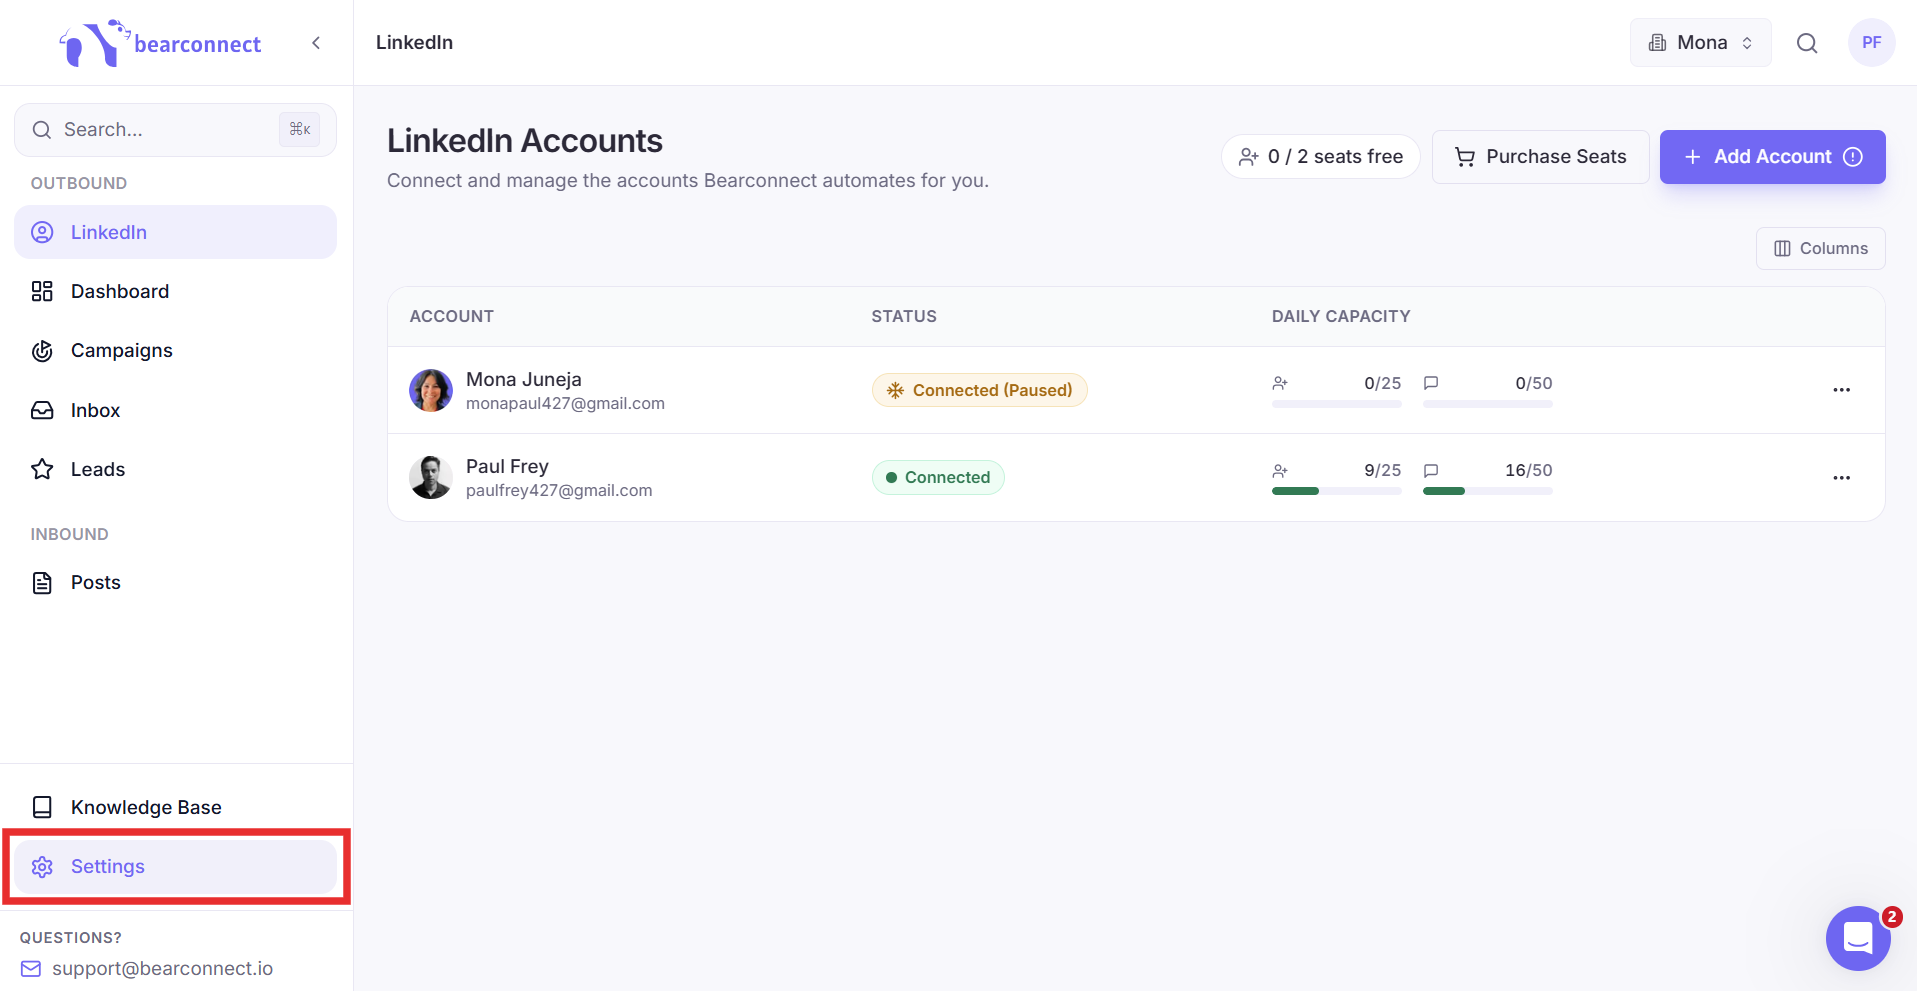
- Open Settings from the left sidebar
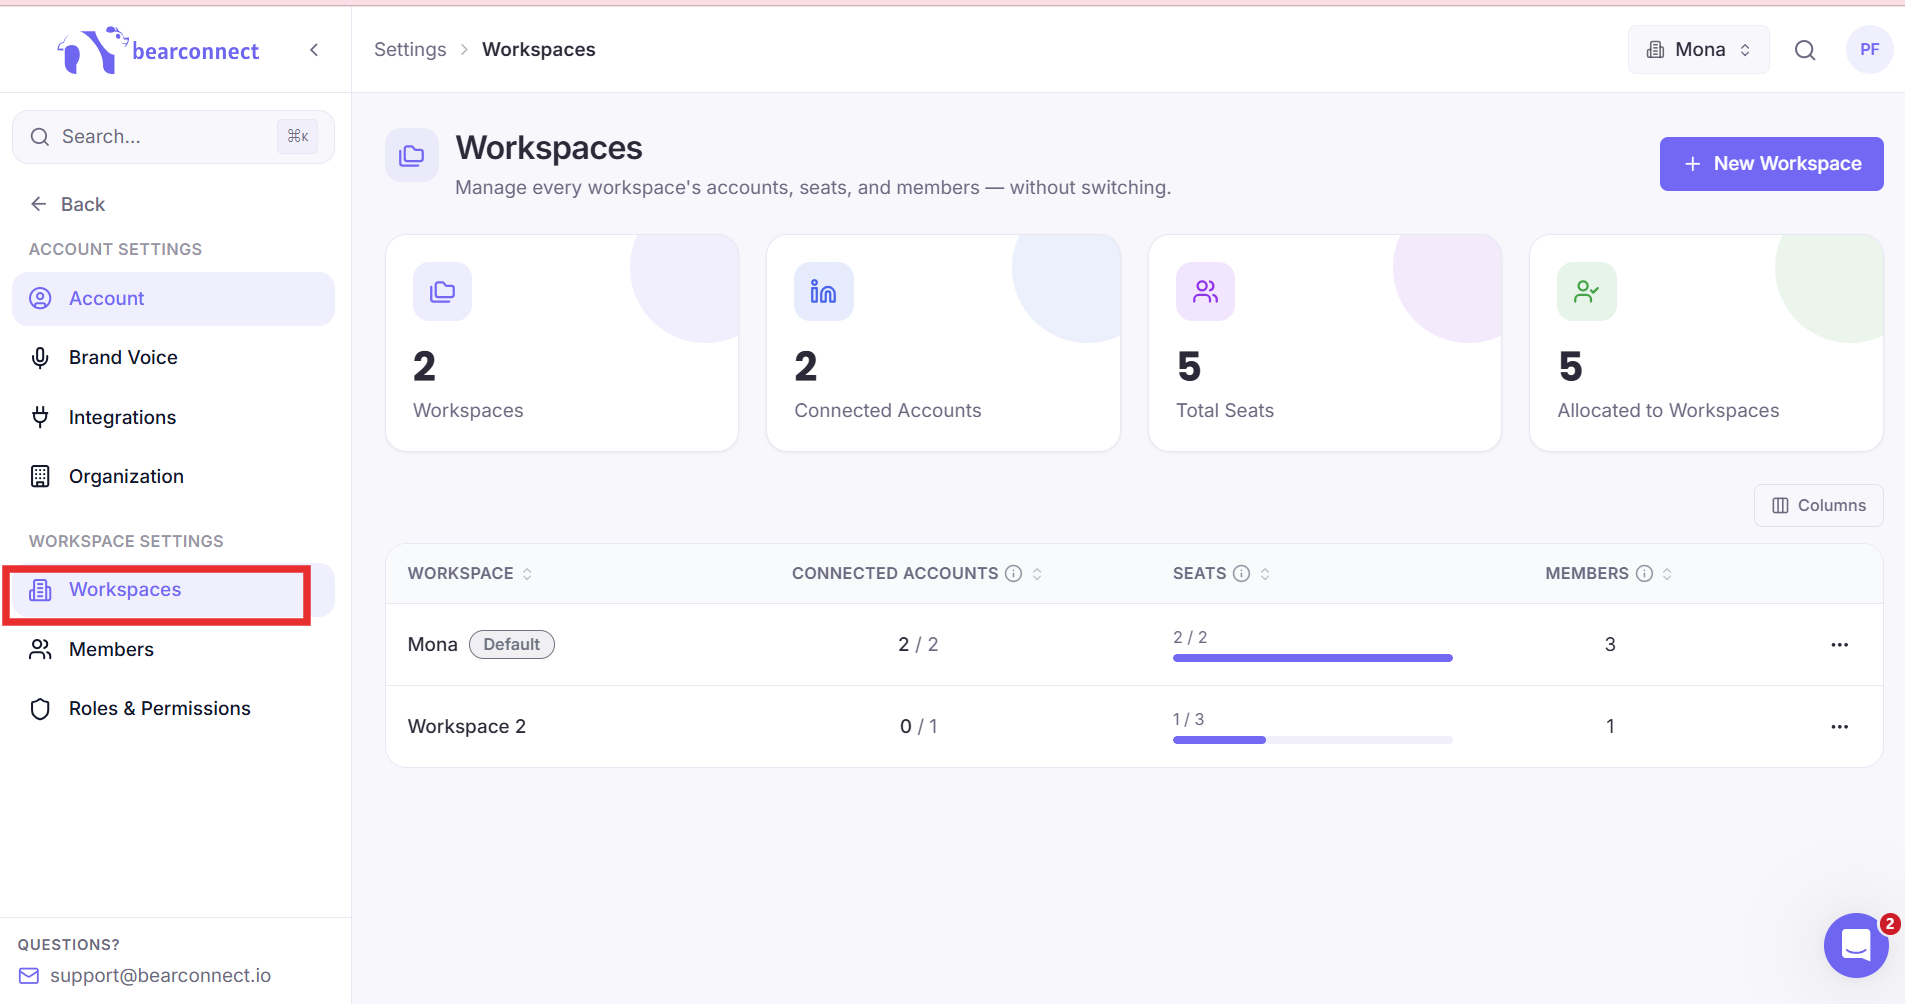
- Under Workspace Settings, click Workspaces
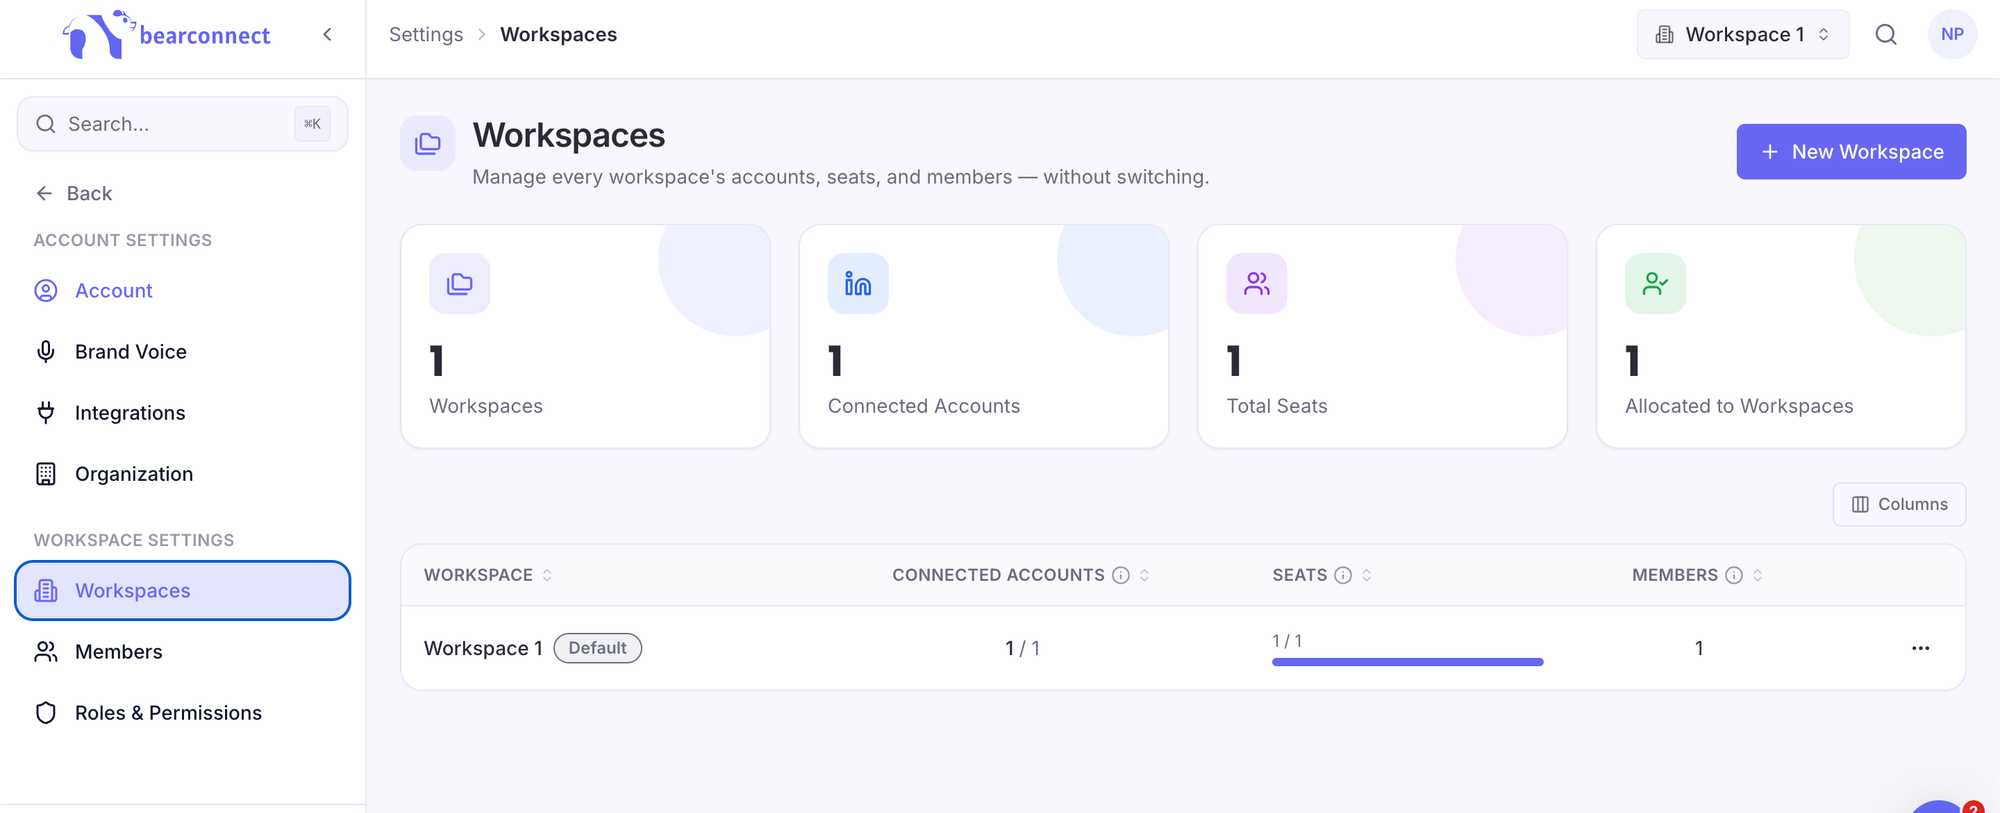
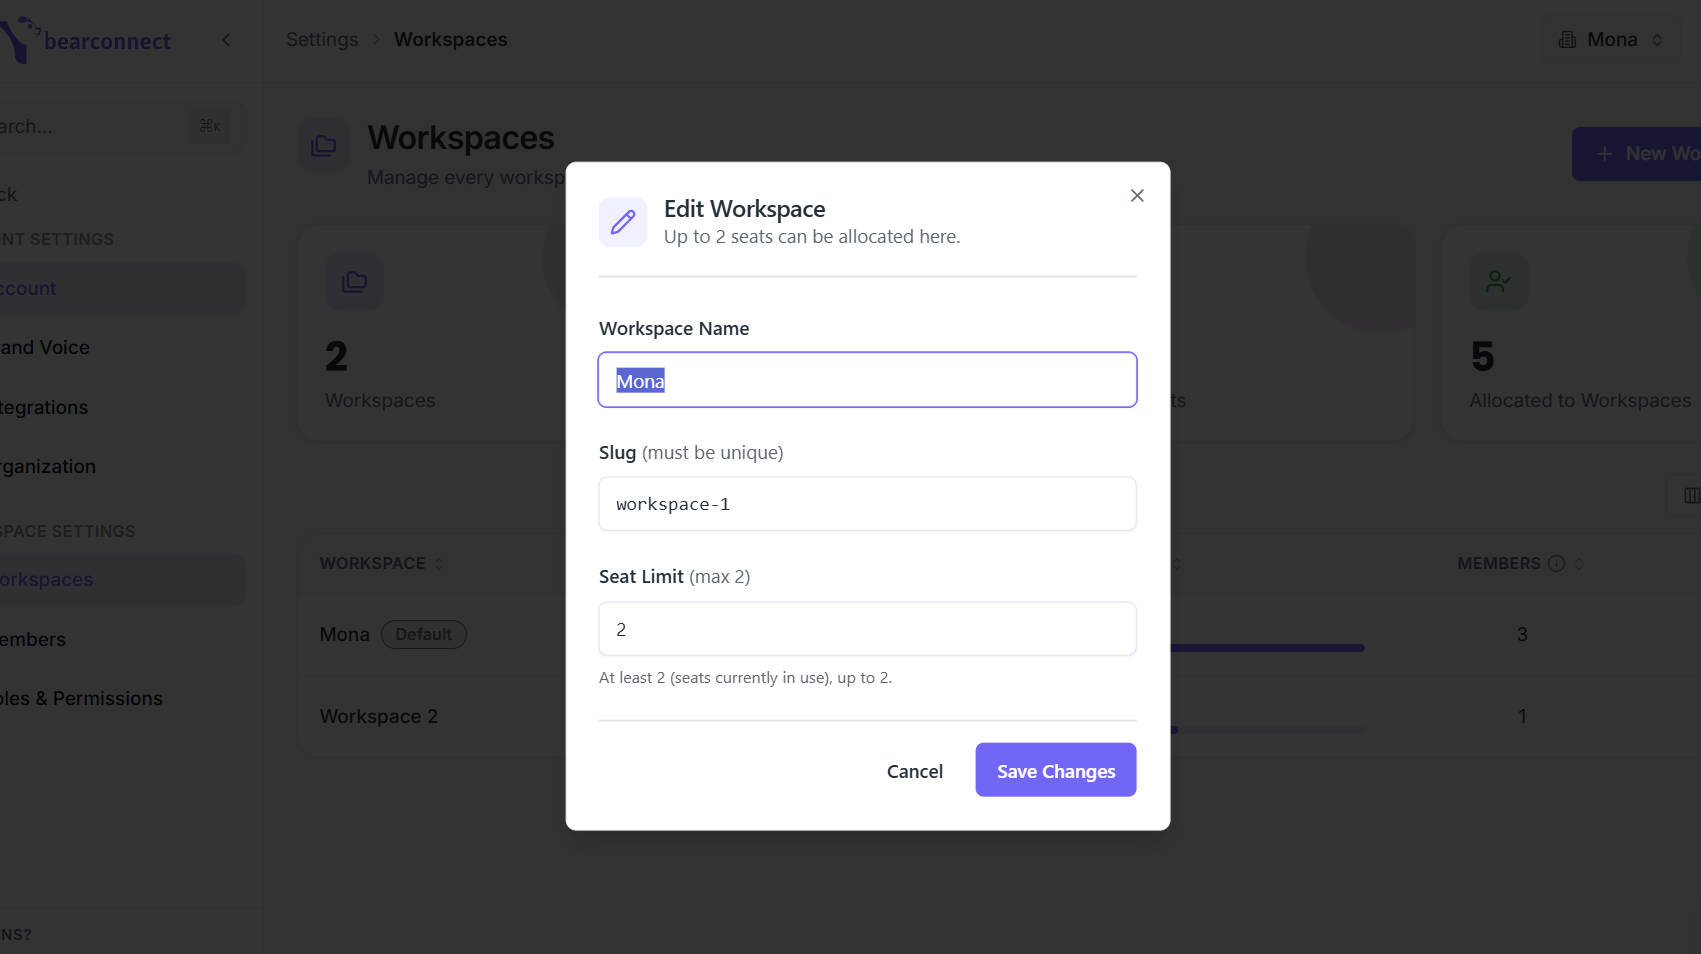
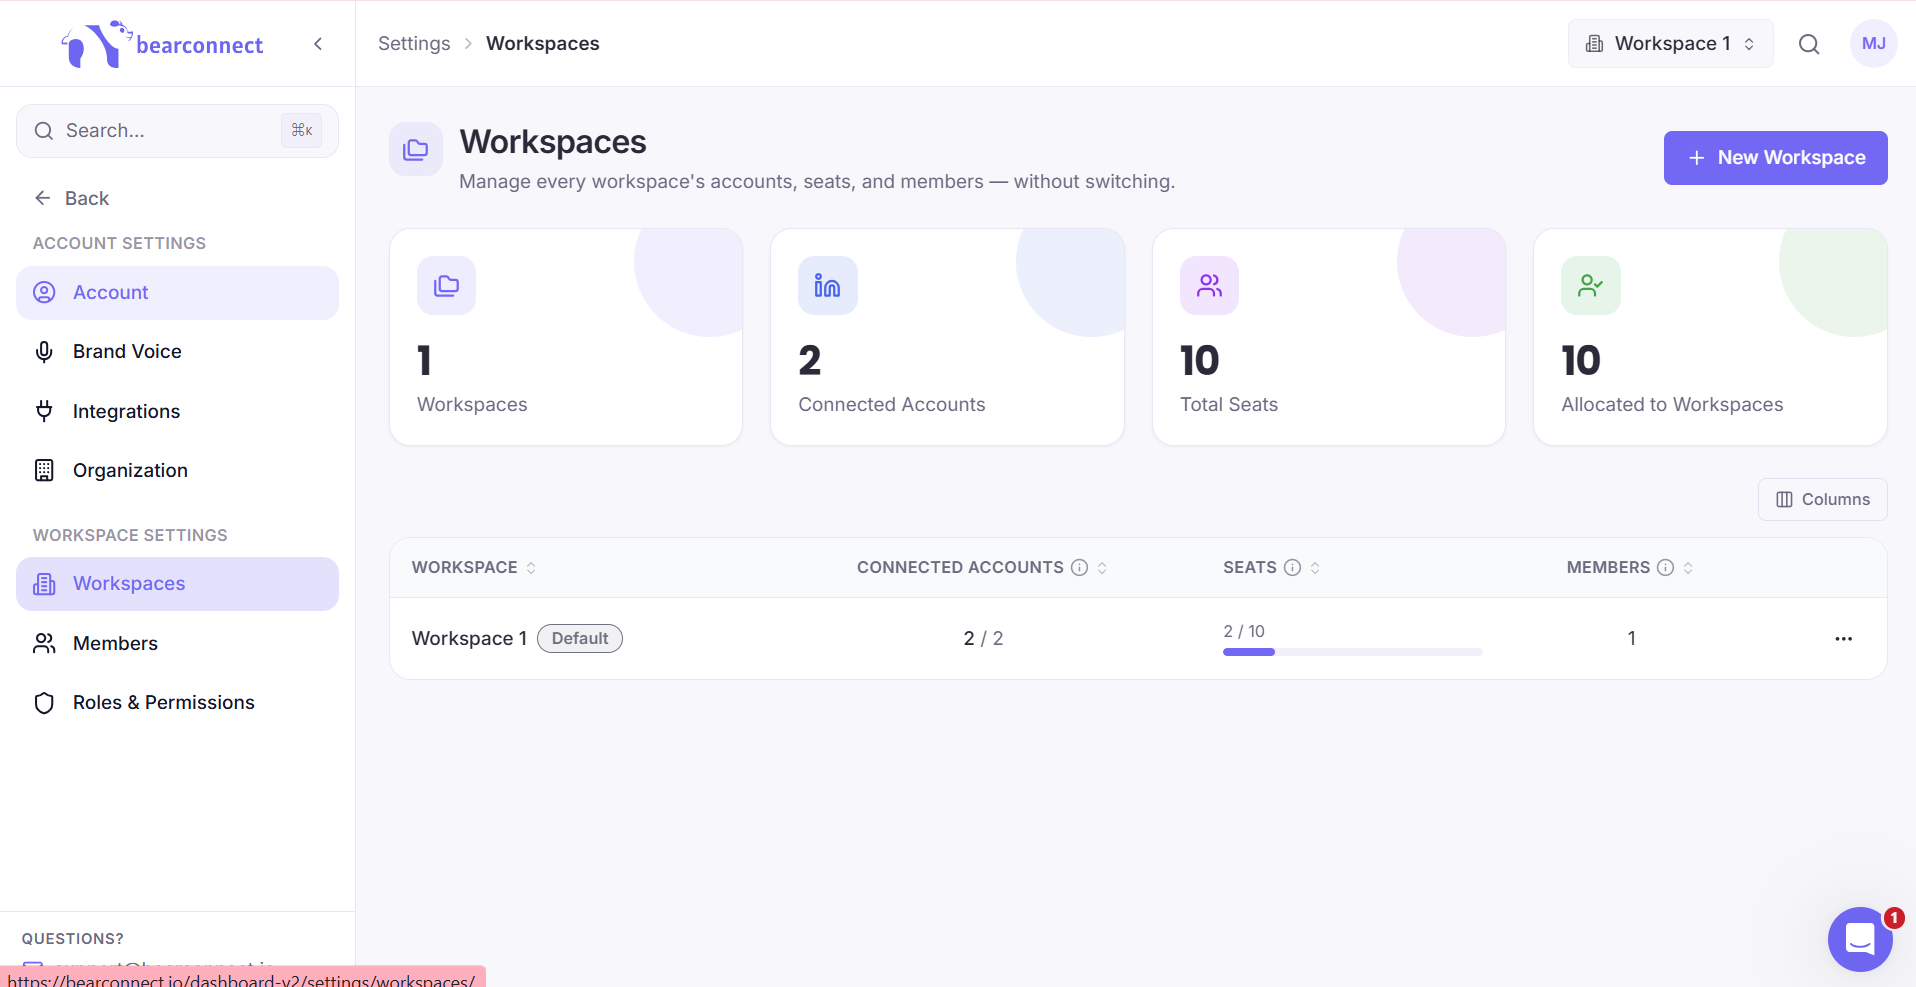
- Review the four summary cards: Workspaces, Connected Accounts, Total Seats, Allocated to Workspaces
That fourth card is the one people ignore. It is also the one that explains most "why can I not add my account" tickets.
[Screenshot slot: Settings > Workspaces overview with the four summary cards and workspace table]
Step 2: Create a new workspace
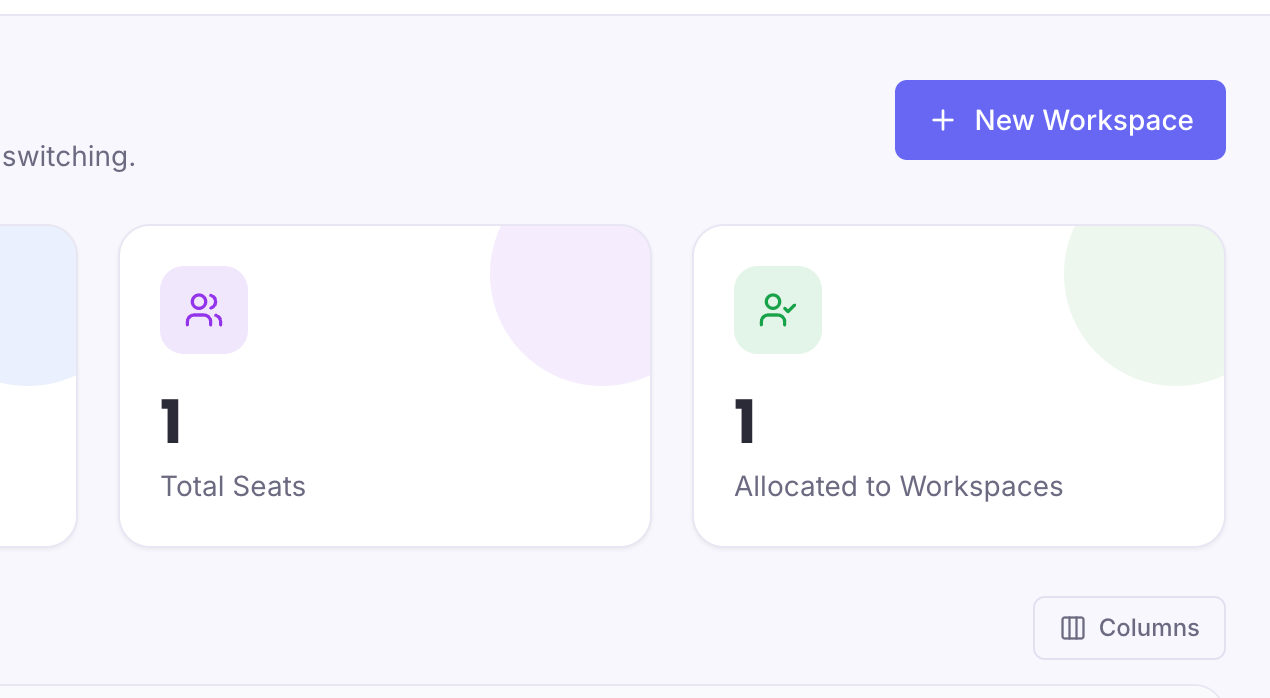
One button, one name field.
- Click + New Workspace in the top right
- Name it after the client, rep or brand it will serve
- Save
Step 3: Allocate seats to that workspace
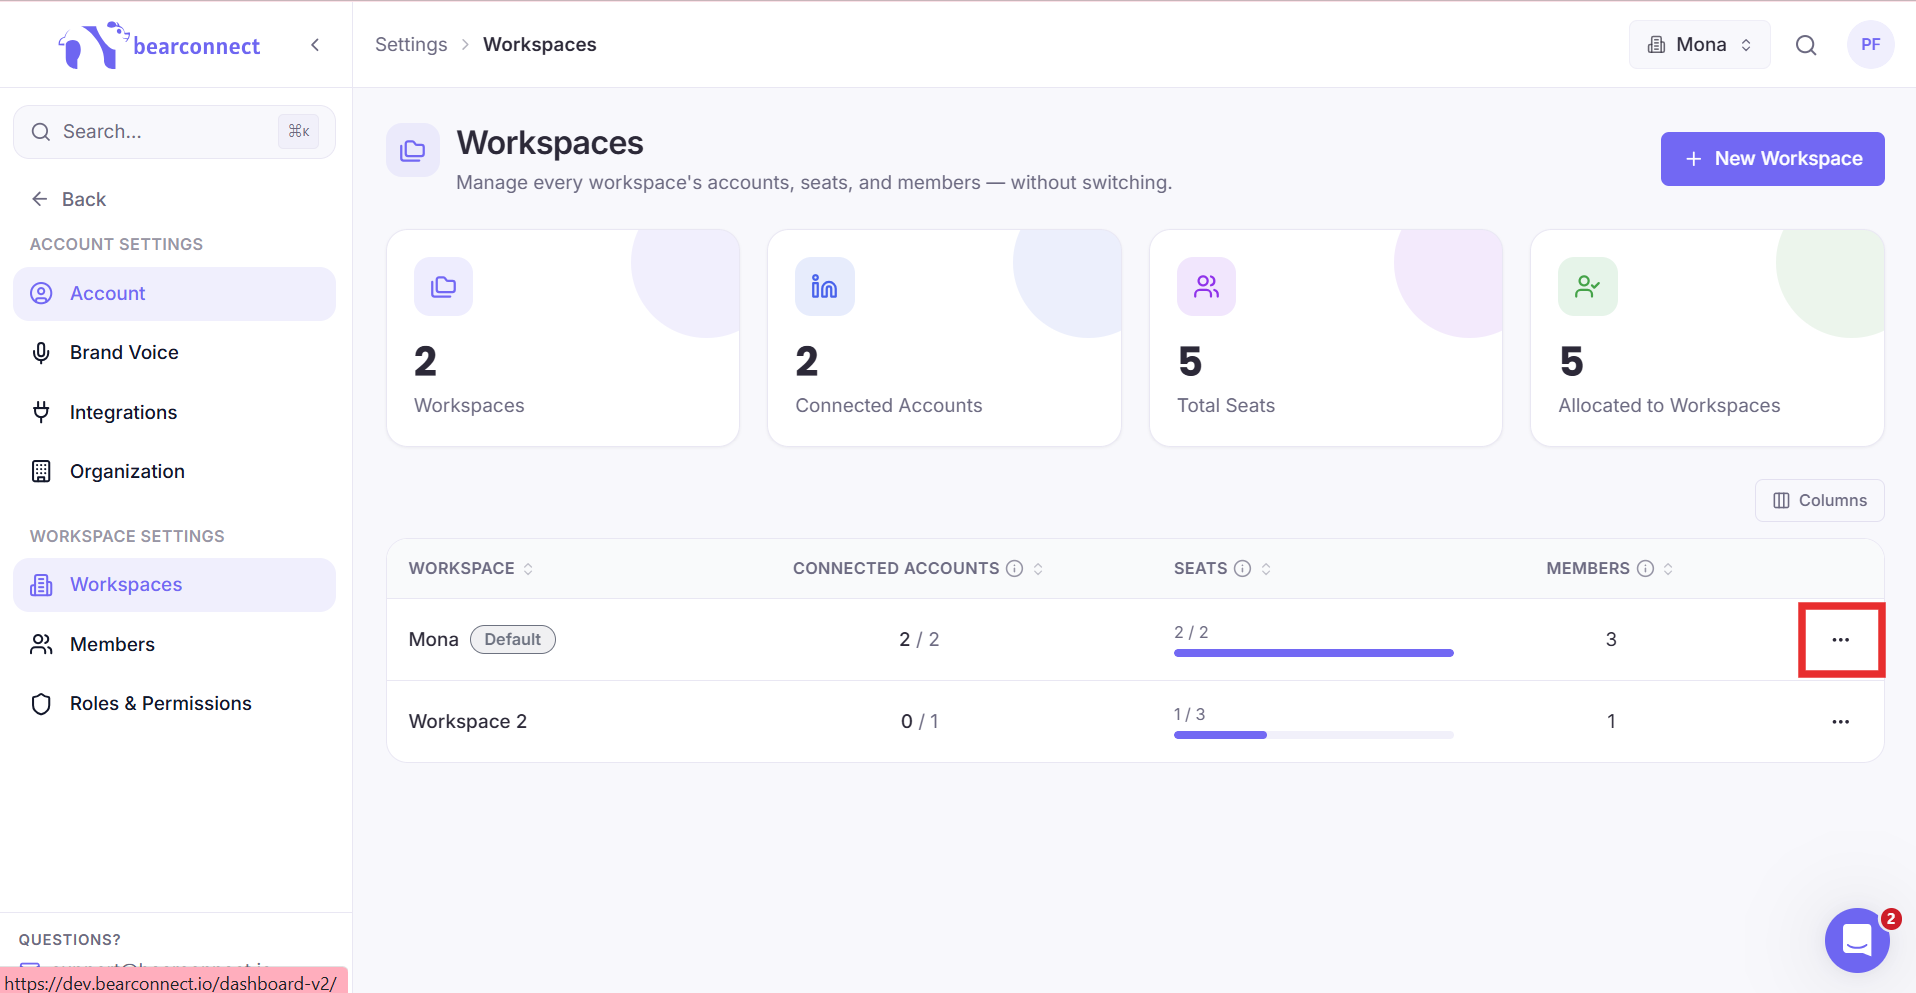
Seats are bought at the account level, then allocated to a workspace.
- Go to Purchase Seats if you need more seats
- Return to Settings > Workspaces
- Click the three dots on the workspace row, then Edit
- Allocate the number of seats that workspace needs
- Rename the workspace here too if you want
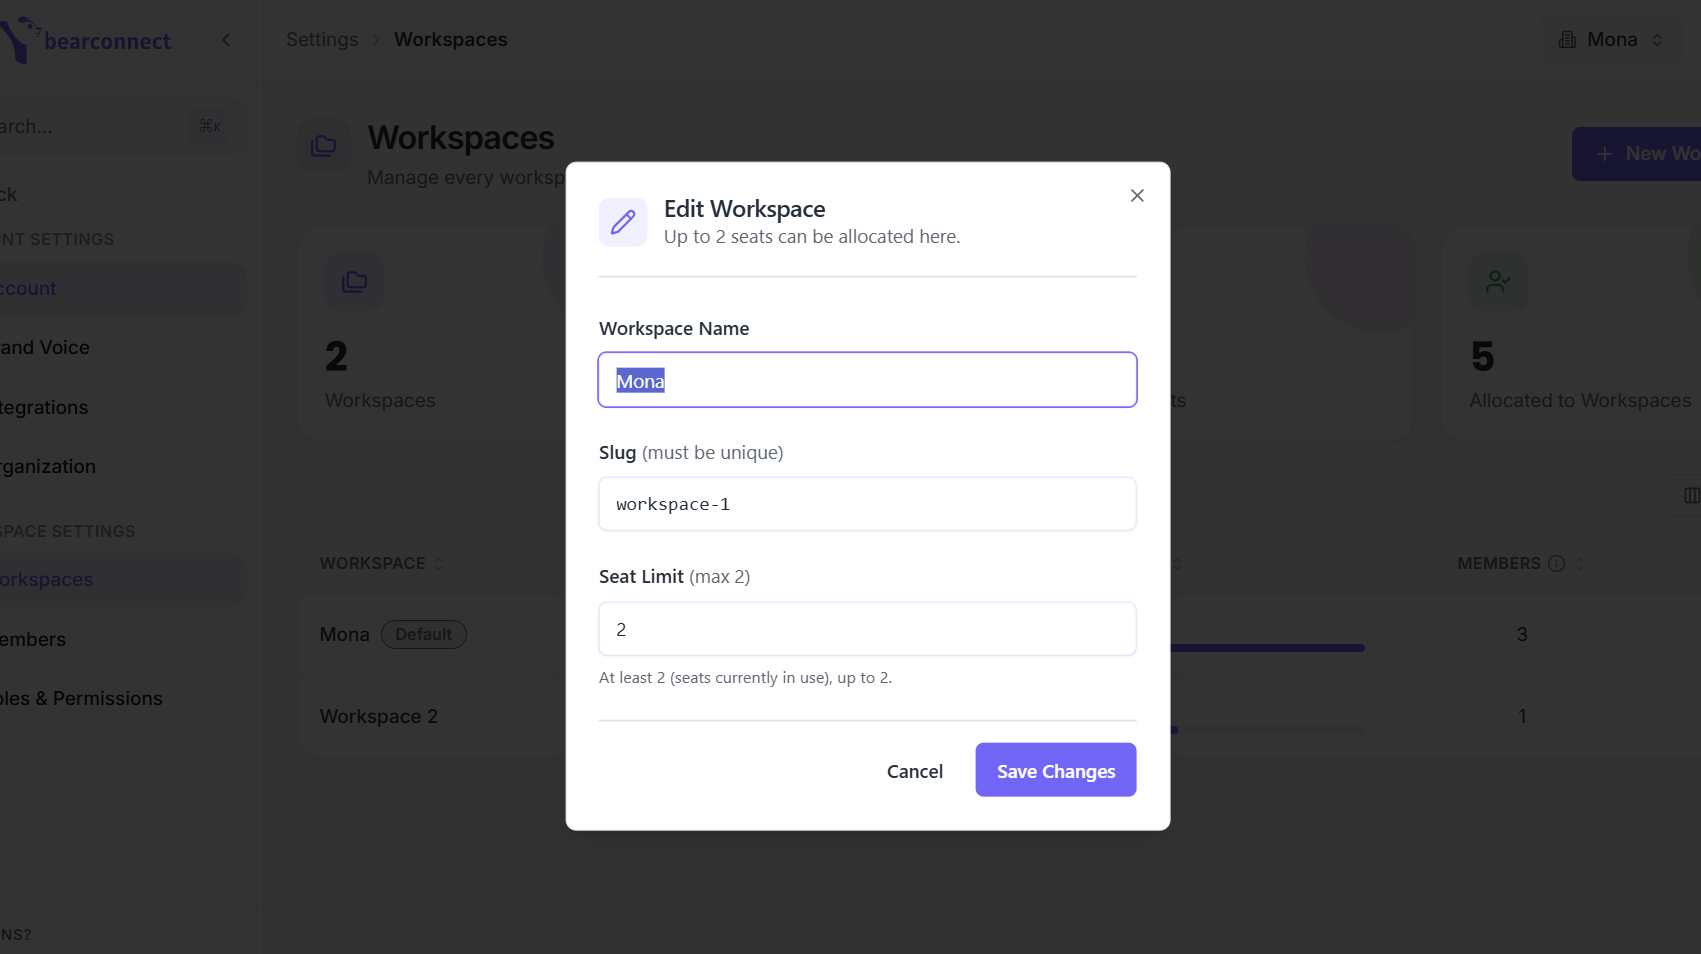
Pro tip: Allocate seats immediately after creating a workspace, because an unallocated workspace looks broken and is actually just empty.
Step 4: Connect a LinkedIn account inside the workspace
Once a seat sits in the workspace, the LinkedIn connection works normally.
- Switch into the new workspace using the top bar picker
- Go to LinkedIn > Add Account
- Connect the account the way you always have
One seat equals one connected LinkedIn account. You can connect as many accounts as you hold seats for, across as many workspaces as you like.
Step 5: Invite members and assign a role
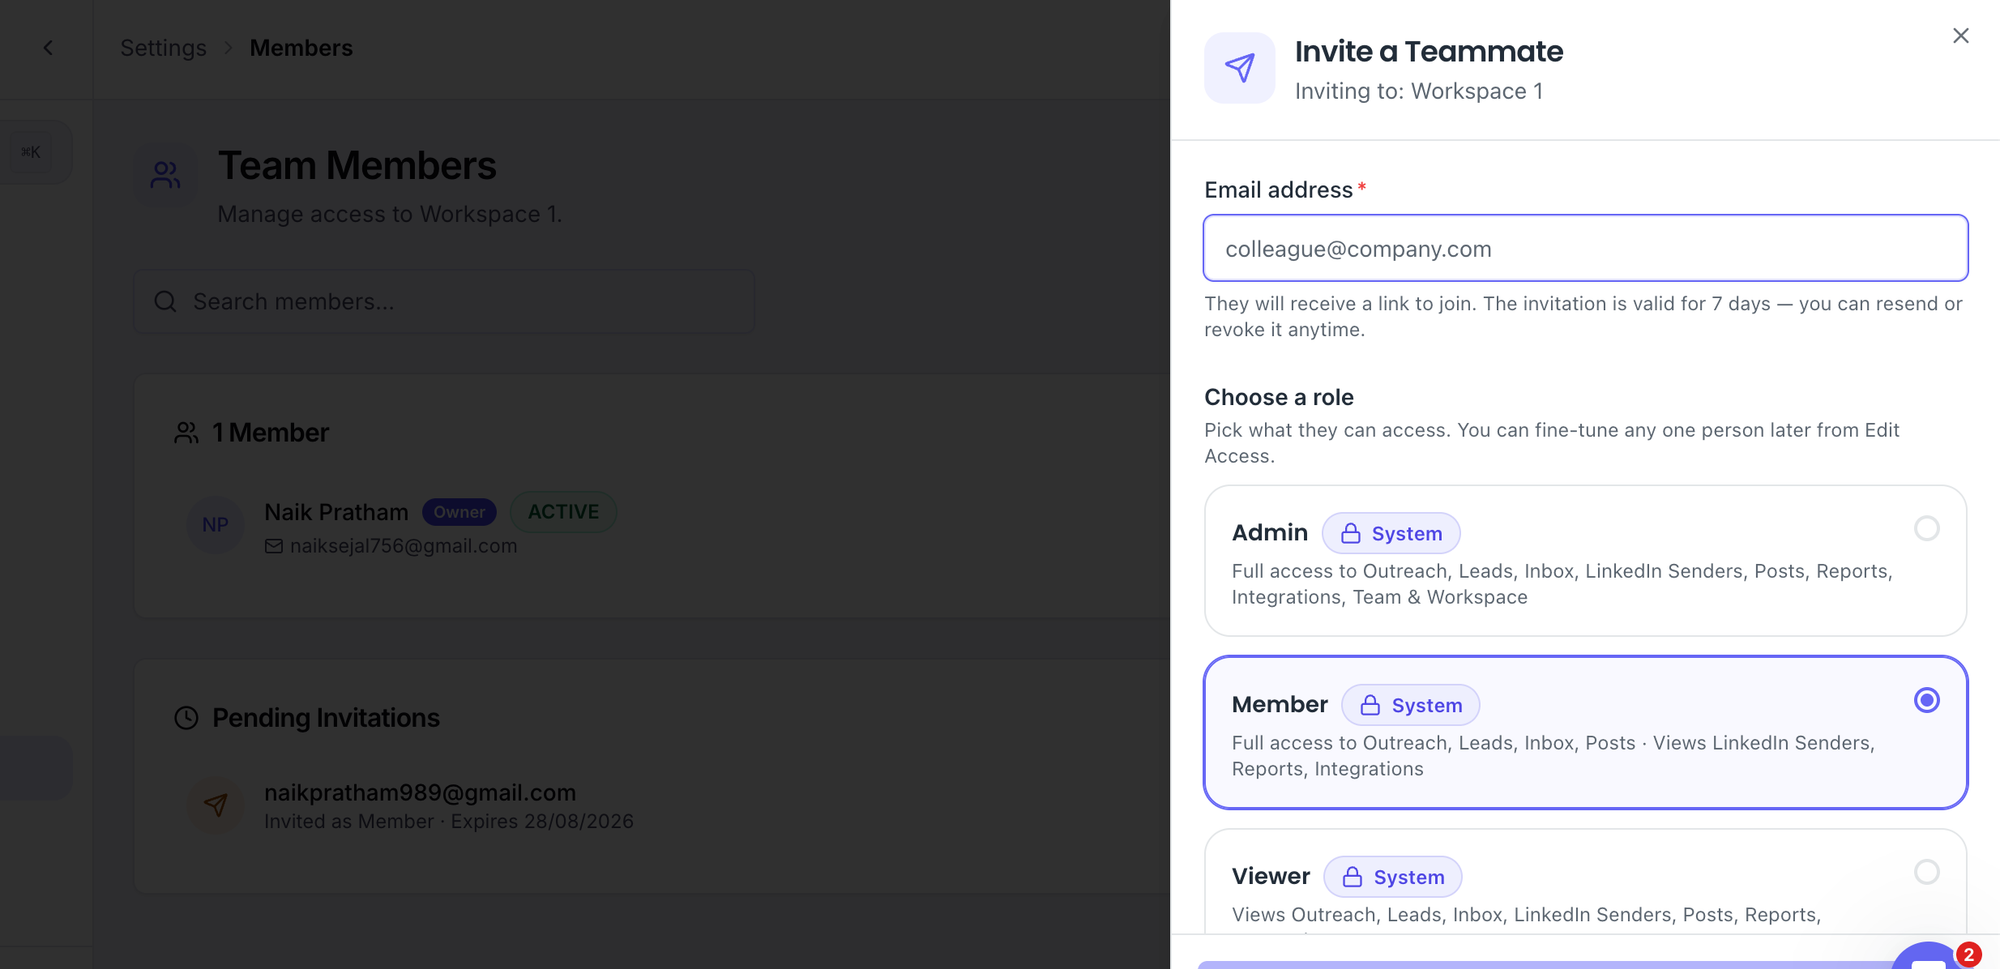
Invites go out by email, and the role decides what the person can do.
- Open Settings > Members
- Invite the person by email address
- Pick the role they should hold
- They accept from their email and appear in your member list
- Change their role later without re-inviting them
I switched a test member from Viewer to Admin mid session. Campaign creation and workspace visibility unlocked straight away.
Step 6: Switch between workspaces from the top bar
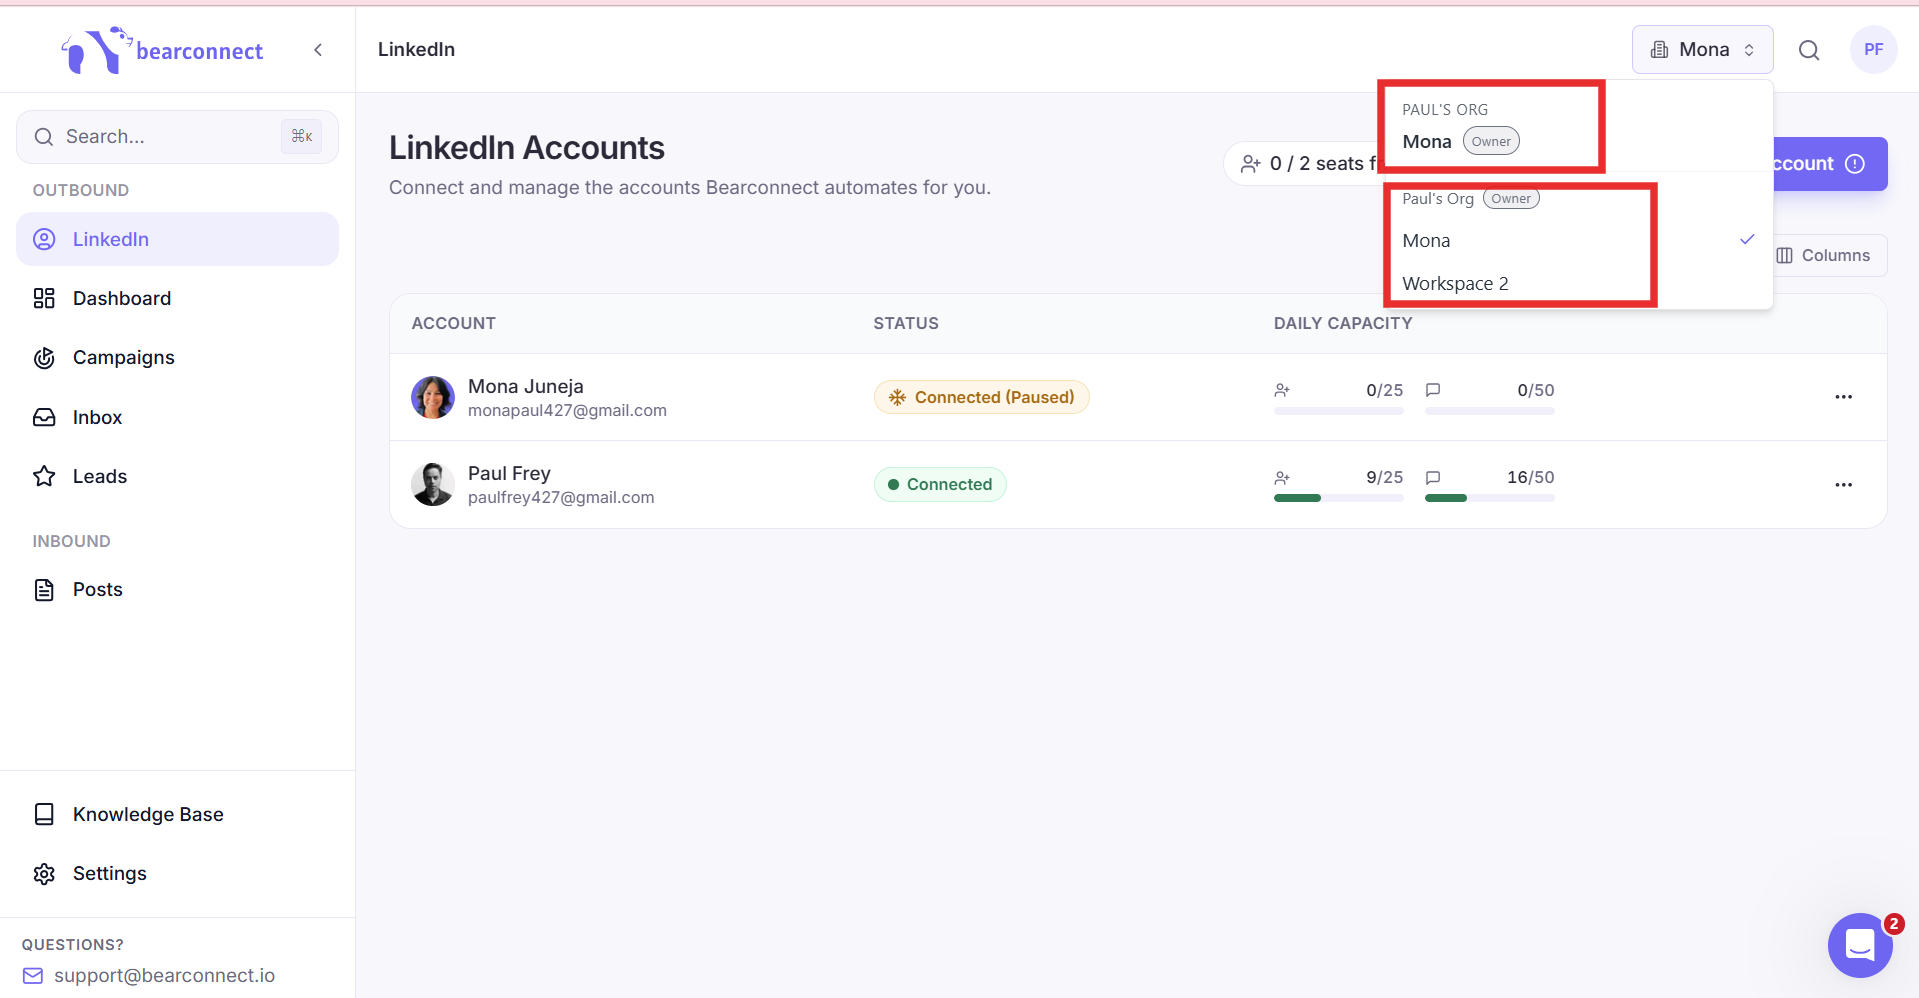
The picker in the top bar lists your organization and every workspace you can access.
- Click the workspace name next to the setup badge
- Pick the workspace you want
- A tick marks the one you are currently inside
Check that tick before you edit a campaign. Ask me how I learned that.
How Do Roles and Permissions Work Inside a Workspace?
Roles decide what each member can see and do, and they apply across your whole organization. Edit a role once and it changes access for everyone holding it, in every workspace.
Owner, Admin, Member and Viewer at a glance
| Role | What it can do | Best for |
|---|---|---|
| Owner | Full control including billing and workspace management | The account holder |
| Admin | Full access to all features, no billing control | An ops lead or agency manager |
| Member | Creates and manages campaigns, leads, inbox and posts | An SDR or VA running outreach |
| Viewer | Read only across outreach, leads, inbox, posts and reports | A client or a stakeholder |
Owner is the account holder rather than a role you assign from the role list. Member, Viewer and Admin appear as system roles you can hand out.
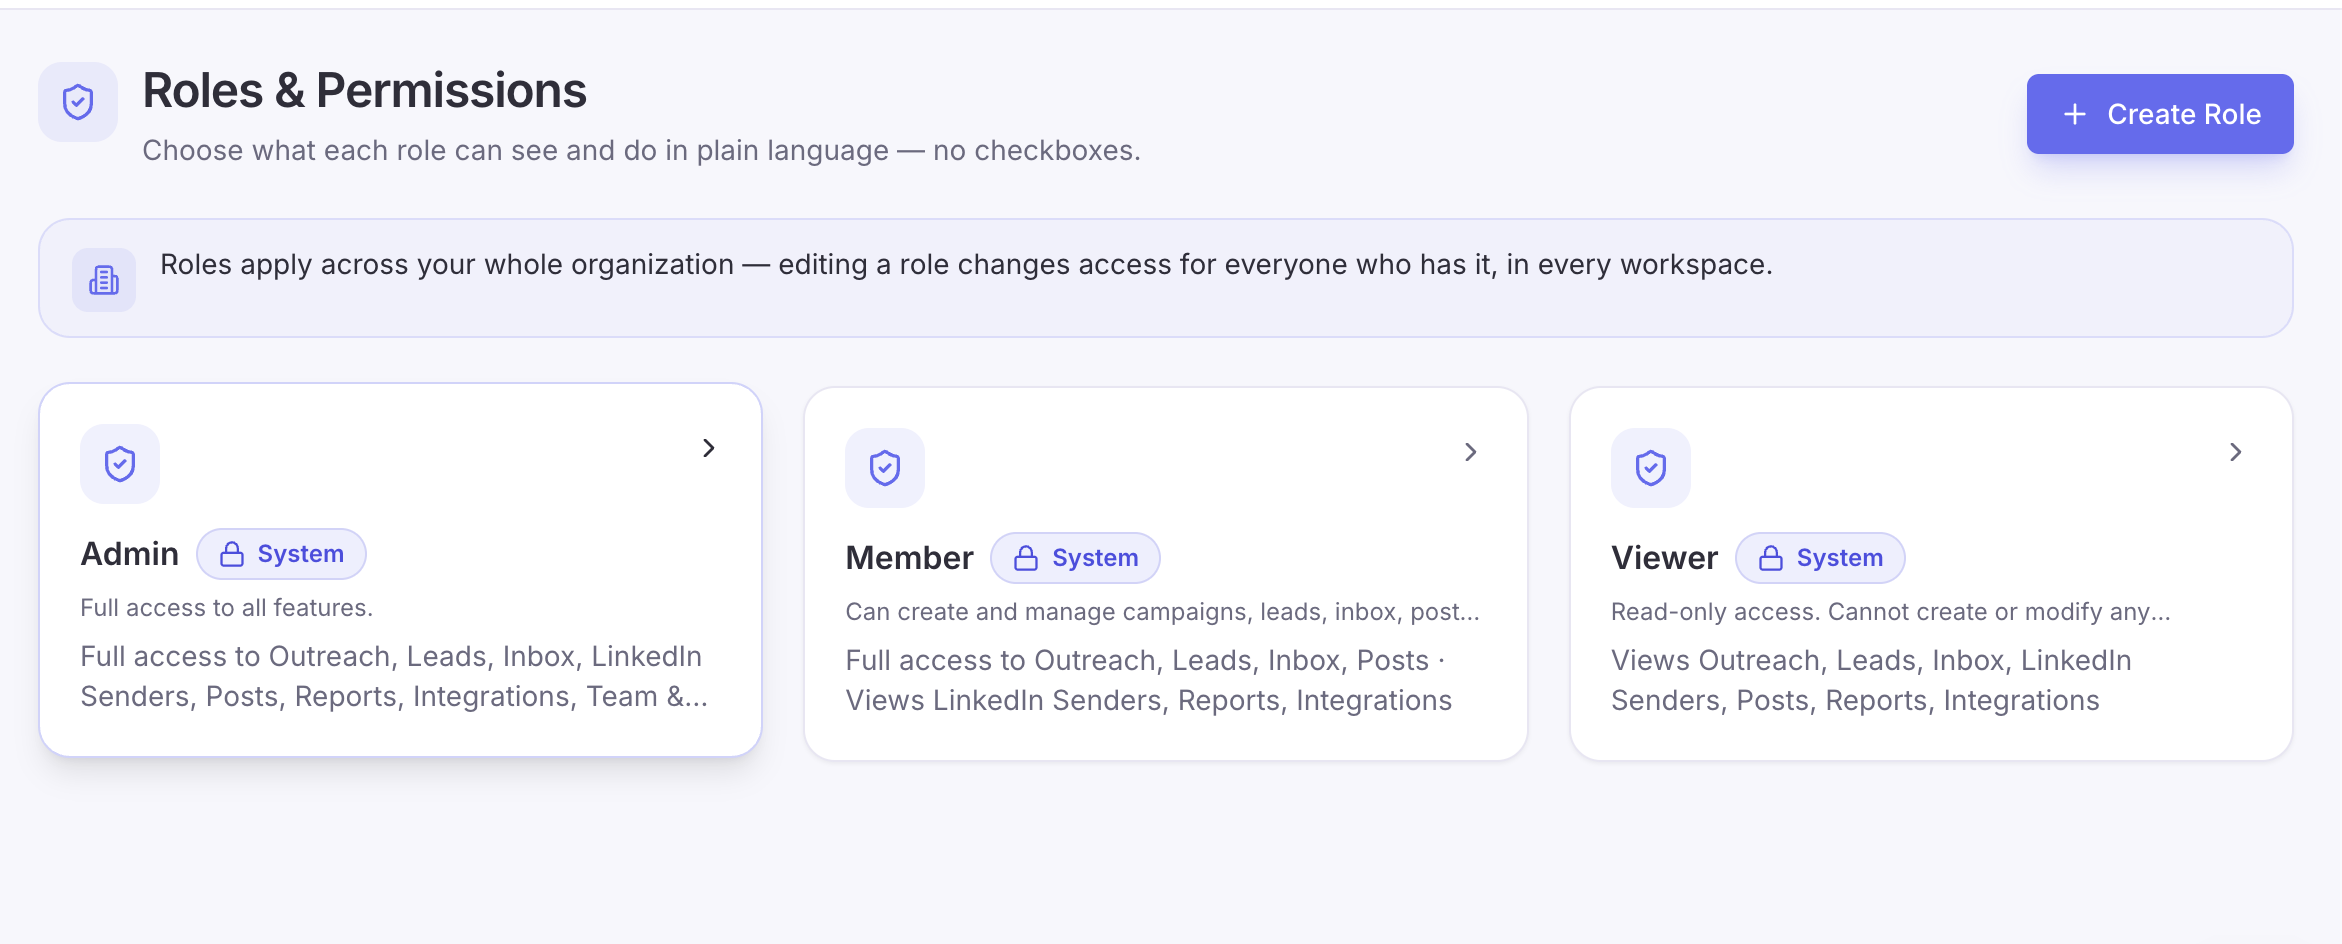
Creating a custom role for a VA or junior SDR
System roles stay locked, so you build a custom role instead of editing one.
- Click Create Role in Roles & Permissions
- Clone Member, Viewer or Admin, or start from scratch
- Choose what the role can view and what it can change
- Name it clearly, for example "SDR, no inbox"
A setup I like for freelancers: can build and launch campaigns, cannot reply in the inbox, cannot add LinkedIn accounts, never sees billing.
Giving a client view only access
Invite the client as a Viewer inside their own workspace and nothing else.
- They log in and see their campaign performance
- They cannot edit campaigns, leads or sequences
- They never see your other clients
How Do Seats Work Across Workspaces?
Seats sit in an account level pool and only work once you allocate them to a specific workspace. One seat equals one connected LinkedIn account.
Why a workspace cannot connect an account even when seats are free
Because free seats in the pool do nothing until you allocate them.
- Total Seats shows what you own
- Allocated to Workspaces shows what is actually usable
- A workspace at 0 seats blocks the Add Account flow
What happens to seats when you delete a workspace
Deleting a workspace releases its seats back to your account pool.
- Seats return to the pool for reallocation
- You can also just lower the seat count on that workspace instead of deleting it
- Campaigns and data inside a deleted workspace go with it, so export anything you need first
What workspaces cost
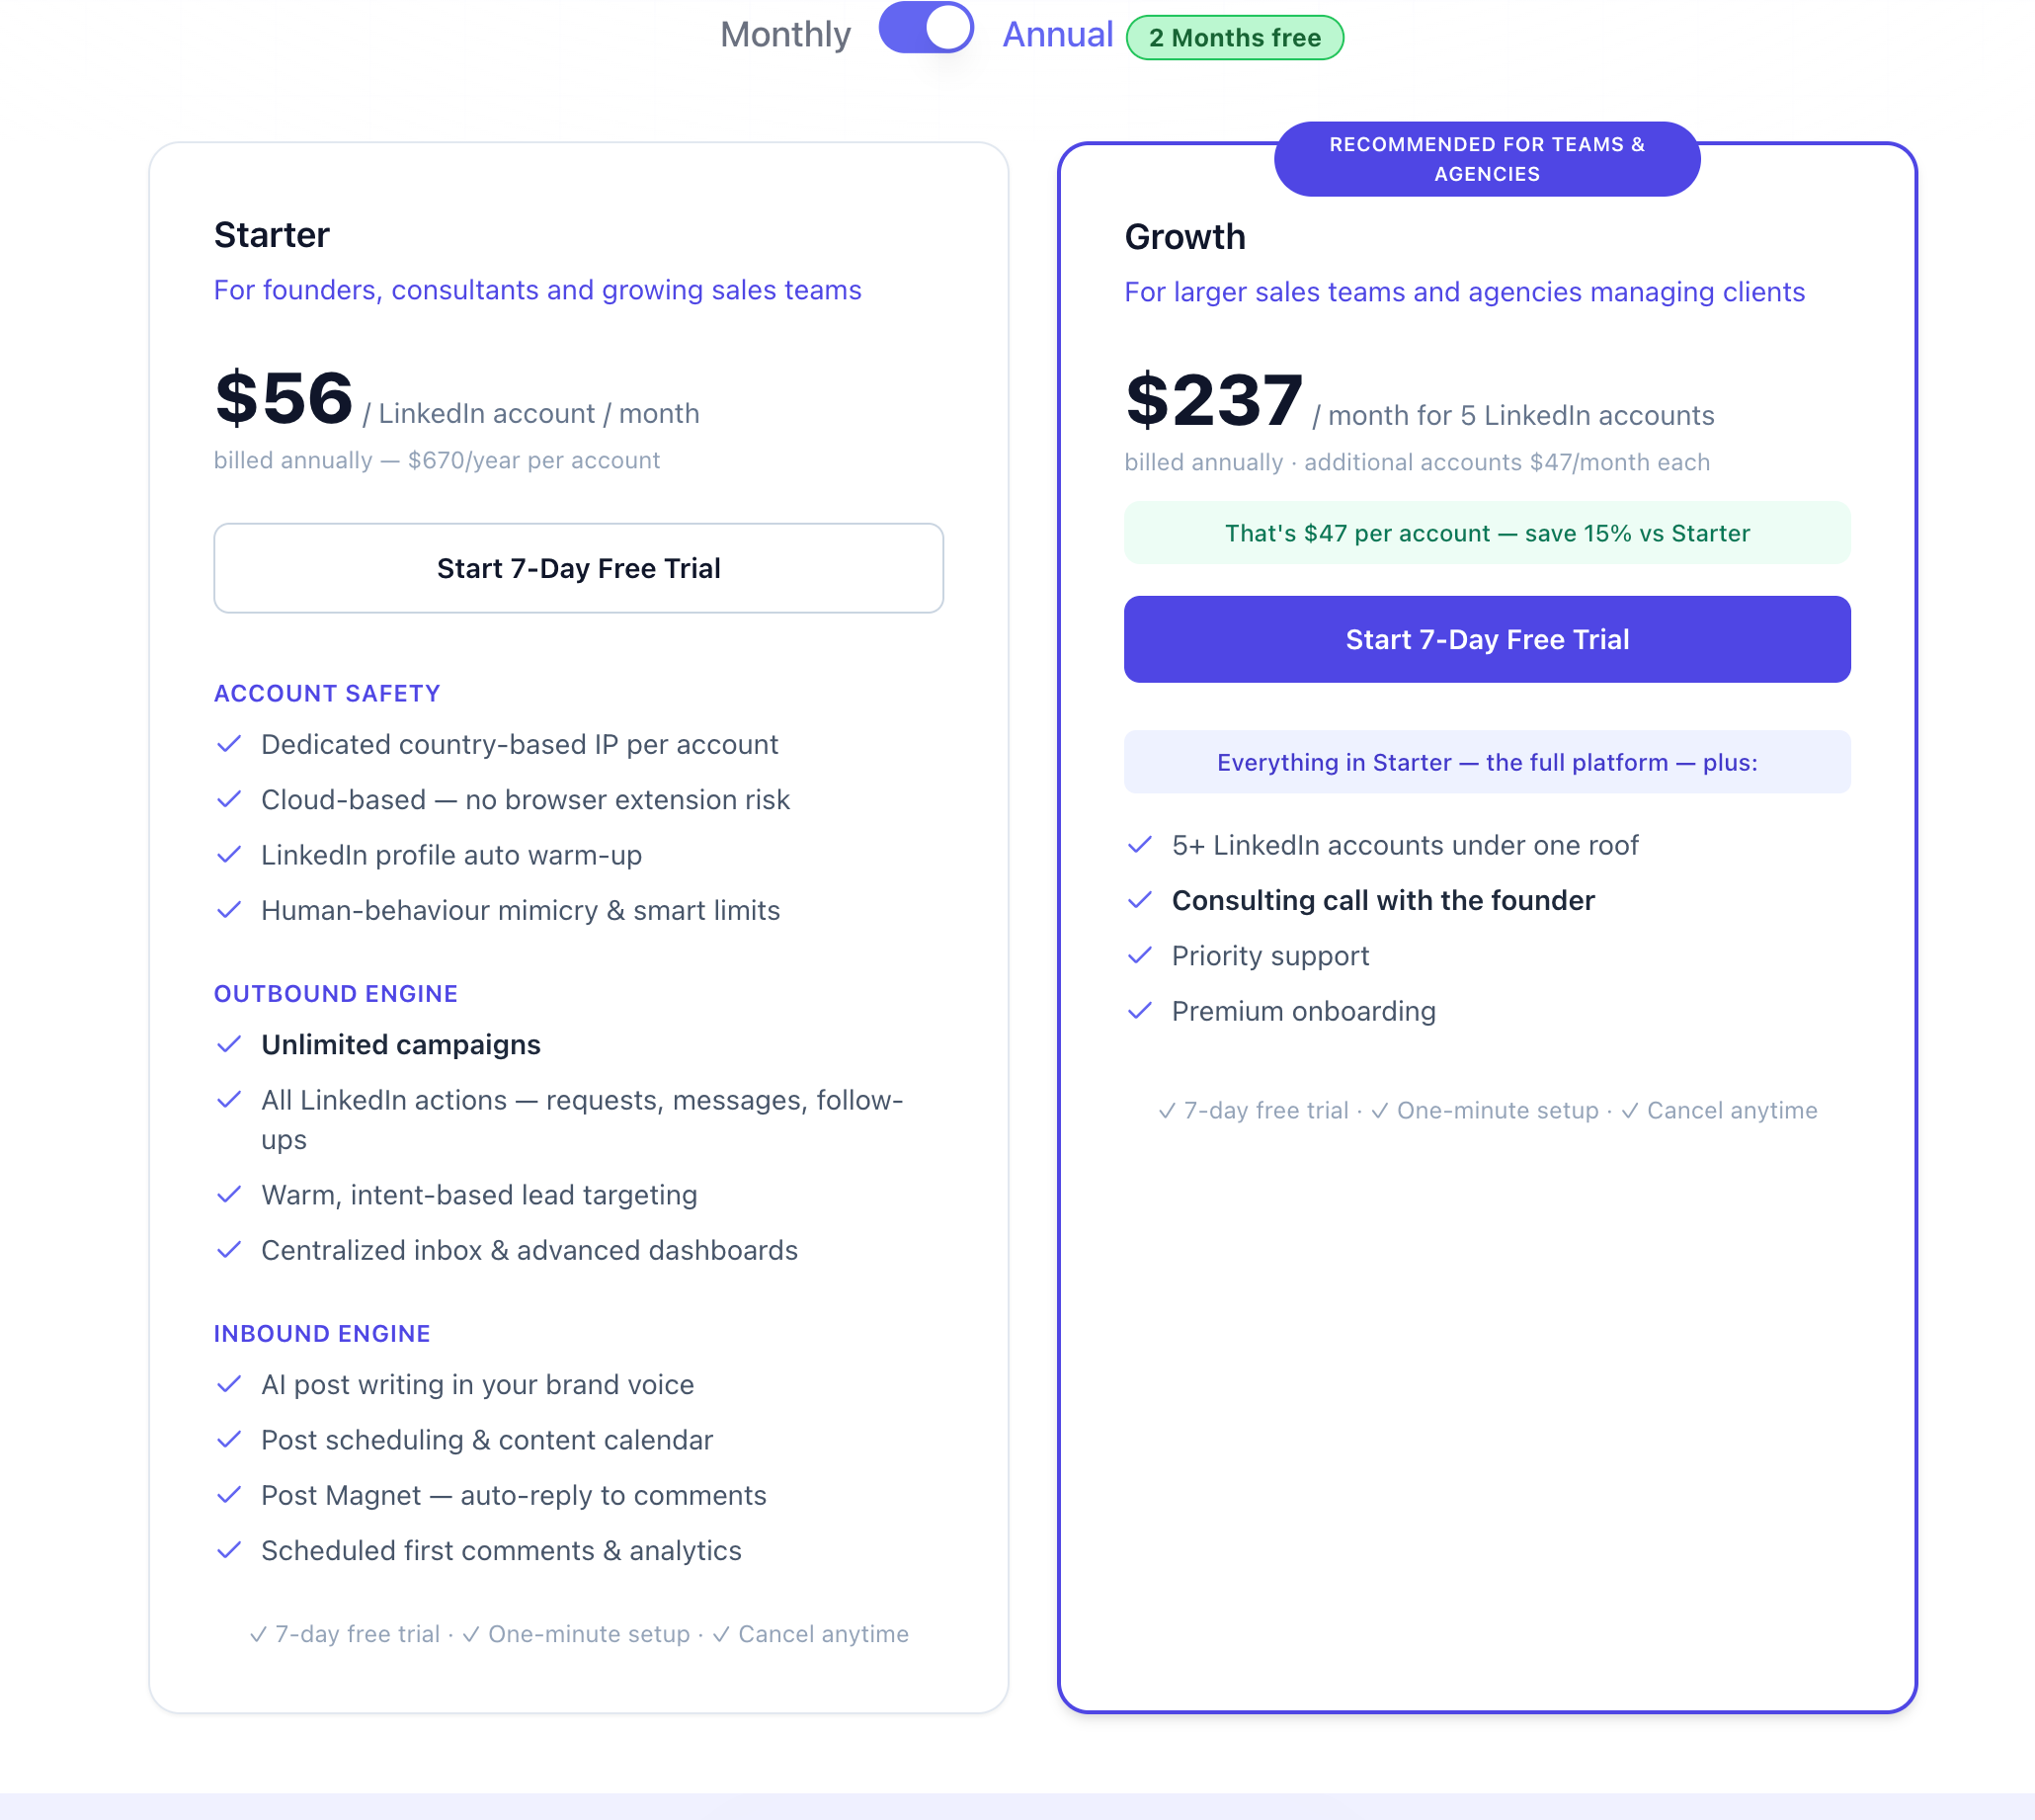
Workspaces themselves cost nothing. You pay per connected LinkedIn account, so ten workspaces with three accounts total cost the same as one workspace with three accounts.
| Plan | 1 to 4 accounts | 5+ accounts |
|---|---|---|
| Monthly | $67 per account | $57 per account |
| Annual | $56 per account | $47 per account |
- 3 accounts monthly = 3 × $67 = $201 per month
- 5 accounts monthly = 5 × $57 = $285 per month
Adding a teammate does not raise the bill. Accounts drive pricing, headcount does not. Full details sit on the pricing page.
Wait, You Might Be Thinking: Is This Just Extra Setup Work?
Fair objection, and the honest answer is that it is optional work with a short payback.
If you run one account alone, skip it entirely. The moment a second account or a second person appears, five minutes of setup replaces a recurring weekly cleanup.
How to Structure Workspaces for Your Business Type
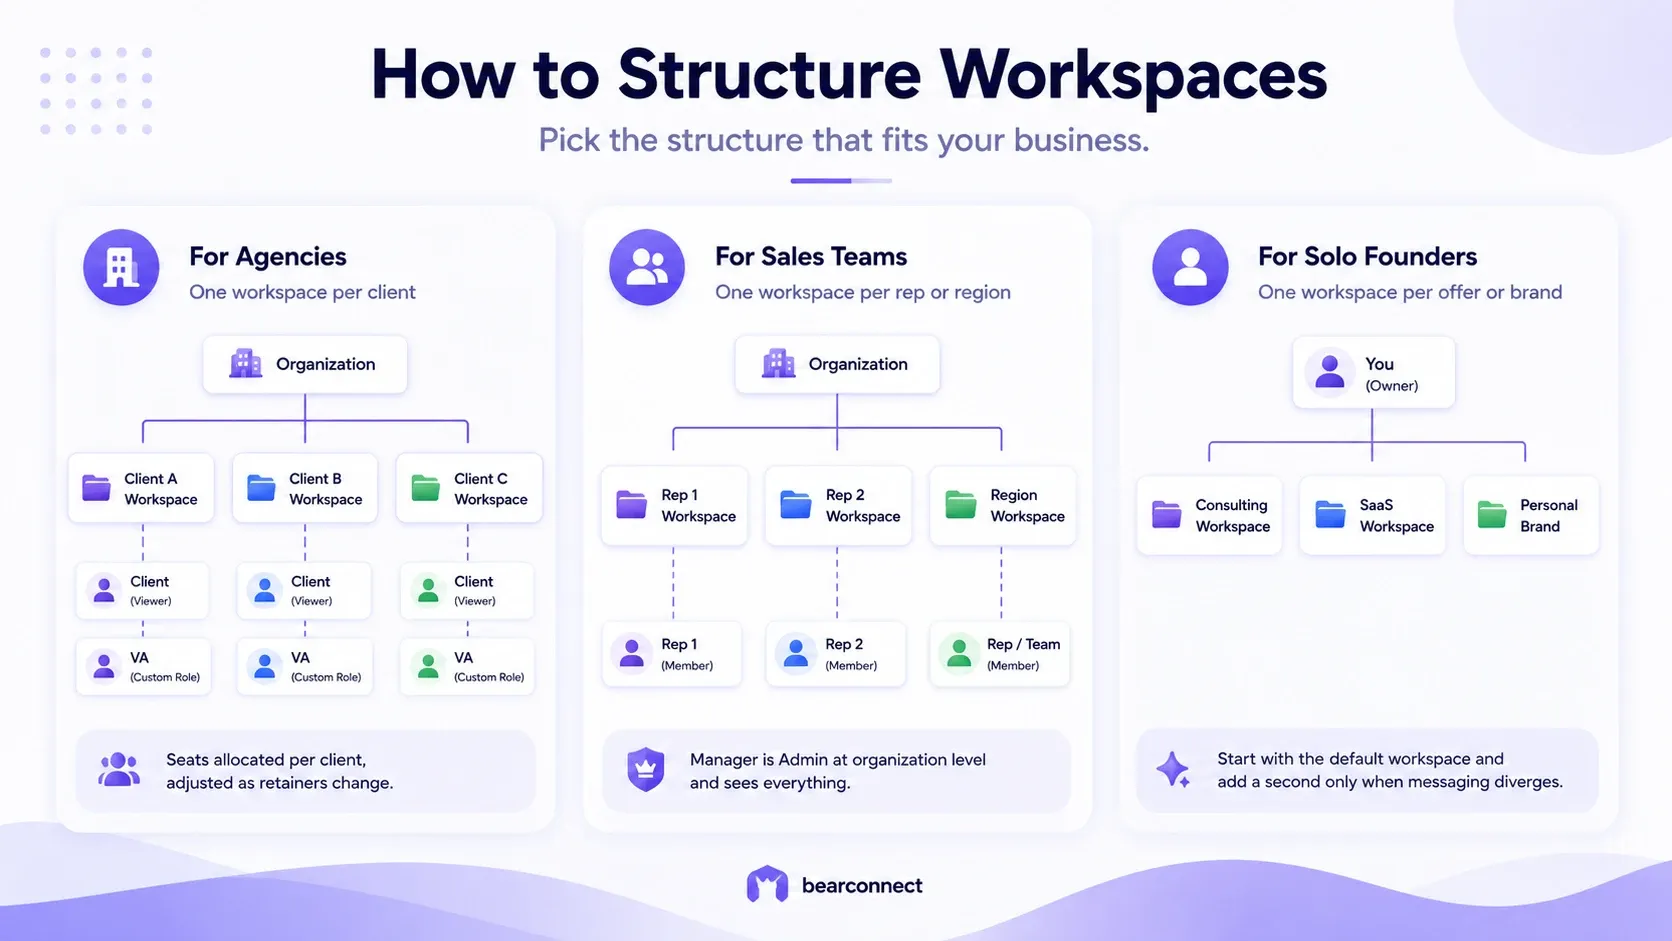
Copy one of these three structures instead of inventing your own. I have watched all three work in practice.
For agencies: one workspace per client
- One workspace per client account, named after the client
- Client invited as Viewer in their own workspace
- Your VA invited as a custom role with no billing access
- Seats allocated per client, adjusted as retainers change
This is the structure most LinkedIn automation agencies land on after a month of trying alternatives.
For sales teams: one workspace per rep or per region
- One workspace per rep keeps pipelines private between reps
- One workspace per region works better when reps share territories
- Manager holds Admin at organization level and sees everything
- Each rep holds Member inside their own workspace only
For solo founders: one workspace per offer or brand
- Separate workspaces for separate offers, for example consulting and SaaS
- Separate workspaces for personal brand versus company outreach
- Start with the default workspace and add a second only when messaging diverges
What Happens to Your Existing Data When You Upgrade to v2?
Nothing breaks. Bearconnect places you in an organization with one default workspace and moves your existing seats, accounts and campaigns into it automatically.
- Your campaigns keep running
- Your connected accounts stay connected
- Your seats appear inside the default workspace
- The workspace marked "Default" in the table is yours
Log in, look around, carry on. Then build structure when you need it.
Common Workspace Setup Mistakes to Avoid
Four mistakes account for nearly every workspace support ticket I have seen.
- Buying seats and forgetting to allocate them. The account looks paid for and the workspace still refuses to connect.
- Running every client from one workspace. You keep the mixed inbox problem and lose the reason you upgraded.
- Giving everyone Admin. Admin reaches everything except billing, which is more access than a freelancer needs.
- Editing campaigns in the wrong workspace. Check the top bar picker first, especially after switching clients.
Workspace Troubleshooting: Quick Fixes
| Problem | Cause | Fix |
|---|---|---|
| Cannot add a LinkedIn account | Workspace has 0 seats allocated | Settings > Workspaces > three dots > Edit > allocate a seat |
| Member cannot see the workspace | Invite not accepted, or role lacks access | Check Members for pending status, then confirm the role |
| Editing the wrong campaigns | You are inside the wrong workspace | Switch with the top bar picker and look for the tick |
| Need to free up seats | Seats locked to an unused workspace | Lower the seat count, or delete that workspace |
| Client sees too much | Role too broad | Move them to Viewer inside their workspace only |
Workspace Best Practices I Would Follow From Day One
Set the structure up before you need it, because renaming and re allocating later is slower than starting clean.
- Name workspaces after clients, reps or brands, never numbers
- Allocate seats the same minute you create a workspace
- Default new people to Member or a custom role, never Admin
- Invite clients as Viewers instead of emailing PDF reports
- Review members quarterly and remove anyone who left
Pro tip: Create one workspace per client even as a solo operator, because nothing needs rebuilding on the day you hire.
FAQ: Bearconnect Workspace Questions Answered
Do I have to create a workspace in v2?
No. You already have an organization and one default workspace with your existing seats inside it. Create more only when you add clients, brands or teammates.
How many workspaces can I create?
Create as many as your workflow needs, since workspaces are free. Your only real limit is seats, because each connected LinkedIn account needs one allocated seat.
Why can I not connect a LinkedIn account to my new workspace?
That workspace has zero seats allocated. Open Settings > Workspaces, click the three dots, choose Edit, and allocate at least one seat.
Can a member see my other workspaces?
Only if you give them access to those workspaces. A member invited to one workspace sees that workspace, and a Viewer role keeps them read only inside it.
Does adding a workspace cost extra?
No. Pricing runs per connected LinkedIn account, so 5 accounts on monthly = 5 × $57 = $285 per month whether they sit in one workspace or five.
Key Takeaways
- Workspaces split your account into separate environments, each with its own LinkedIn account, campaigns and inbox
- The click path is Settings > Workspaces > + New Workspace > Edit to allocate seats > LinkedIn > Add Account > Members to invite
- A workspace with zero allocated seats cannot connect an account, and that single rule explains most setup problems
- Workspaces cost nothing extra, since pricing runs per connected LinkedIn account
Ready to Transform Your LinkedIn Strategy?
Join thousands of professionals already using Bearconnect to automate their outreach and grow their network.
7-day free trial • Cancel anytime
Related Articles

LinkedIn Automation: The Complete Guide for 2026
What LinkedIn automation is, how it works, what LinkedIn allows, safe limits, how to choose a tool and how to run your first campaign.
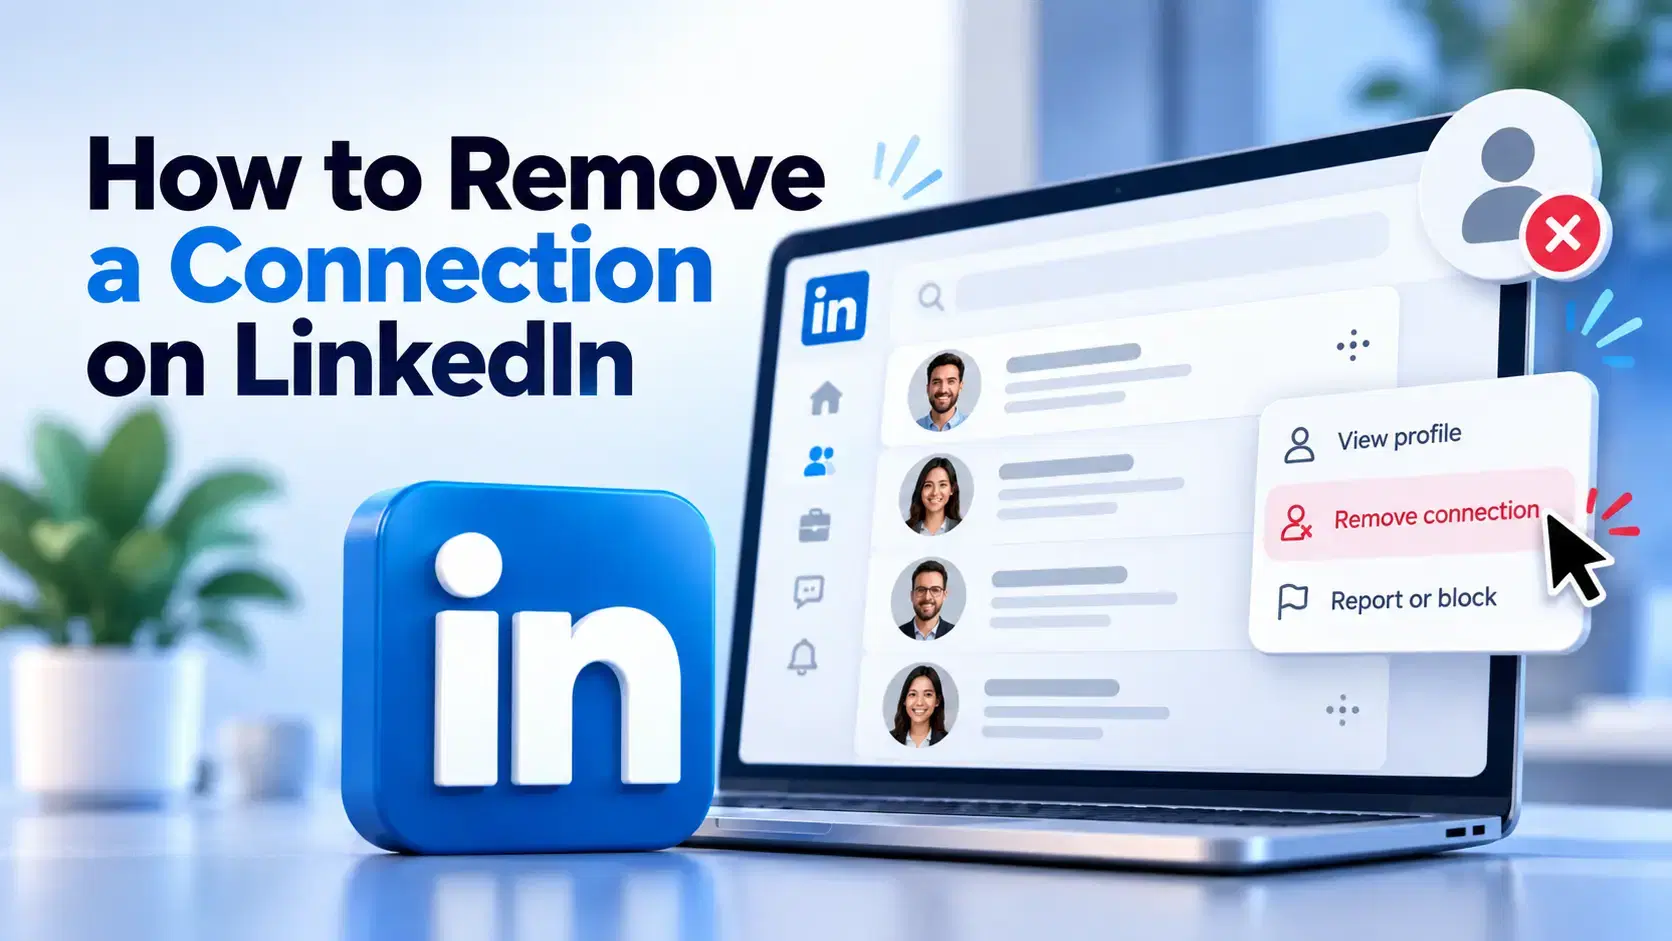
How to Remove a Connection on LinkedIn (Do They Get Notified?)
Removing a LinkedIn connection takes a few clicks, but most people want to know one thing first: does the other person get notified? This guide covers the steps on desktop and mobile, and what changes afterward.
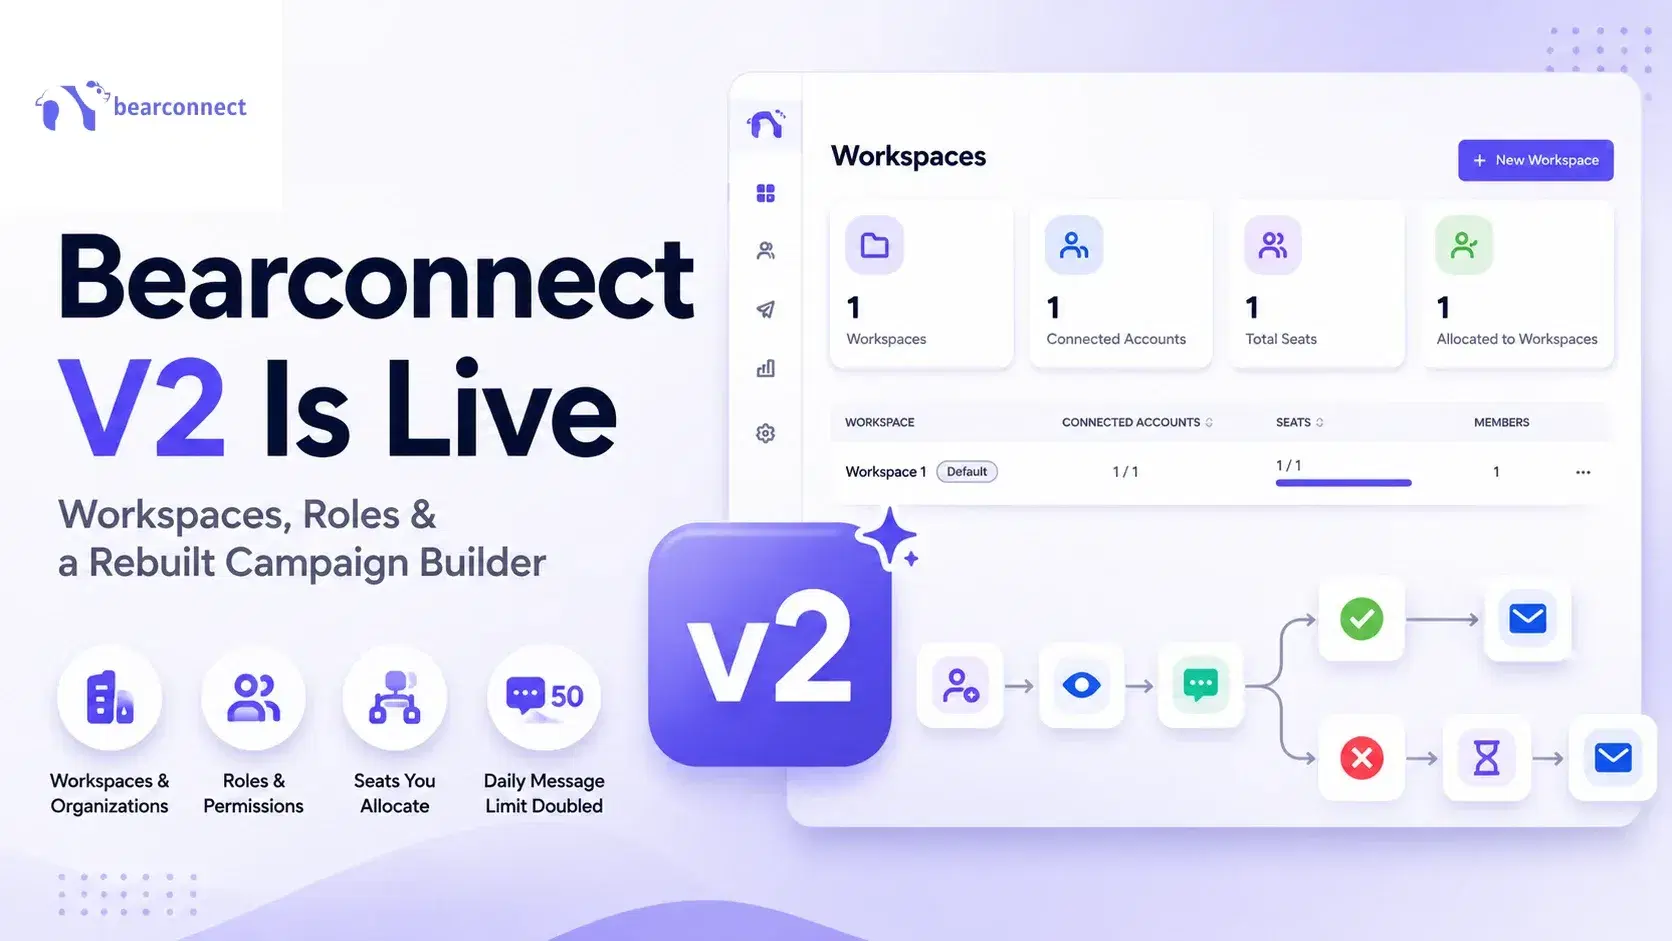
Bearconnect V2 Is Live: Workspaces, Roles and a Rebuilt Campaign Builder
Bearconnect V2 introduces dedicated workspaces, flexible roles, and a rebuilt campaign builder, giving agencies and sales teams more control over every LinkedIn account they manage.