Bearconnect User Roles Explained: Owner, Admin, Member, Viewer, and custom roles
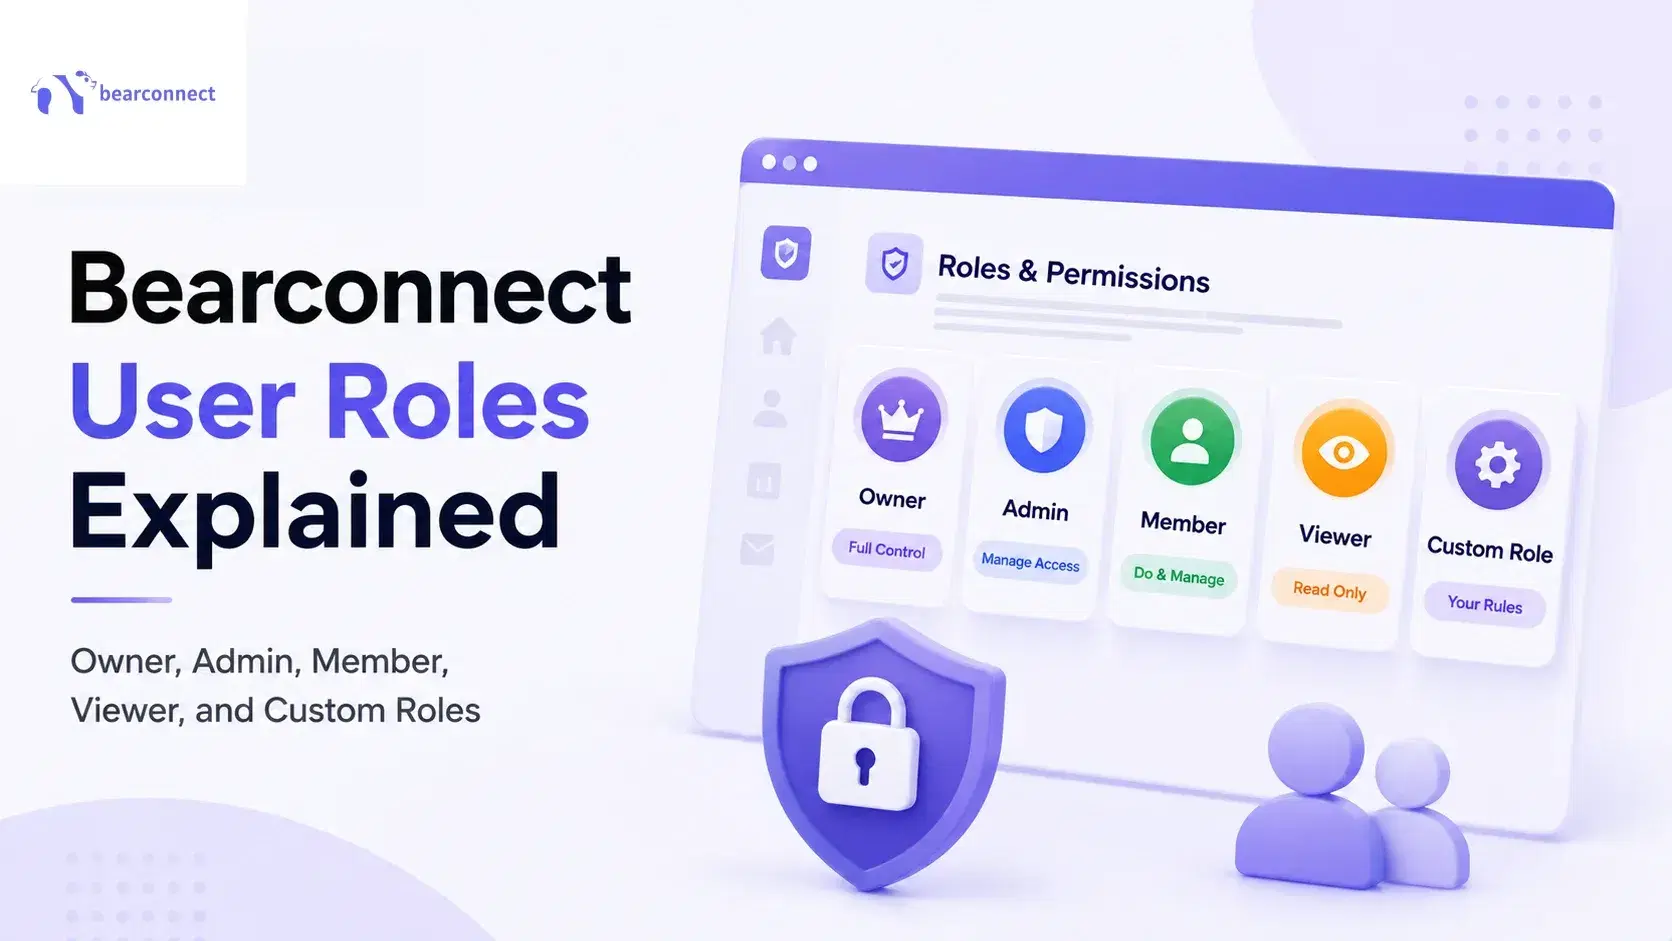
Roles and permissions in Bearconnect work through four built-in roles, Owner, Admin, Member and Viewer, plus custom roles you build yourself when those four do not match how your team actually works.
You pick the role first, invite the person by email second, and change that role later in one click without ever re-sending an invite.
Ever handed your LinkedIn password to a virtual assistant and then slept well that night?
Me neither. Here is why.
I have run outreach across client accounts long enough to know exactly where the fear sits. It is never "can they send messages."
It is "can they see my invoices, my other clients, and my inbox." This guide answers that in the order you actually worry about it.
TL;DR: The Four Roles in One Line Each
- → Owner = full access including billing, and it is you, the person who created the account
- → Admin = everything an Owner can do except see billing
- → Member = adds LinkedIn accounts and builds campaigns, but cannot manage workspaces or billing
- → Viewer = looks, reports, and touches nothing
- → Custom role = you decide each permission, and you can name it after the person using it
What Are the Four Built-In Bearconnect User Roles?
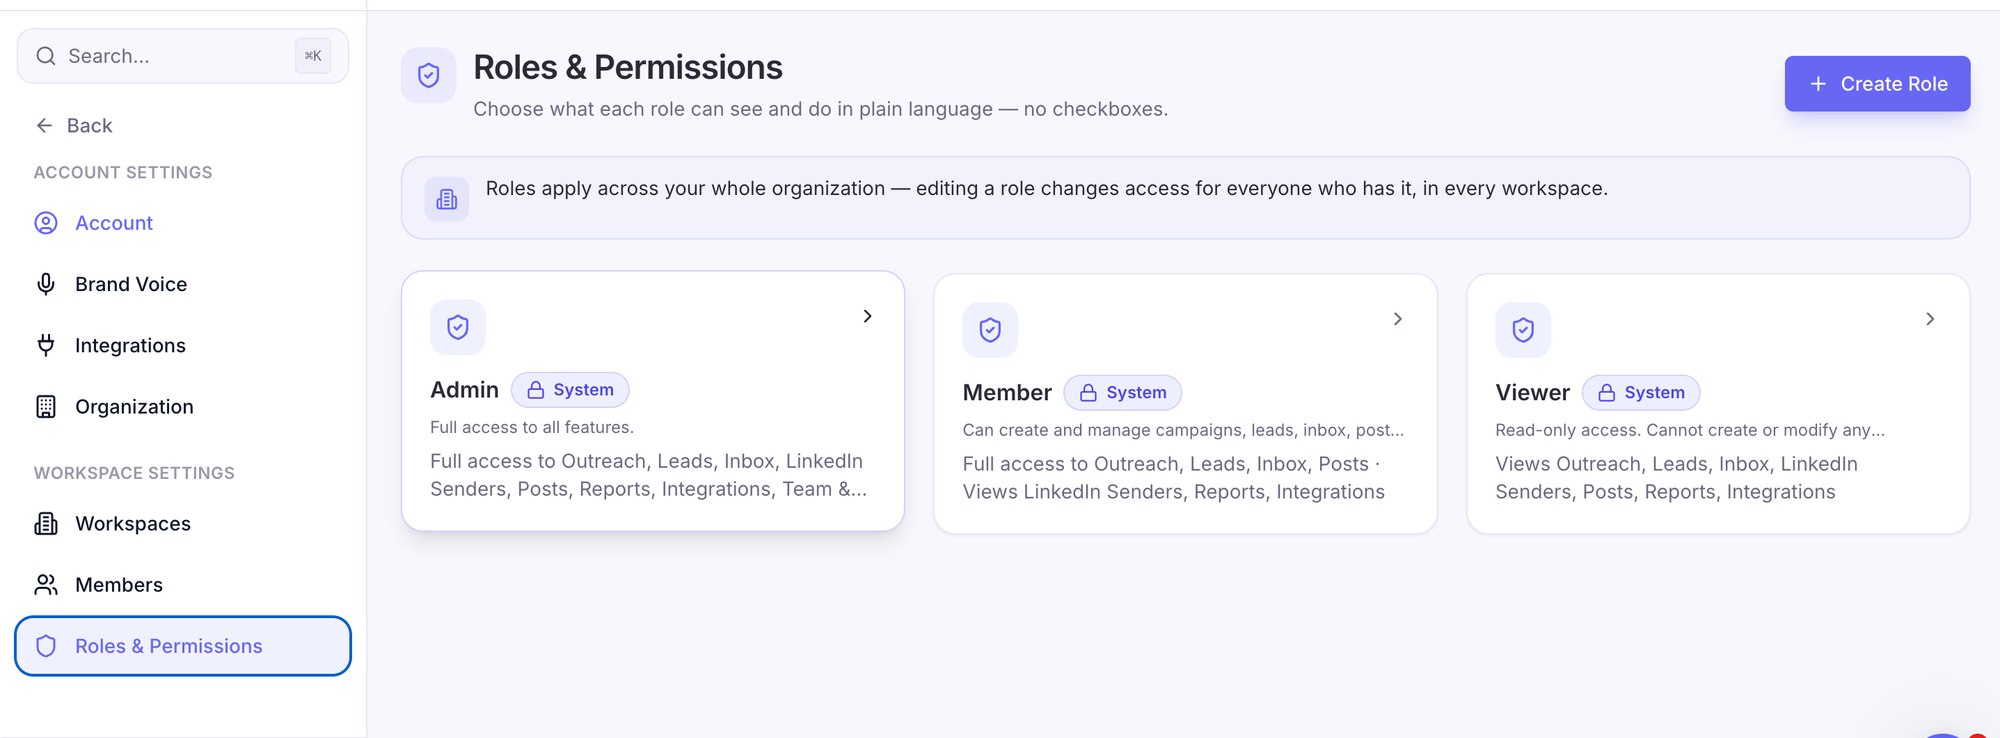
Bearconnect ships with four built-in roles, and one of them is already yours before you invite anybody.
- Owner is the account holder.
- Inside Settings > Roles and Permissions you will see system role cards for Member, Viewer and Admin, because Owner is not something you assign. It is something you already are.
That distinction confuses people on day one. It should not. You are handing out three levels of access, not four.
1. Owner: Full Access Including Billing
The Owner sees everything, including invoices, payment methods and plan changes. This is the person who originally created the account.
Real example: an agency founder is the Owner, so nobody on the delivery team ever sees client margins or card details while still running campaigns daily.
- Manages billing and plan
- Creates and deletes workspaces
- Adds LinkedIn accounts and campaigns
- Invites members and changes their roles
2. Admin: Everything Except Billing
Admin is the role I hand to the person who runs operations while I stay out of the tool. Admins add LinkedIn accounts, build campaigns and manage workspaces.
They cannot see billing.
→ Admin = full operational control, zero financial visibility
Good fit: an agency ops manager or a head of sales who needs to spin up a new client environment without asking you first.
3. Member: Runs Campaigns, Cannot Manage Workspaces
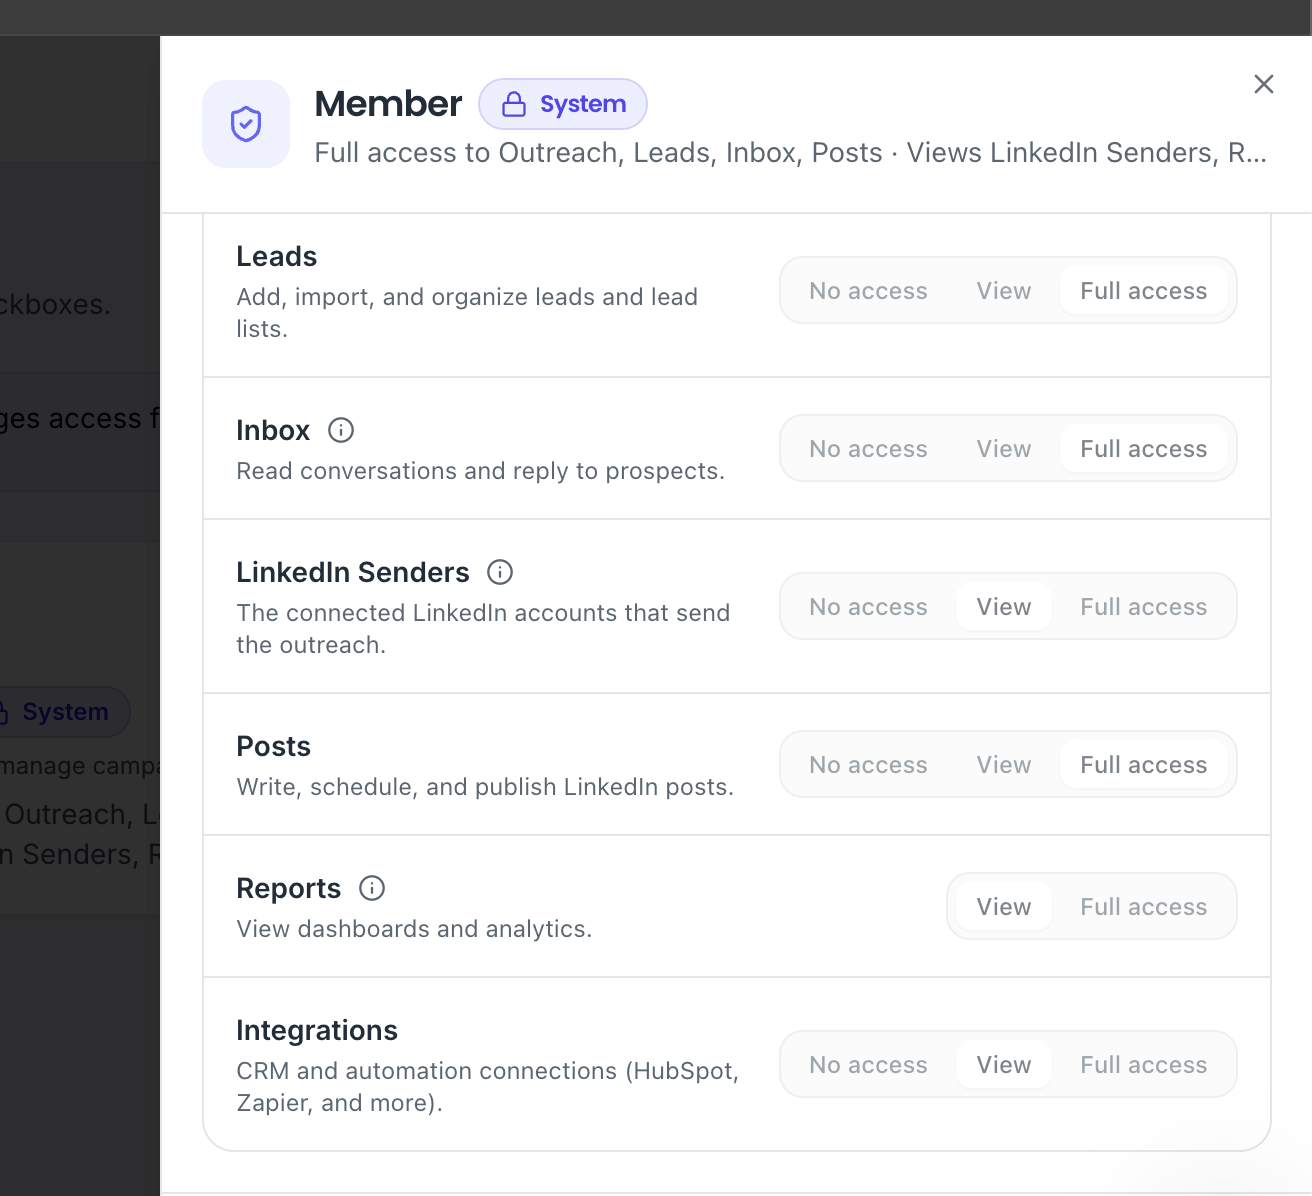
- Member is the default role for the people doing the daily work. They add LinkedIn accounts and create campaigns. They cannot manage workspaces and cannot see billing.
- This is the SDR role. They live inside their assigned space, run sequences, and reply in the unified inbox.
4. Viewer: Read-Only Access
Viewer is the safest role in the product and the most underused.
- A Viewer cannot add accounts, cannot create campaigns, cannot manage workspaces and cannot see billing.
They look. That is it.
Best use case: the client who asks "can I see the numbers myself?" Give them Viewer and stop scheduling screen shares.
Bearconnect Permission Matrix: Who Can Do What?
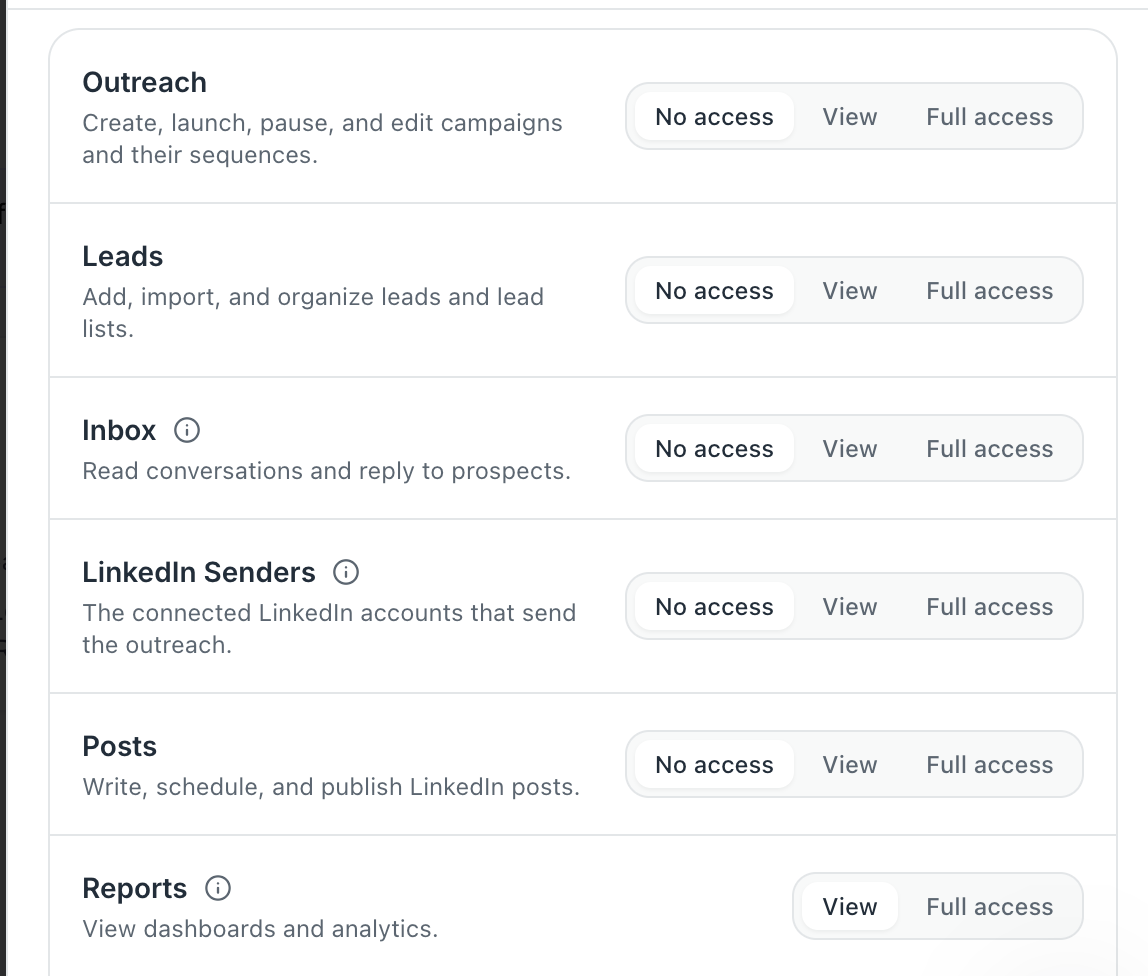
Here is the whole permission model in one table, which is the fastest way to settle any internal debate about access.
Full Comparison Table
| Capability | Owner | Admin | Member | Viewer |
|---|---|---|---|---|
| See billing and invoices | Yes | No | No | No |
| Add or remove LinkedIn accounts | Yes | Yes | Yes | No |
| Create and edit campaigns | Yes | Yes | Yes | No |
| Reply in the inbox | Yes | Yes | Yes | No |
| Create or manage workspaces | Yes | Yes | No | No |
| Invite members and set roles | Yes | Yes | No | No |
| View campaign analytics | Yes | Yes | Yes | Yes |
Read the table top to bottom and the logic is obvious. Access widens as trust widens, and billing sits alone at the top.
Admin vs Member: The One Difference That Matters
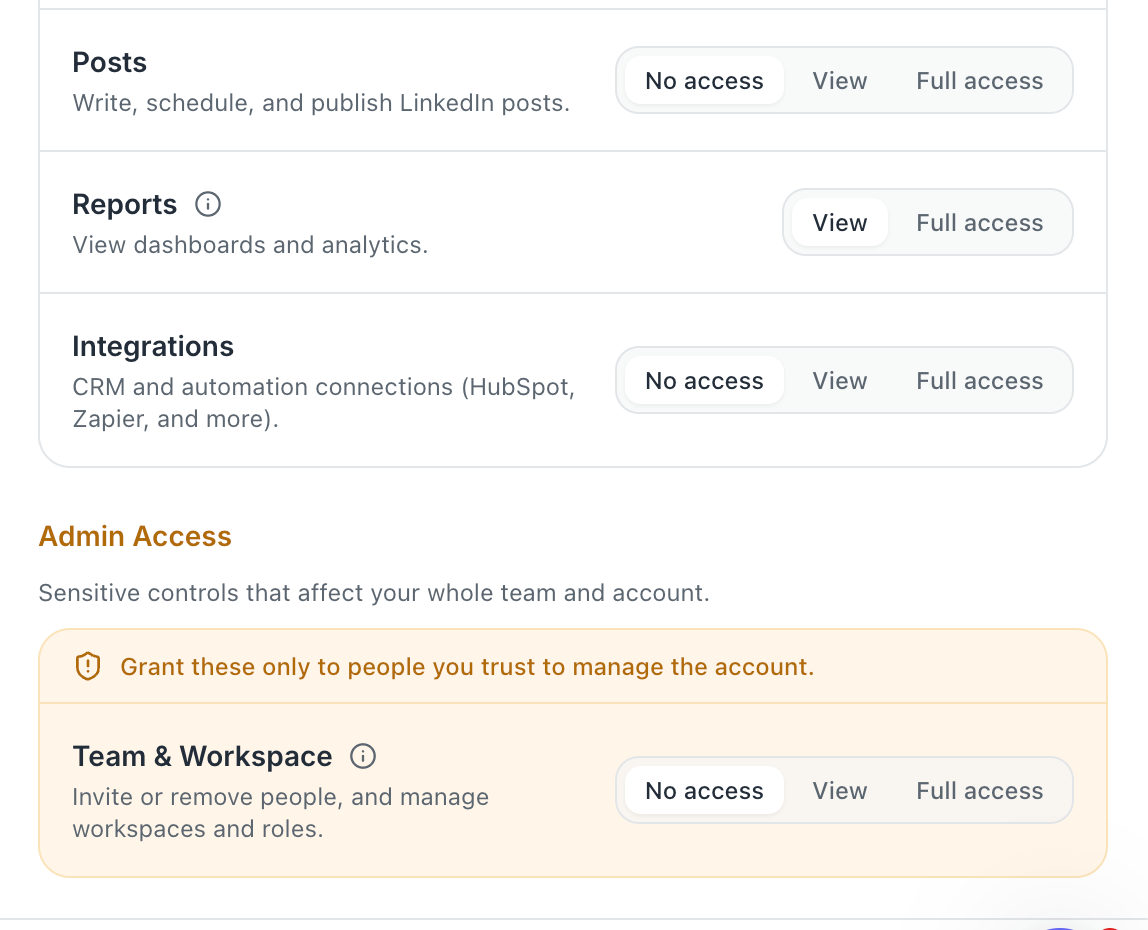
The only real gap between Admin and Member is workspace control. Both can run outreach.
Only Admin can create workspaces, restructure them and invite other people.
So the question is not "how much do I trust this person with campaigns." It is "do I want this person changing the shape of my account."
- → Trust them with outreach = Member
- → Trust them with structure and people = Admin
From my experience, most teams give Admin too early. A new SDR does not need workspace powers in week one. Member covers 90 percent of daily work.
Which Role Should You Give Each Person on Your Team?
Match the role to the job, not to how much you like the person. Below is the mapping I use when onboarding a new team into a multi-account LinkedIn setup.
| Person | Role I give | Why |
|---|---|---|
| Virtual assistant | Custom role or Member | Runs sequences, no structural or billing access |
| Junior SDR | Member | Needs campaigns and inbox, nothing else |
| Senior SDR or team lead | Member | Same daily work, plus reporting duties |
| Ops or delivery manager | Admin | Creates client workspaces without waiting on you |
| Client or stakeholder | Viewer | Sees results, changes nothing |
| Co-founder | Admin | Full operational parity, billing stays with Owner |
| Freelance copywriter | Custom role | Writes sequences, blocked from sending or replying |
What Can Your Team Actually See, and What Stays Private?
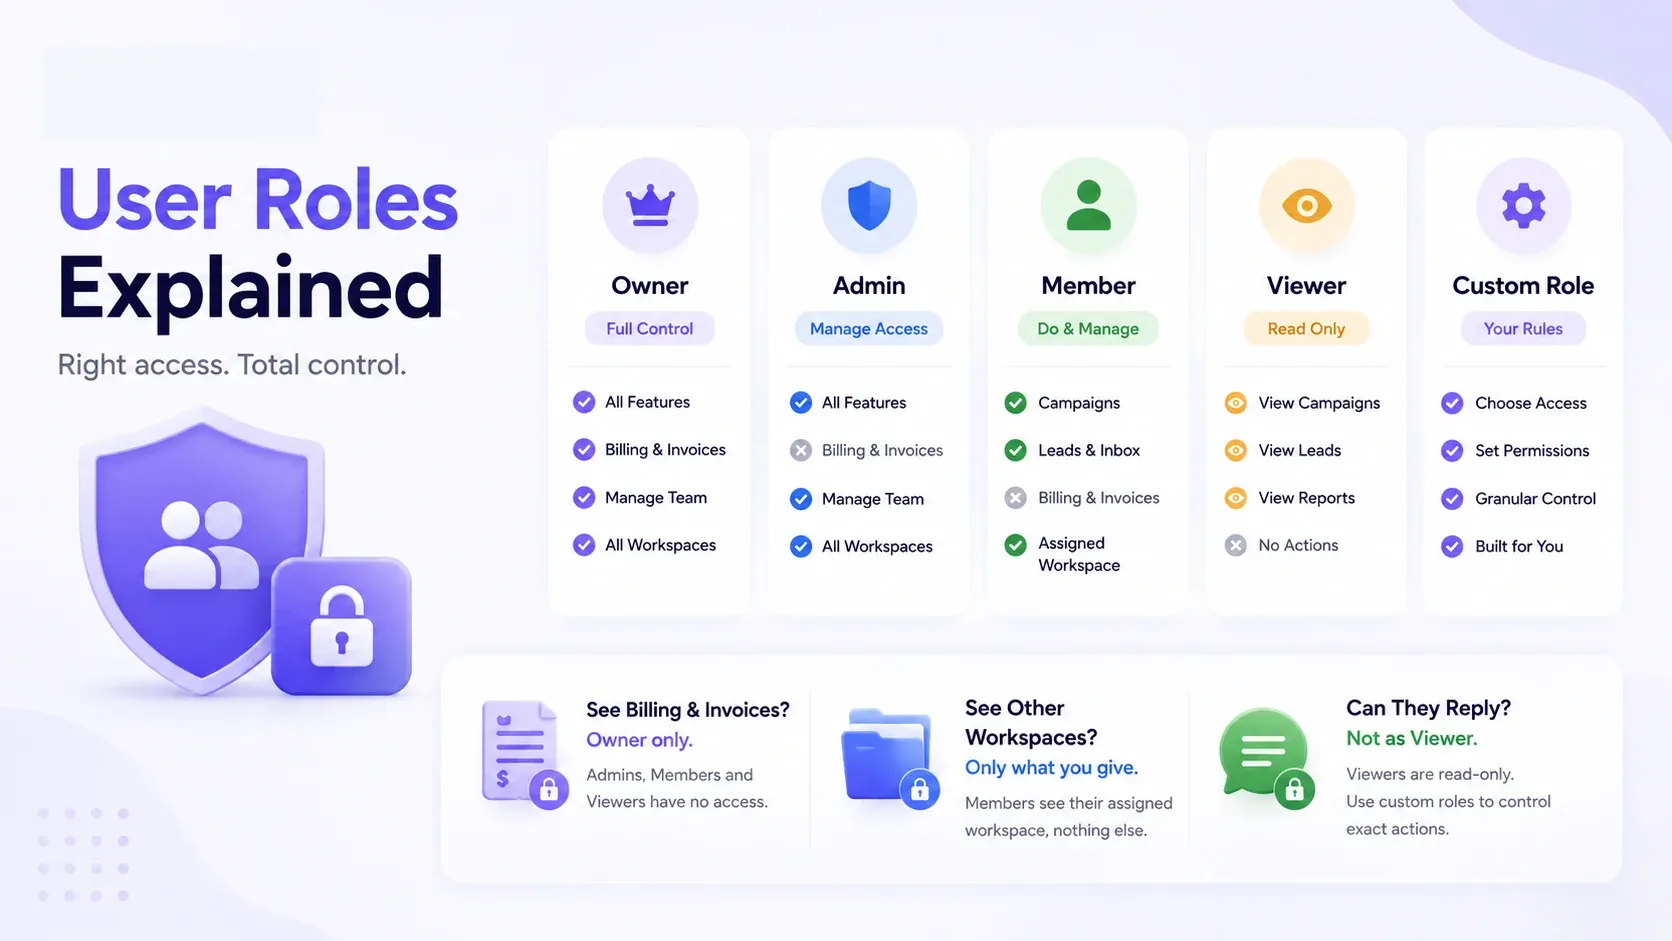
1. Can Team Members See Your Billing and Invoices?
No. Billing sits with the Owner only.
Admin, Member and Viewer never see plan cost, invoices or payment details. This matters most for agencies, because your client should never see what you pay per account while you invoice them for delivery.
2. Can a Member See Your Other Workspaces and Clients?
Members see the workspace you place them in, not your whole account. Workspaces are separate environments, each with its own LinkedIn account, campaigns and inbox.
Real scenario: you run five clients in five workspaces. Your VA works in two. Client C never appears on their screen, so there is no accidental cross-client reply.
That separation is the entire point of workspaces.
3. Can a Viewer Reply to Your Prospects?
- No. Viewer access is read-only, so a Viewer cannot send connection requests, run campaigns or reply to messages.
- If you need someone who can send but never reply in your voice, that is a custom role, not Viewer. I cover that build below.
Wait, You Might Be Thinking: What If I Pick the Wrong Role?
Then you change it, and it takes about four seconds. Role changes apply immediately with no new invite, no new email and no re-onboarding.
Upgrade a Viewer to Admin and campaign creation, posting and workspace visibility unlock for them on the spot. Downgrade works the same way.
Permissions here are a dial, not a one-way door.
How to Create a Custom Role in Bearconnect
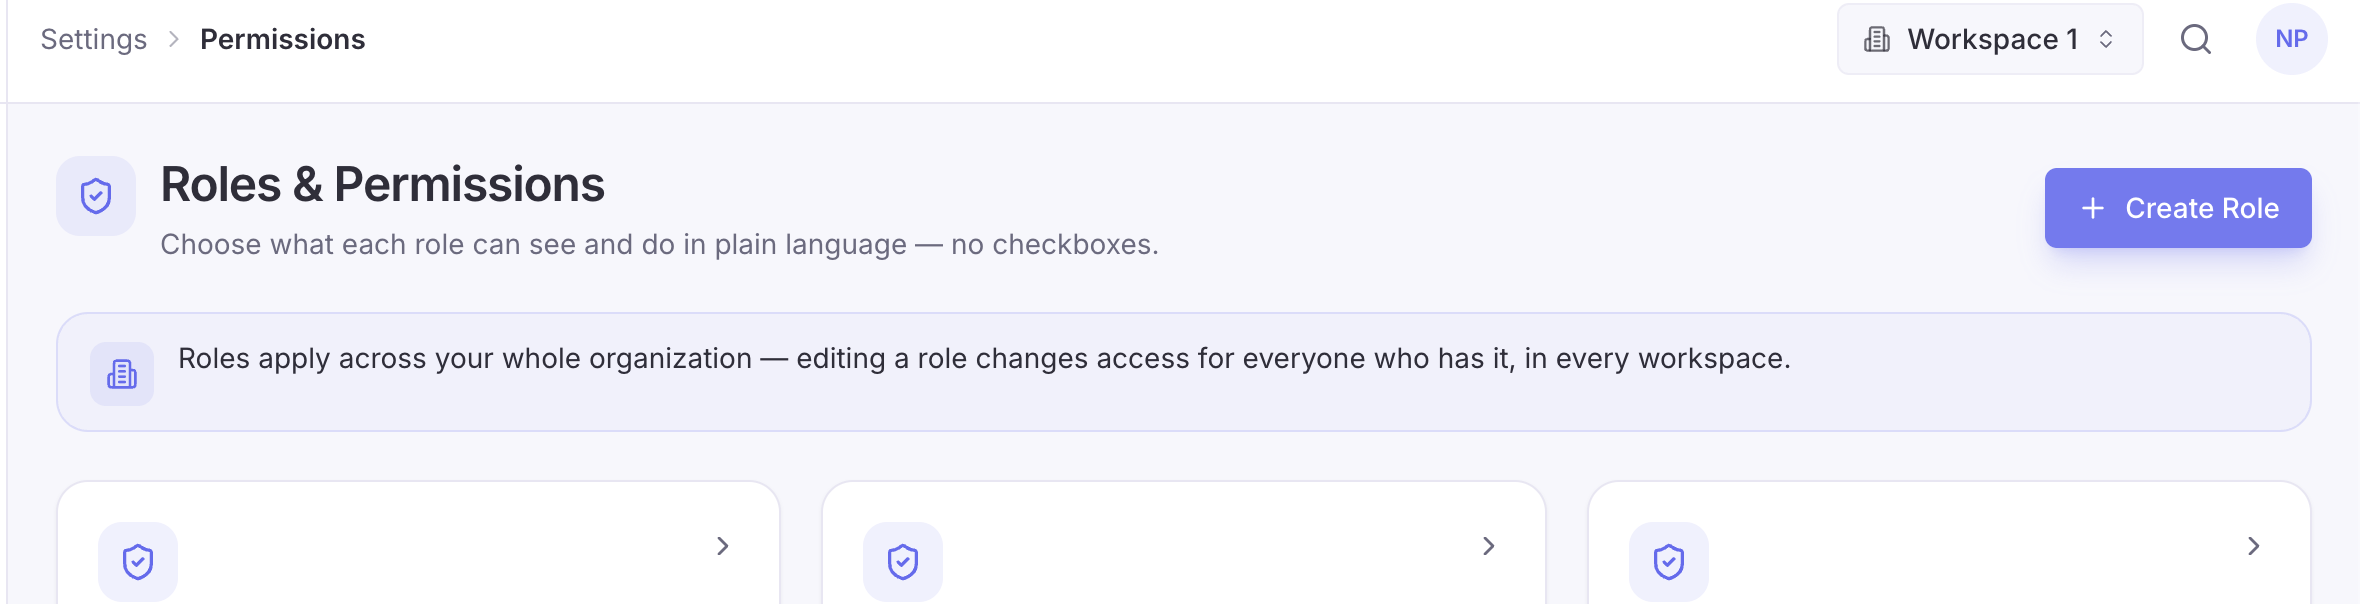
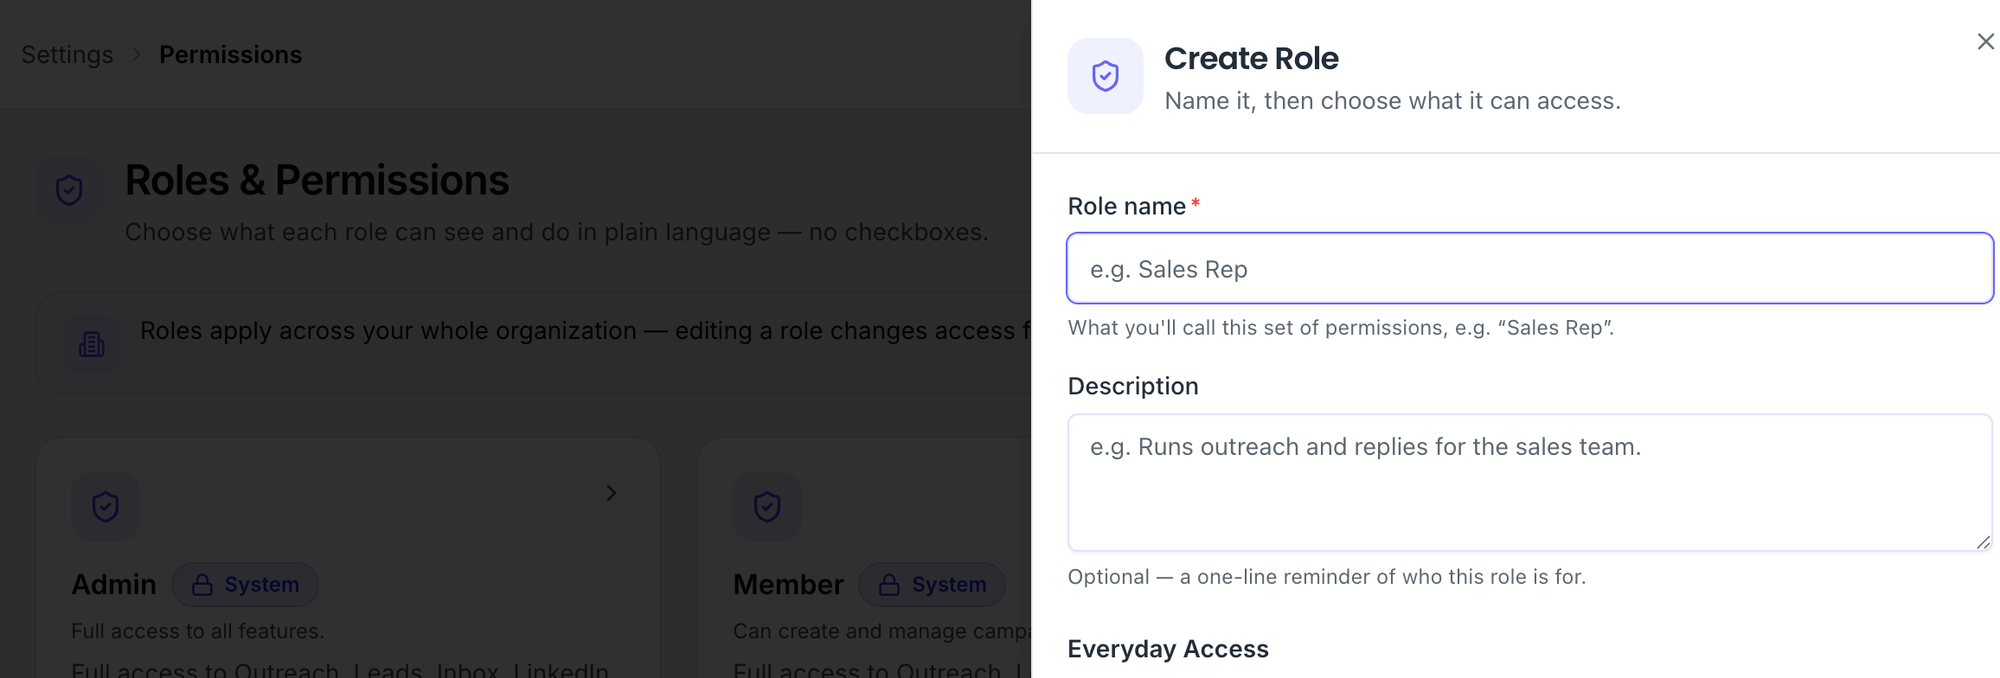
Custom roles exist when teams do not fit into three boxes, and you can set each permission on its own. You build them in Settings > Roles and Permissions using Create Role.
One note worth remembering: roles apply across your whole organization, so a role you build once is reusable everywhere.
When Built-In Roles Are Not Enough
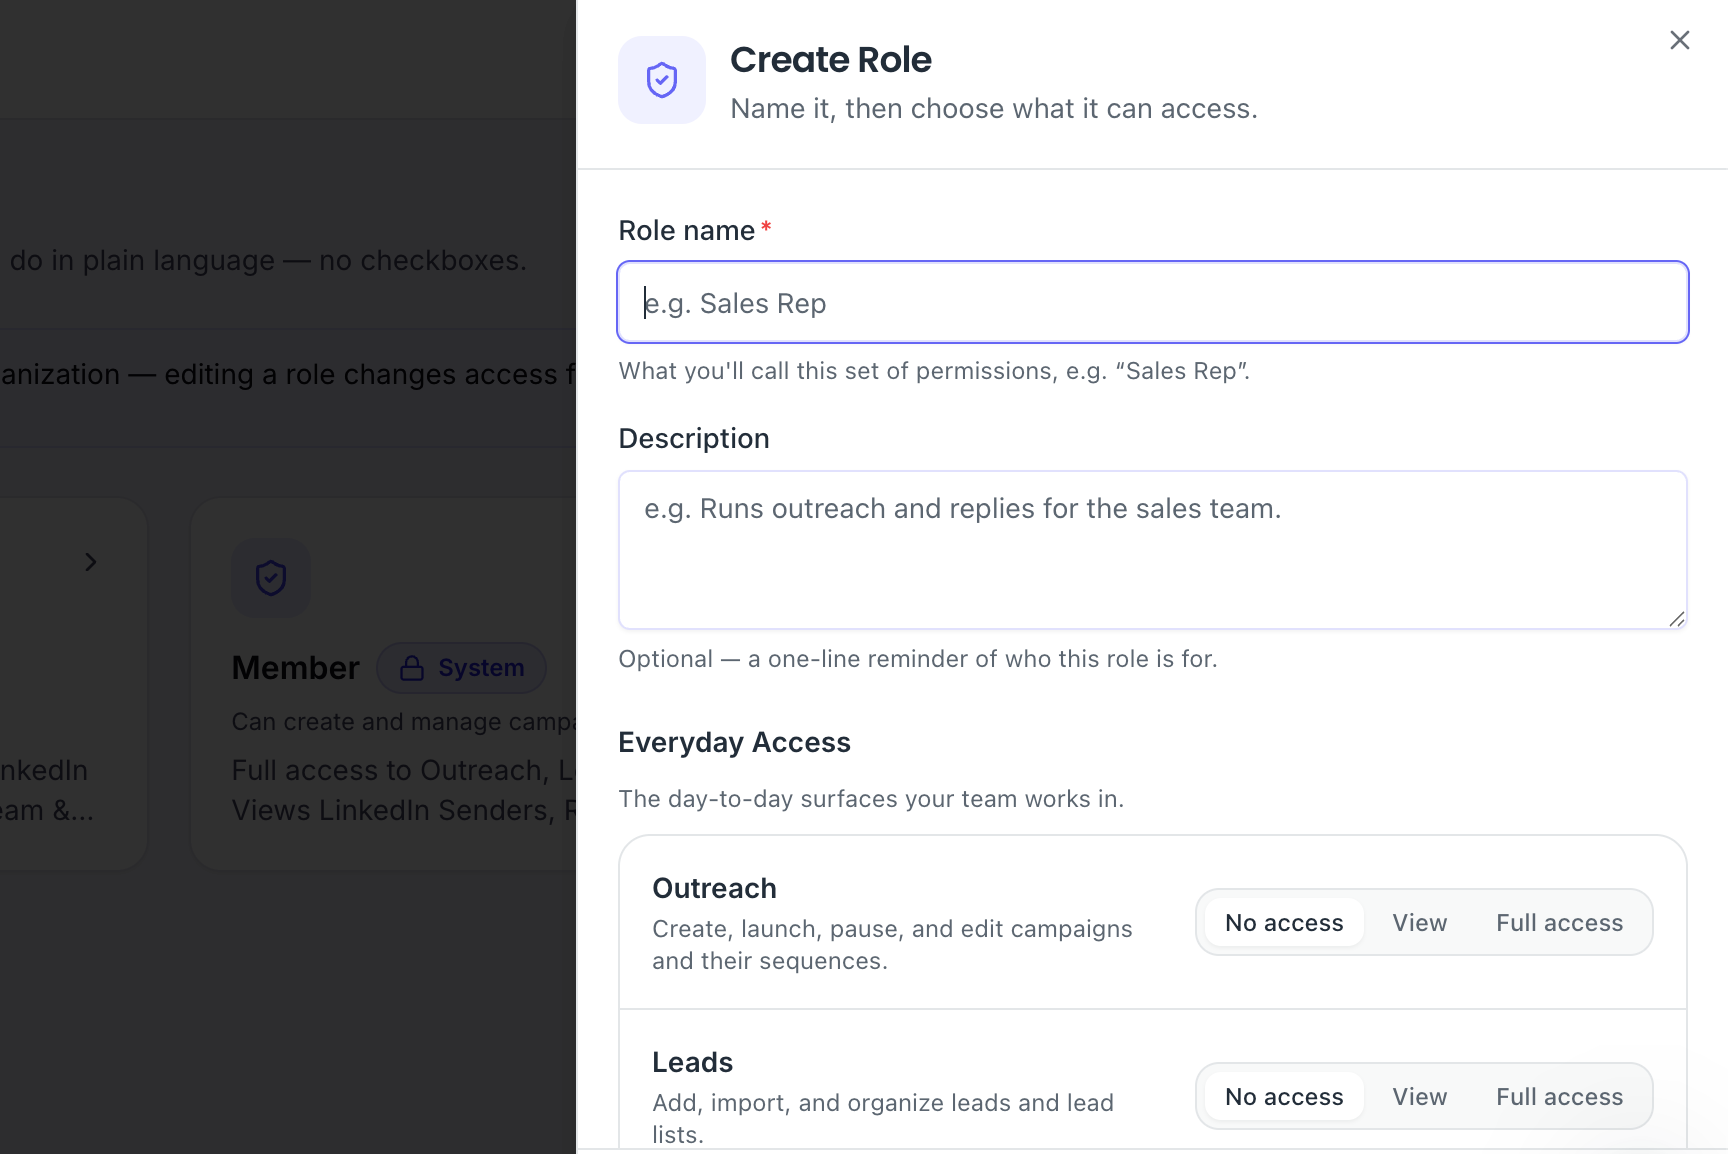
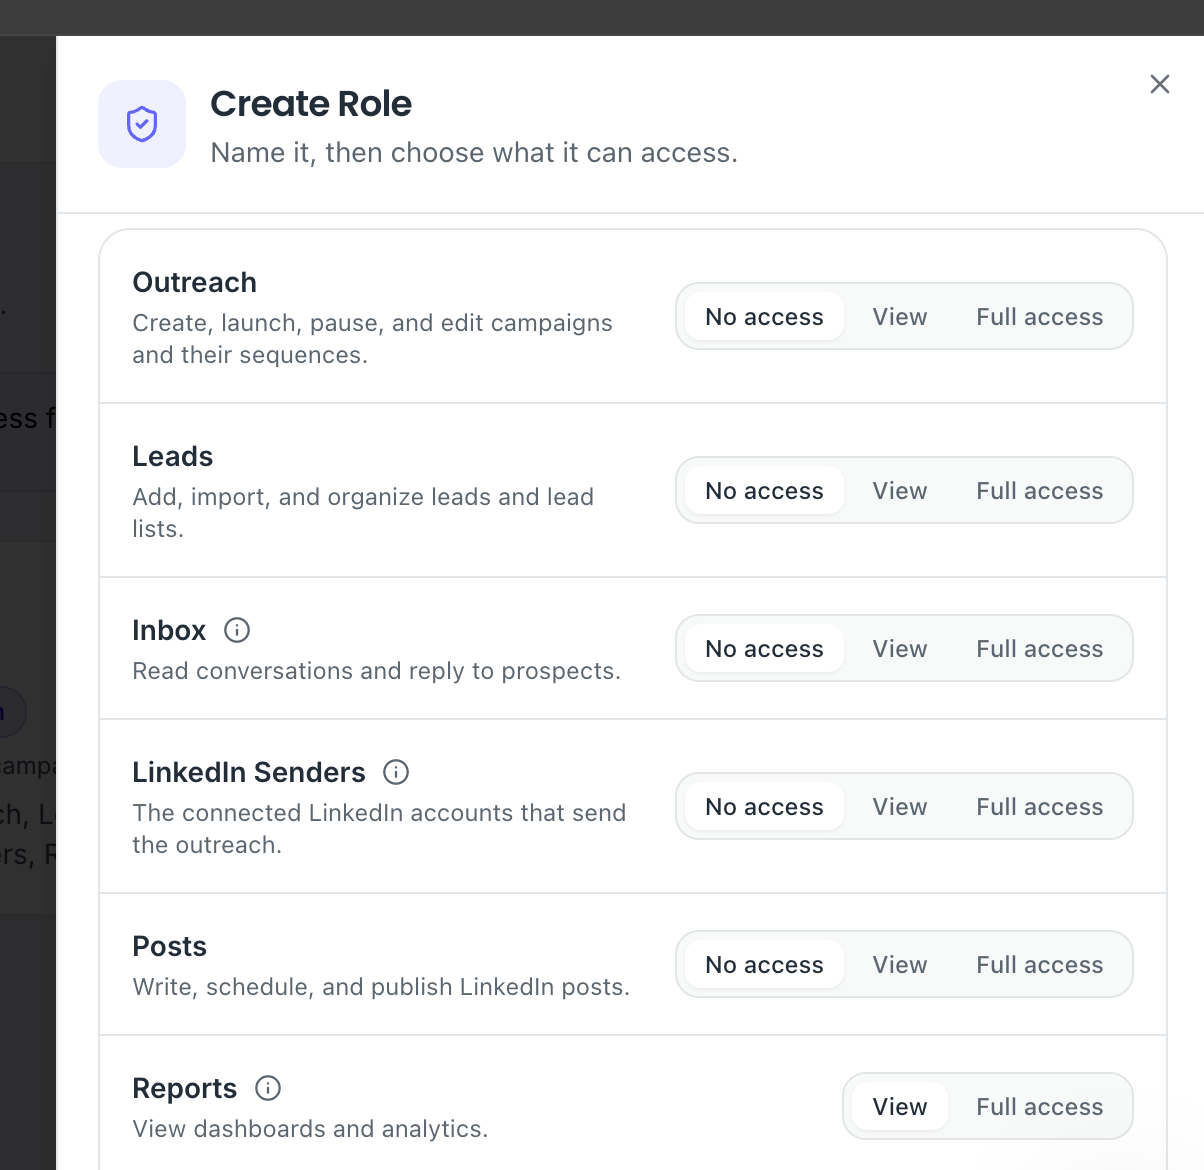
Use a custom role the moment you need to split "can send" from "can reply." Built-in roles bundle those together. Custom roles do not.
Common triggers:
- A contractor who should send but never answer prospects
- A copywriter who drafts sequences but never launches them
- A client who wants analytics plus inbox visibility, nothing more
Example: A Role That Runs Outreach but Cannot Reply
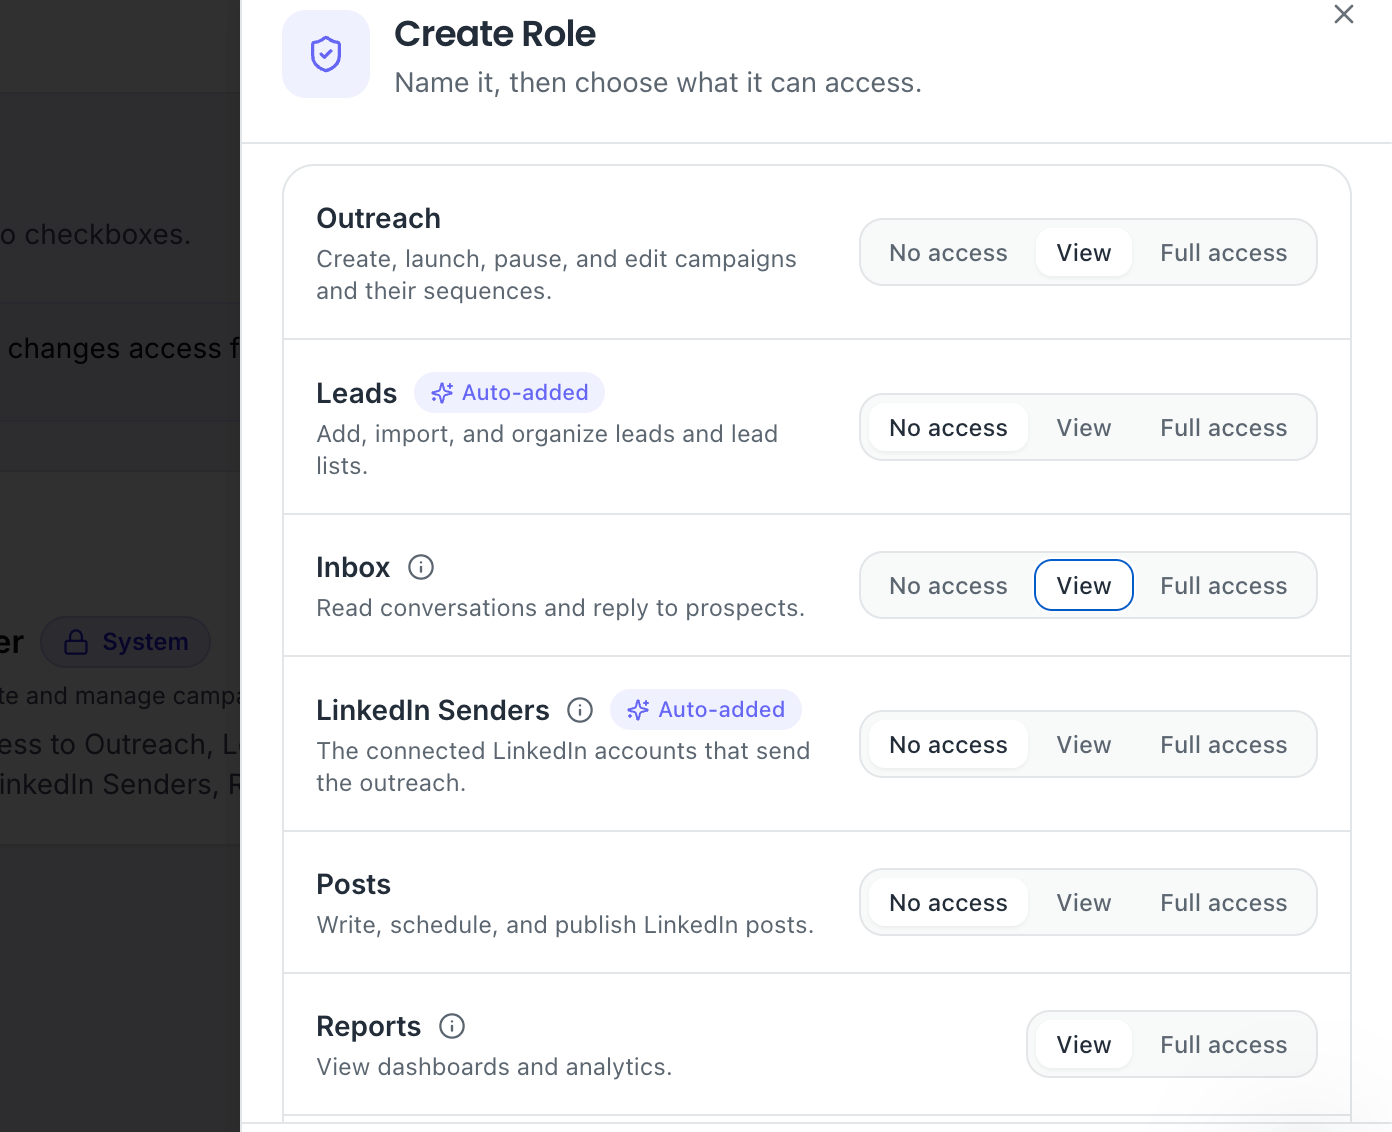
Here is a real build I use for freelance outreach help.
- Create a new role and name it after the person, for example Rose.
- Allow campaign viewing and campaign launching.
- Block inbox replies, so conversations stay in your voice.
- Block adding LinkedIn accounts.
- Leave billing visibility off, which it already is.
→ Result = volume without brand risk
Pro tip: Build the custom role before you send the invite, because assigning a role is faster than editing one after somebody is already inside.
Naming Custom Roles After the Person Using Them
Name custom roles after people, not job titles, when your team is small. "Rose" and "Sophie" tell you instantly who holds what. "Contractor Level 2" tells you nothing at 9pm on a Friday.
Switch to title-based names once you pass roughly ten people, because names stop scaling.
Custom Role Permission Checklist Before You Save
Run these four questions before saving any custom role:
- Can they see billing? Should be no unless they are the Owner.
- Can they reply to prospects? Only if they represent the brand.
- Can they add LinkedIn accounts? Usually no for contractors.
- Can they manage workspaces? Reserve that for Admins.
How to Invite a Team Member and Assign a Role
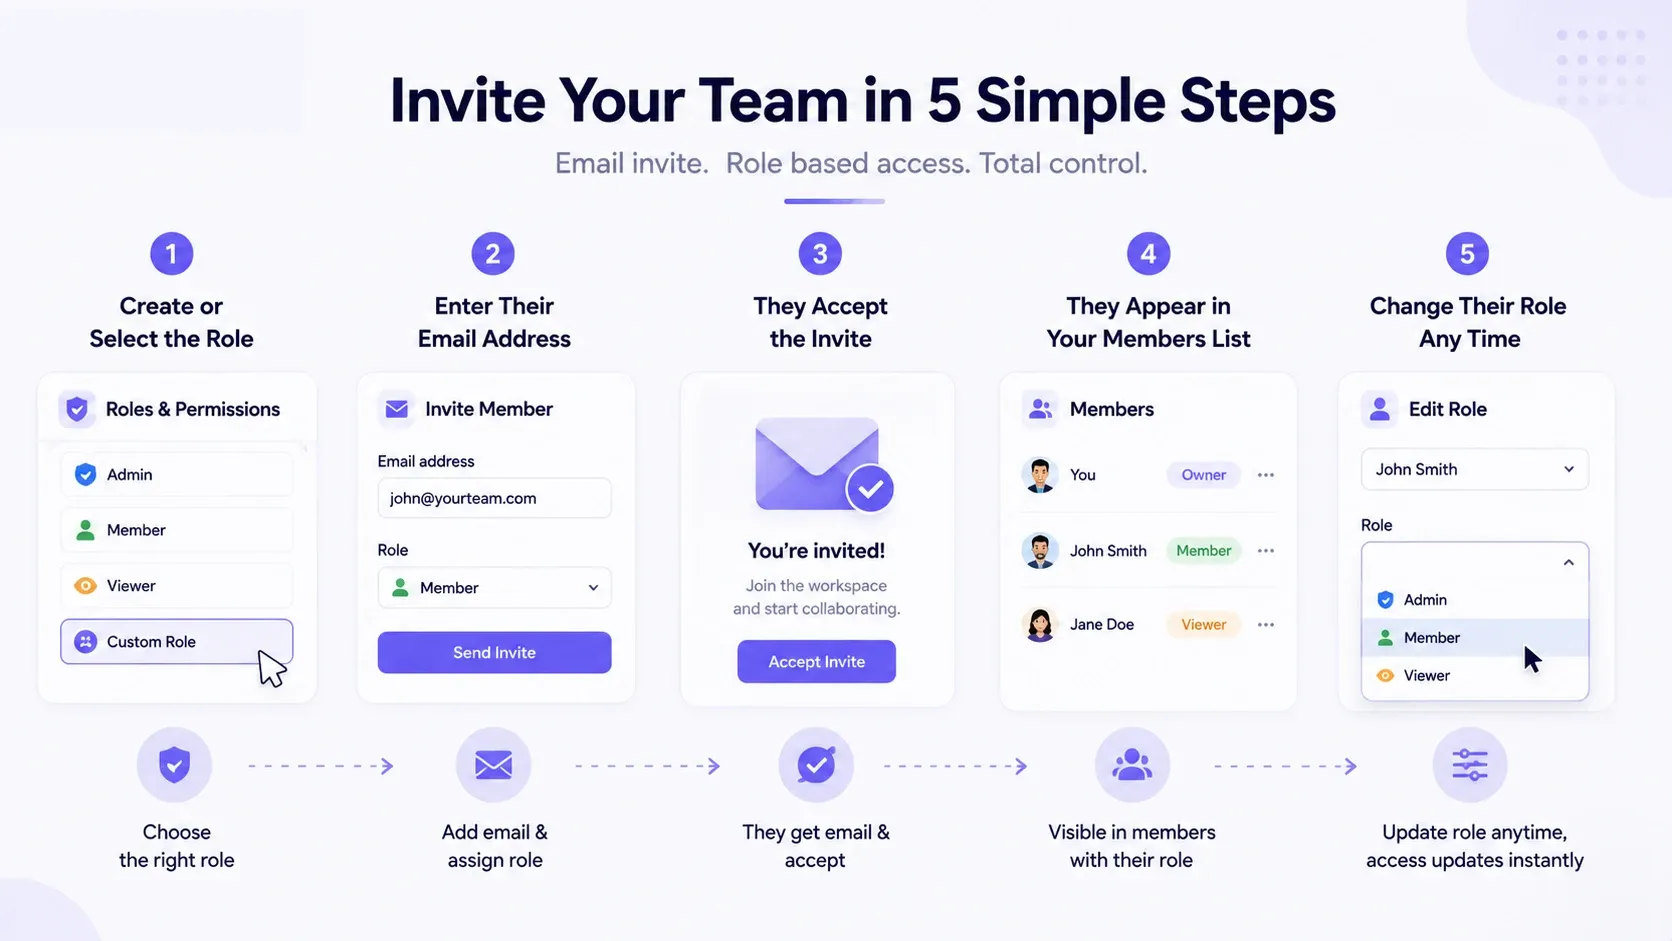
The invite flow runs on email, never on a shared password, and it takes five steps. This is the whole reason role based access matters in a LinkedIn automation tool rather than being a nice extra.
Step 1: Create or Select the Role First
Pick the role before you type an email address. Go to Settings > Roles and Permissions, then either choose a system role or create a custom one.
Step 2: Enter Their Email Address
Open Settings > Members and enter their work email. No password changes. No shared logins. No screenshots of a login screen in Slack.
Step 3: They Accept the Invite
They get an email invitation and must accept it before anything happens. Nothing changes on your account until they click accept.
If someone says they never got it, check spam before you re-send.
Step 4: They Appear in Your Members List
Once accepted, they show up in your workspace member list with their role and status. Your Members screen becomes your single source of truth for who holds what access.
Step 5: Change Their Role Any Time
Role changes take effect immediately. Promote a Viewer to Admin and their campaign creation, posting and workspace visibility unlock right away without a fresh invite.
Do Roles Apply Per Workspace or Across Your Whole Organization?
Roles apply across your whole organization, not to a single workspace, and the Roles and Permissions screen states this directly.
That surprises agency owners who assume they build one role per client.
You do not. You build a role once, then control exposure through workspace membership.
- → Role = what a person can do
- → Workspace = where they can do it
So a Member with access to two client workspaces holds the same abilities in both, and sees nothing in the other three. Design your roles by capability, and your client separation by workspace.
What Happens to the Person You Invite on Their Side?
The person you invited becomes the owner of their own account on their side, while holding only the permissions you granted inside your workspace. Both facts are true at once, and that trips people up.
Think of it like a building pass. They own their house. Inside your office, they can only open the doors you enabled.
Practical consequence: your VA can hold their own Bearconnect account for another client and still be a limited Member in yours. Nothing leaks between the two.
Why Role Based Access Matters in LinkedIn Automation
Role based access in a LinkedIn automation tool removes the single riskiest habit in outreach teams, which is password sharing. This is not a compliance checkbox. It is account safety.
1. The Password Sharing Problem This Replaces
Shared credentials break the moment someone leaves. You rotate a password, then discover three tools and two people depended on it.
With roles, offboarding is one click on one screen.
2. Account Safety and Session Risk When Logins Are Shared
- Role based access keeps outreach running through the platform instead of through five browsers in three cities.
- If account safety is your main worry, read how to avoid LinkedIn automation restrictions alongside this guide.
3. Client Trust and Clean Reporting
- Viewer access changes client calls. Instead of exporting screenshots, you give the client read-only visibility into their own workspace analytics.
- Clients who can see progress themselves ask for fewer status updates. Every agency I have watched adopt this cuts reporting time noticeably in the first month.
How to Remove or Offboard a Team Member Safely
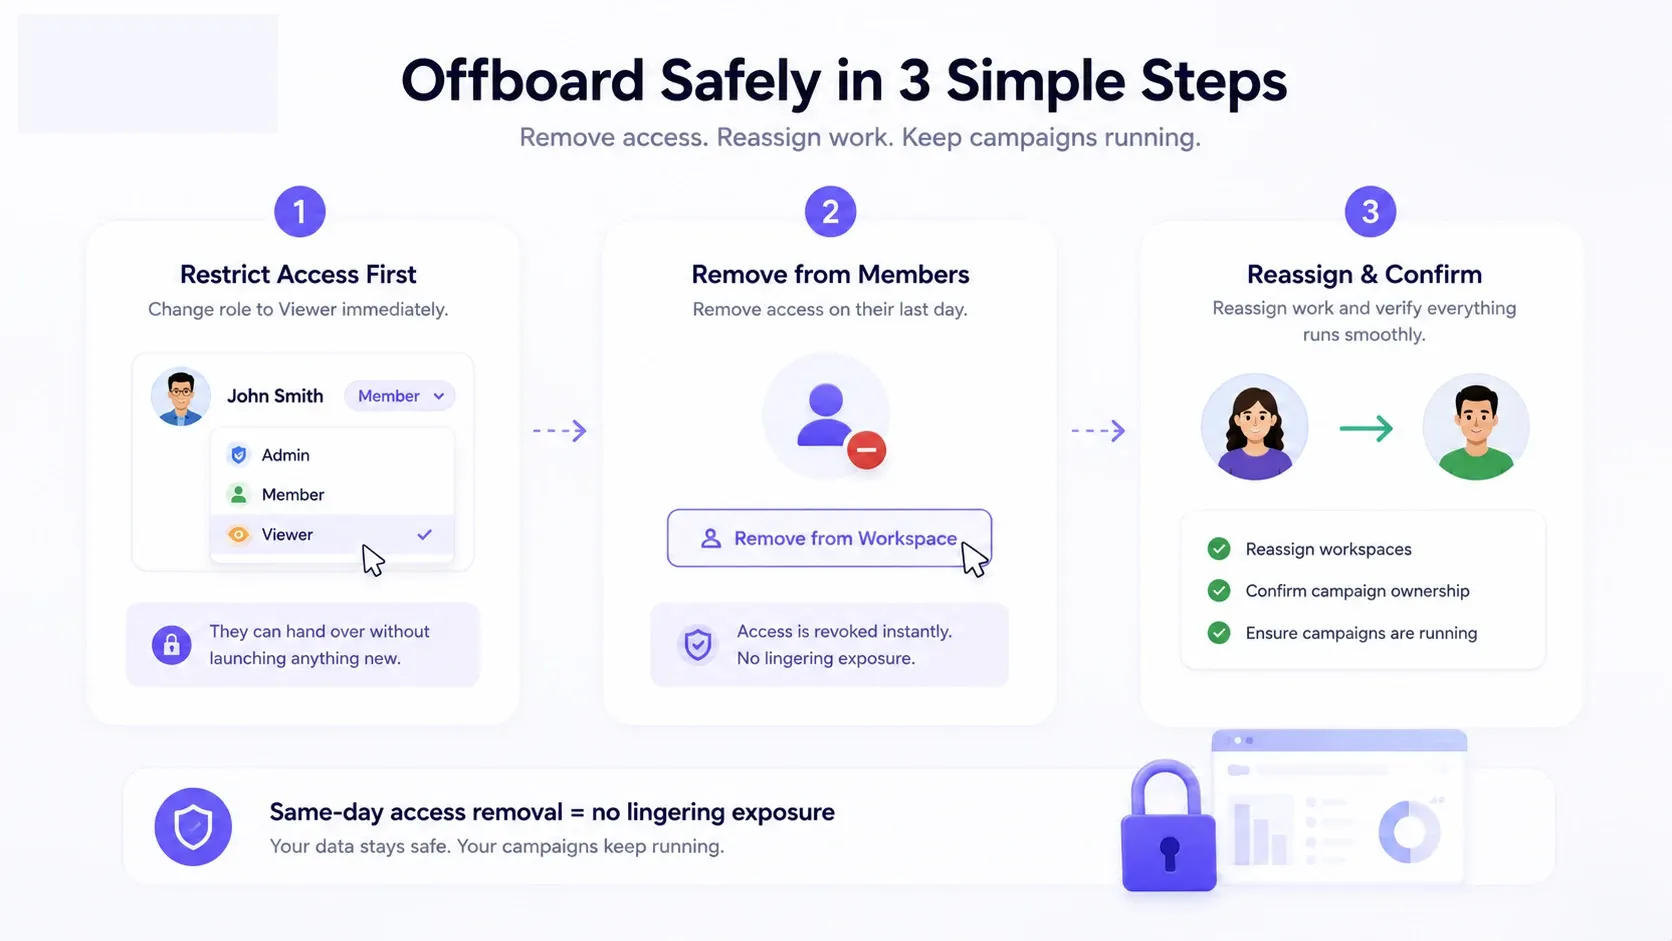
Offboard by removing access first and reviewing their work second, in that order. Most teams do it backwards and leave access live for weeks.
What Happens to Their Campaigns and Conversations
Campaigns belong to the workspace, not the person, so removing someone does not delete the sequences they built. Conversation history stays in the workspace inbox for whoever takes over.
That is the practical argument for workspaces over individual logins. The work survives the person.
The 3-Step Offboarding Checklist
- Change their role to Viewer the moment notice is given, so they can finish handover without launching anything new.
- Remove them from the Members list on their last day.
- Reassign their workspaces and confirm campaigns still run under the new owner.
→ Same-day access removal = no lingering exposure
Common Role and Permission Mistakes to Avoid
The three mistakes below cause most of the access problems I see, and all three are avoidable in under a minute.
Making Everyone an Admin "For Now"
Admin is not a shortcut, it is workspace control. Teams grant it to skip a decision, then discover a new hire restructured a client environment.
Default to Member. Promote on evidence, not on convenience.
Giving a Client Member Access Instead of Viewer
Clients should be Viewers. A client with Member access can edit campaigns you designed, and they will, usually the night before a launch.
View-only keeps transparency without shared control.
Forgetting to Downgrade a Contractor After the Project Ends
Contractors stay active far longer than their contracts do. I have seen accounts where a freelancer from last quarter still held campaign access, which nobody noticed because nothing broke.
Role Setup Best Practices I'd Follow From Day One
Apply least privilege from the first invite and you will never run an emergency access audit. These are the habits that hold up as teams grow.
- Give the smallest role that lets someone finish their job
- Use Viewer generously for clients and stakeholders
- Build one custom role per repeated job type, not per person, once you pass ten users
- Review your Members list every quarter and remove anyone inactive
- Document which role each job type gets, so onboarding stops being a judgement call
Pro tip: Put your quarterly access review on the same calendar day as your billing review, because you already open pricing that day anyway.
FAQ: Bearconnect Roles and Permissions
1. Can I have more than one Owner?
No. Owner belongs to the person who originally created the account, and it carries billing access. If you need a second person with full operational control, make them an Admin instead.
2. Can an Admin see my billing?
No. Admins hold full access except billing, so they can add LinkedIn accounts, build campaigns and manage workspaces without ever seeing invoices, plan cost or payment details.
3. How many custom roles can I create?
You can build custom roles for each way your team works, with granular permissions per role. In practice, most teams settle on two or three custom roles beyond the built-in ones.
4. Can I change someone's role without re-inviting them?
Yes. Role changes apply immediately with no second invite. Promoting a Viewer to Admin unlocks campaign creation, posting and workspace visibility for them right away.
5. What happens to the person I invite on their side?
They become the owner of their own account on their side, but inside your workspace they hold only the permissions you granted. Your data and their account stay separate.
Key Takeaways
- Four built-in roles exist, and Owner is already you, so you assign Admin, Member or Viewer
- The only real gap between Admin and Member is workspace control
- Billing stays with the Owner, always, no matter how senior the other person is
- Custom roles let you split sending from replying, which built-in roles bundle together
- Roles apply organization wide, while workspaces control where a person can act
- Role changes apply instantly, so start narrow and widen later
If you are setting this up for the first time, start with the workspaces setup guide, then come back and assign roles.
Structure first, people second, and the access questions answer themselves. For team-wide rollouts, the LinkedIn automation for agencies guide covers how this scales past ten clients.
Ready to Transform Your LinkedIn Strategy?
Join thousands of professionals already using Bearconnect to automate their outreach and grow their network.
7-day free trial • Cancel anytime
Related Articles

LinkedIn Automation: The Complete Guide for 2026
What LinkedIn automation is, how it works, what LinkedIn allows, safe limits, how to choose a tool and how to run your first campaign.
How to Remove a Connection on LinkedIn (Do They Get Notified?)
Removing a LinkedIn connection takes a few clicks, but most people want to know one thing first: does the other person get notified? This guide covers the steps on desktop and mobile, and what changes afterward.
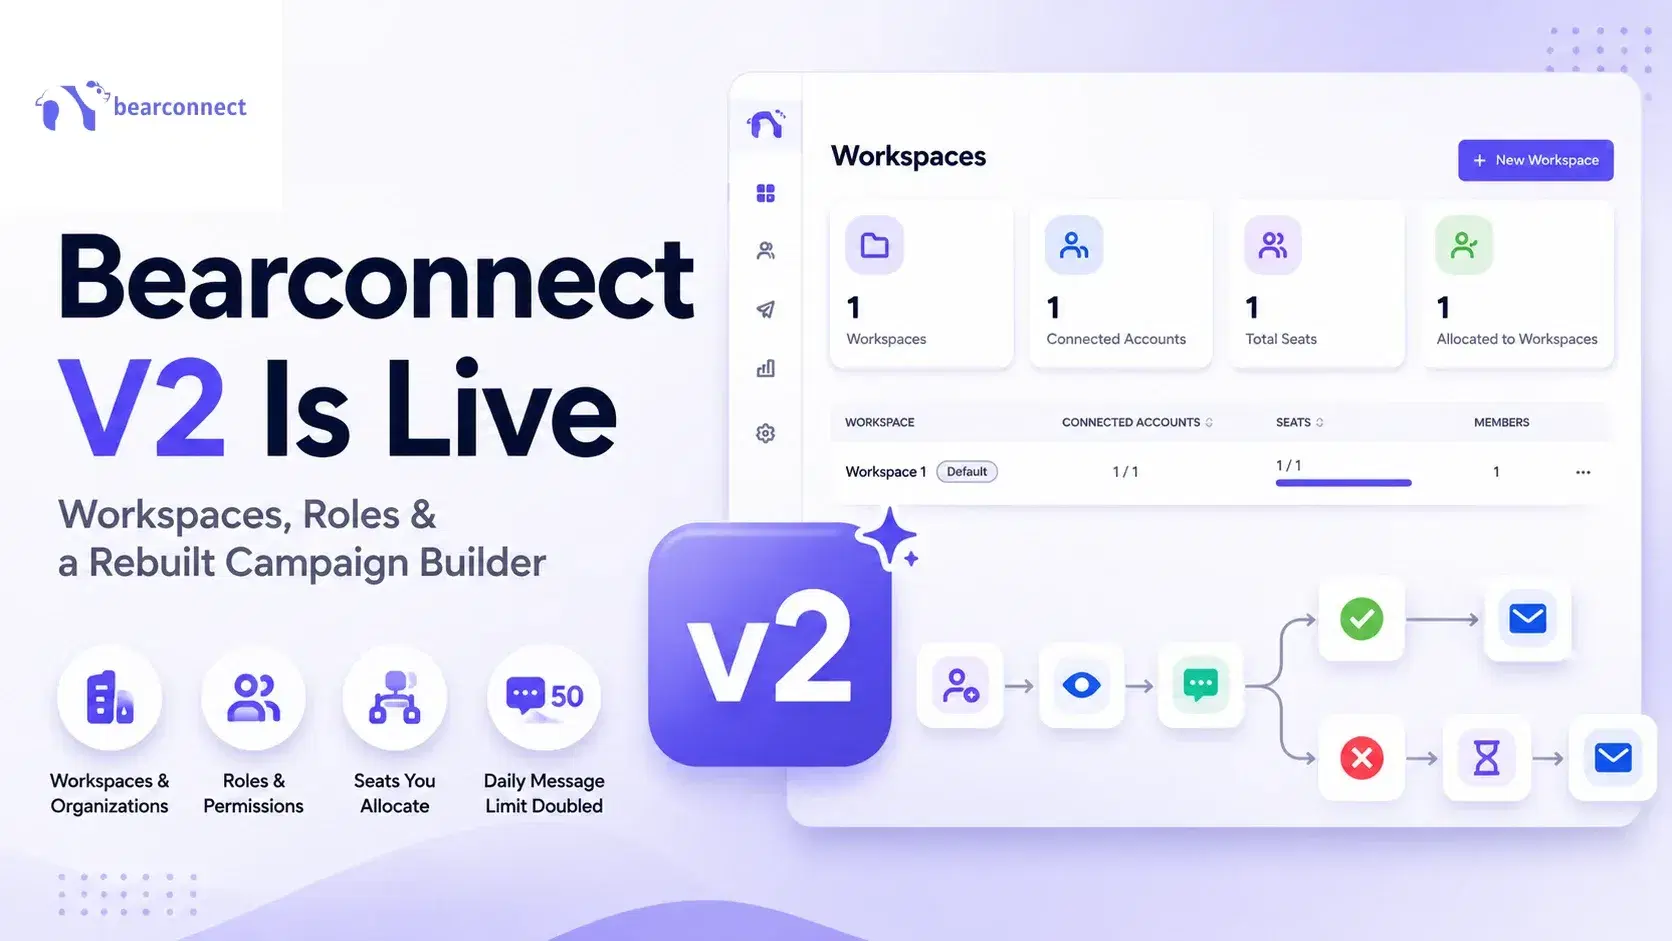
Bearconnect V2 Is Live: Workspaces, Roles and a Rebuilt Campaign Builder
Bearconnect V2 introduces dedicated workspaces, flexible roles, and a rebuilt campaign builder, giving agencies and sales teams more control over every LinkedIn account they manage.